

Let’s introduce our Nanoleaf Aurora to Siri, HomeKit and Shortcuts. We will look into the basic steps and additional tricks to get the most out of our setup. Good news: if you’ve followed our post Nanoleaf Aurora How To – Setup and Configuration to the Muks!, you might have mastered the first steps already. Let’s see …
Estimated reading time: 10 minutes
Table of contents
HomeKit Setup: First Steps
If you are completely new to HomeKit (or Siri Shortcuts), watch Siri’s 1 minute explainer cartoon from our post Minority Report: A Siri, HomeKit, Home App and Shortcuts Overview:
Spring Clean your Nanoleaf Aurora Scenes

So you’ve downloaded quite some community scenes and your Nanoleaf app dashboard is full of scenes you might never use or they have funny names, you will never memorize. Since every scene in your dashboard will be synchronized to HomeKit and Siri, let’s spring clean our scenes list first:
- In the Nanoleaf app dashboard, swipe left on the scene you don’t need anymore and tap the delete button.
- Alternatively, swipe left on the scene, tap the three dots and rename it. To avoid ambiguous scene names, it makes sense to prefix the scenes with the device name, e.g. “Muks Relax”. This helps you to not confuse your Nanoleaf scenes with scenes from other smart lights, you might have.
Pro-Tip: HomeKit has a limit of 100 Scenes!
Connect Nanoleaf Aurora to Apple HomeKit
Open your Apple Home app and verify that your Nanoleaf Aurora is visible as a device. It should display as one single bulb. If it’s not there yet, here are the steps to check what might be missing:
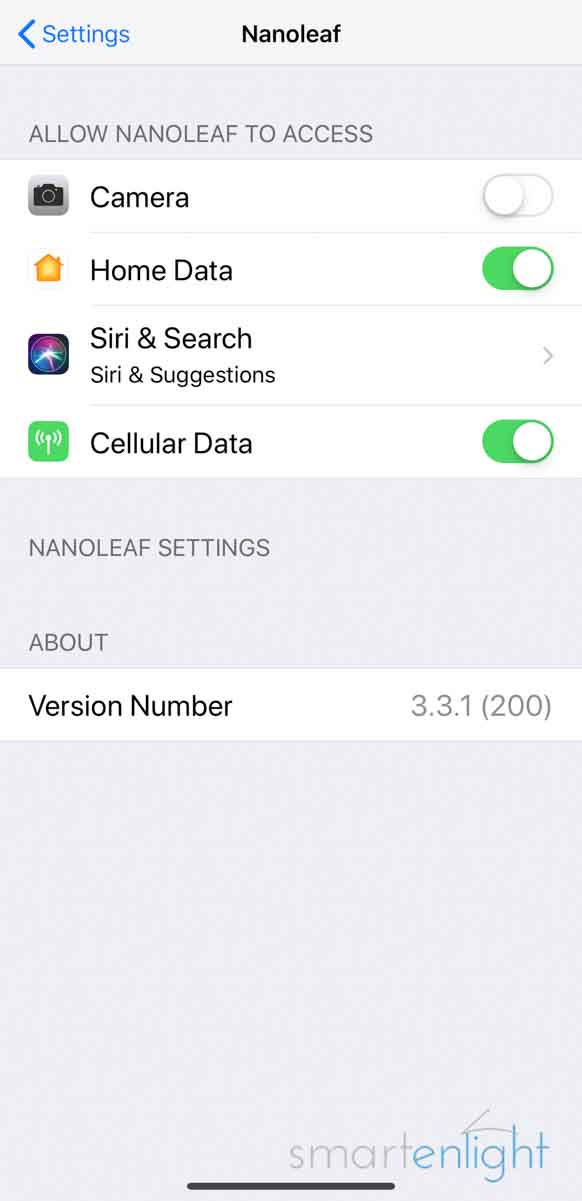
- When launching the Nanoleaf app for the first time on an iOS device, it will immediately request access to our Home Data, which is our HomeKit database. If you have not clicked “Allow” or can’t remember, open the Nanoleaf app from the iOS settings and make sure, that “Home Data” is switched on.
- We then had to select a HomeKit Home to which we want to add our Aurora. You can verify the proper selection in the Nanoleaf app Settings / Home section.
- Last but not least, we had to scan/enter the HomeKit ID, which we can find either on the accompanying leaflet or at the back of our Aurora controller (good we took a picture or didn’t glue it to the wall, right?). If you didn’t do that yet, you’ll need to add Aurora as a HomeKit accessory in the Apple Home app, by clicking the “+” on the top right and selecting “Add Accessory”.
At this point, you should find your Nanoleaf Aurora and all your scenes from the dashboard in the Apple Home app. The synchronization between the Nanoleaf Scenes and HomeKit happens automatically. Just make sure that you’ve enabled Scene Sync in the Nanoleaf app settings, so that every time you save or delete a scene in Nanoleaf, the change is mirrored in the Apple Home app.
Basic Voice Commands
As with other smart lighting devices, Siri understands following commands for your Aurora:
- Hey Siri, turn on/off <Aurora-name> (lights).
- Hey Siri, set <Aurora-name> to X (percent).
- Hey Siri, dim/brighten the <Aurora-name> (by x percent)
- Hey Siri, set <Aurora-name> to <color>. Note, check out these Hex color names for an amazing list of colors Siri could recognize.
- Hey Siri, set/turn on/activate <Aurora scene name>.
Pro-Tip: There are many voice command alternatives you can use with Siri and smart lighting. Pick the ones which work best for you from the overview in this post: Siri and Philips Hue: Setup, Review and Voice Commands.
Adding Aurora to HomeKit Rooms and Scenes
How to add Aurora to a HomeKit Room
If you have not yet assigned Aurora to a room, it’s a good time to do so.
- Locate Aurora’s accessory icon either on the Home tab or in the “Default Room” of your Apple Home app. Note, the default room is where all unassigned HomeKit devices can be found.
- Long or force tap on your Aurora icon in the Apple Home app. At the bottom right, tap on the “Settings” button and you can specify the room in the Room section.
Once you’ve added Aurora to a room, it becomes part of the room commands, and you can say:
- Hey Siri, turn on/off <room name>
How to add Aurora to HomeKit Scenes
For this, we need to switch back to the Nanoleaf app. You can find all your HomeKit scenes listed in the Group Tab of your Nanoleaf Dashboard. To add an Aurora scene to your existing HomeKit room scenes, you need to:

- Swipe left on the HomeKit scene you want to modify.
- Tap on the pencil symbol to edit the scene.
- On the top right, tap on “Manage” and then pick “Manage Accessories” from the list.
- Locate your Aurora in the accessories list and tap on it, a green checkbox to it’s right will indicate it’s selected.
- Click done, but more to come, we still need to select the Aurora scene.
- Tap on the little arrow next to your Aurora device.
- Select the Aurora scene which should be activated in this HomeKit Scene.
- Adapt Aurora’s brightness to your liking.
- Tap on “Dashboard” to return back to the Group Tab.
- You should now see that the number of accessories in the HomeKit Scene has increased since we’ve added Aurora.
You can activate your HomeKit Scene, which includes your Aurora with the command:
- Hey Siri, set/turn on/activate <HomeKit Scene>.
- Hey Siri, <HomeKit Scene> (Note, that’s the short command)
Pro-Tip: If you’ve configured overlapping HomeKit scenes, like different HomeKit scenes for different areas of your living room but also scenes combining all the devices in your living room, you’ll need to add Aurora through the steps above to the overall HomeKit scenes.
How to schedule Aurora Scenes
We have two options to automate our Aurora Scenes through schedules, but we shall choose wisely:
HomeKit Schedules
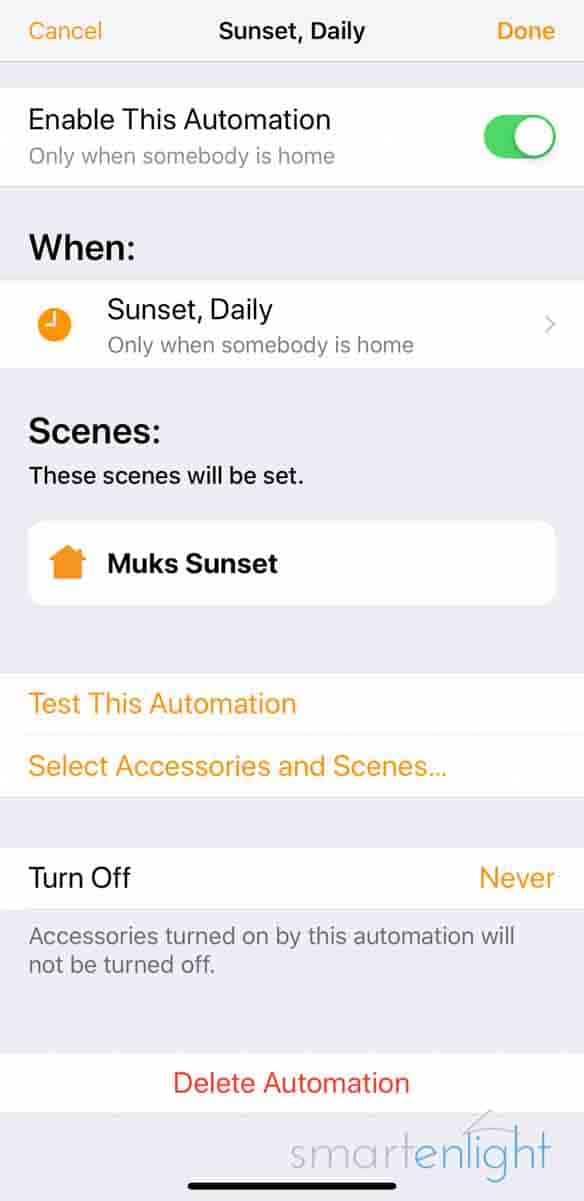
HomeKit schedules are good for controlling accessories/scenes at specific times, or – Yay! – at sunset/sunrise. You can specify the time of day, the weekdays and whether you/somebody or you/nobody should be at home.
We use the HomeKit schedules to set an animated Nanoleaf Sunset Scene – at sunset – as a little reminder to check the real sunset.
We also use it at specific times to synchronize our HomeKit scenes across the devices to make sure they follow the schedule as well as to turn all the lights off at night, in case we forgot some.
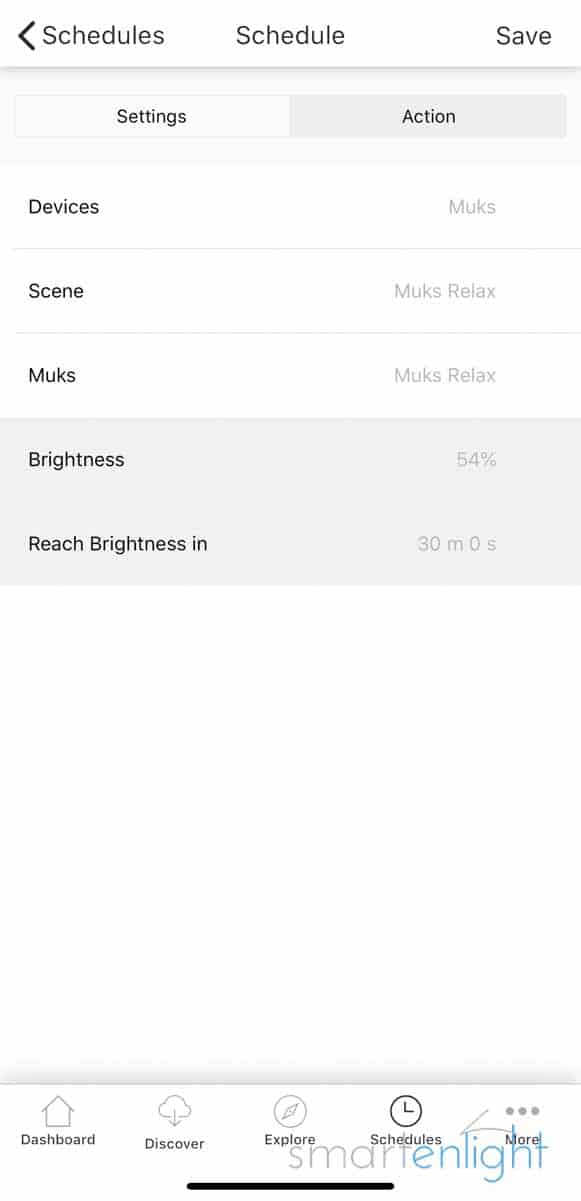
Nanoleaf Schedules
Schedules in the Nanoleaf app are great to automate Aurora fade ins and fade outs. We can specify the Aurora scene and a period from one second up to one hour to reach a specific brightness.
We use the Nanoleaf schedules to simulate natural light transitions, gradually fading in at evening and later dimming into a nightlight scene. Well, since we have no presence/people control in the Nanoleaf app, this happens also when we’re not at home.
Pro Tip: To simulate natural light transitions (dimming) over time, find the native app with the most features to automate your different smart lights. We’ve distributed schedules over 4 apps to get the most out of our smart home lights.
More HomeKit Options to Automate Aurora
HomeKit gives us more options, than just the automation based on schedules, we’ve already seen above:
- We can additionally switch Aurora Scenes when (specific) people arrive or leave.
- We can use other HomeKit Devices to trigger Aurora Scenes.
- And last but definitely not least, we can use HomeKit sensors to trigger an Aurora Scene. Think of motion or contact (door/window) sensors, smoke detectors, and security/occupancy sensors.
All these options can include time windows and people specific presence settings. Wow.
How to combine Aurora Scenes with Music
Have you heard of Siri Shortcuts? We’ll now create our very own command: “Hey Siri, Relax!” and play some chill music animated by our “Firefly” scene.
Note, if you’d like to re-create the exact same experience, you can download our “Firefly” scene from the Discover / Rhythm tab in your Nanoleaf app.
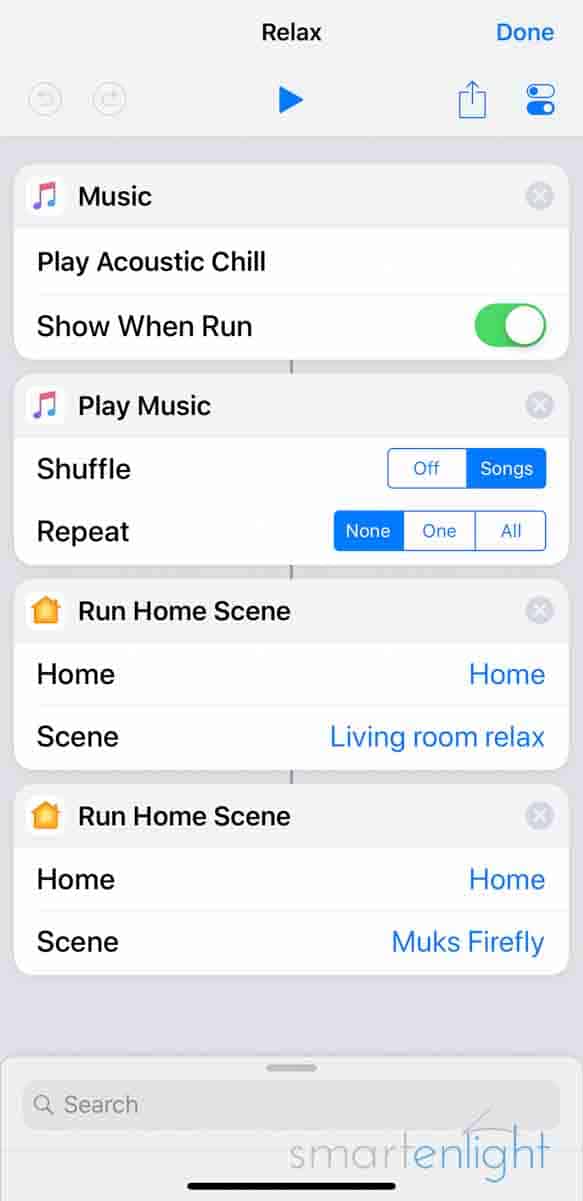
- Open your Apple Music App and start your favorite relax playlist (we are using here an Apple-curated, regularly updated playlist, like “Acoustic Chill”).
- Open your Shortcuts app and click the “+” to create a new Siri Shortcut.
- Type “music” into the search bar.
- At the top of the list under Siri Suggestions, you will find “Play …” whatever your relax playlist is named. (You see, we launched our playlist only once and now it appears as Siri Suggestion in our Shortcuts app =) Easy, just tap on it!
- We have added our first action. Now, the playlist will always start from the beginning with probably the same song. To make sure we always hear something new, we can type again “music” in the search bar and add the “Play Music” action from the Music section. Here we can shuffle songs and define whether they should repeat.
- Now let’s add the HomeKit scene: Type in “Home” into the search bar, at the bottom of the list and you will find “Run Home Scene”, tap on it.
- Click on “Choose” in the newly added Run Home Scene action. Tap on your Home in the list.
- Tap “Choose” do define the Aurora scene and pick yours from the list (e.g. Firefly)
- Almost done! Tap on the settings icon on the top right (underneath “Done”)
- Let’s give this shortcut a name, e.g. “Relax”
- Finally, let’s teach Siri our new voice command. Click on “Add to Siri.”
- Tap the record button and say: “Relax”
- Click 3 times “Done” in the upper right corner! Close the app and we are finally done!
Now, you just need to say “Hey Siri, relax!” and instead of some funny answer, she will come back with “Running your Shortcut … OK” and will play your favorite relax playlist and switch to your favorite Rhythm scene to visualize your music. Enjoy!
Conclusion
Nanoleaf has implemented solid HomeKit and Siri support.
Additionally to generic light commands, we can control our painted, dynamic and rhythm scenes with Siri. We can add them through the Nanoleaf app to our existing HomeKit scenes and finally also schedule them at sunrise/sunset.
Siri’s HomeKit automation options are extensive and flexible, and as we can integrate our Aurora Scenes now also with Siri Shortcuts, our imagination seems to be the only (automation) limit.
I hope you’ve enjoyed this post! If you have questions or would like to share your experience with Nanoleaf Aurora and Siri, please use the comment section below.
Happy Siri Aurora!
P.S. You can find more Siri posts here.
For the Nanoleaf Rhythm Module, please see Nanoleaf Aurora and the Rhythm Module: Visualize Your Music. And, for the Nanoleaf Remote: Nanoleaf Remote Setup – The Shape of the Universe?
The comparison to Alexa and Google Assistant, is here: Assistant Showdown with Nanoleaf Aurora: Who will win, Siri, Alexa or Google Assistant?


This is a awesome site to go to for ur music.