
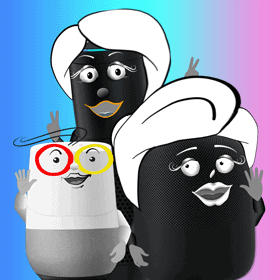
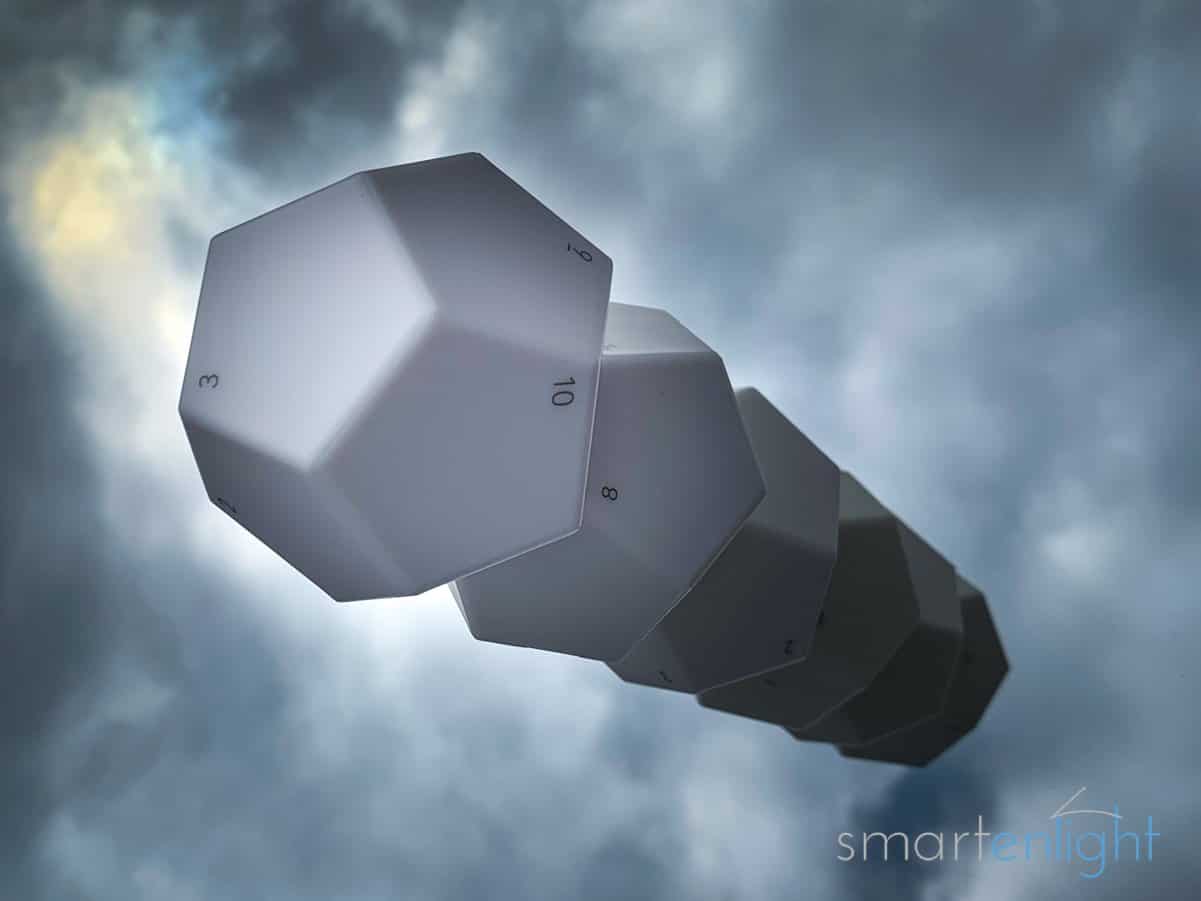
Don’t get me wrong, this post is about how to set up your Nanoleaf Remote! But the very first aspect which will catch your eye, way before you realize that this is a glowing remote control, is its shape. It’s a regular dodecahedron, a sphere of 12 pentagons.
And since the Nanoleaf Remote is a great conversation starter, we will start with dodecahedron’s amazing story. Frankly, what story could be better than: is this the shape of our universe?
We’ll travel to dodecahedron’s roots in Ancient Greece and to mind-blowing theories in cosmology, the branch of astronomy which studies the origin and evolution of the universe. We’ll then, cover the technical basics and different concepts which will help you to set up your Nanoleaf Remote.
After reading this, you’ll not only have a great Nanoleaf Remote setup, but also plenty of amazing stories to tell, when somebody asks: “Oh, what is that?”
Estimated reading time: 20 minutes
Table of contents
- The Story of Hippasus
- Plato’s Shape of the Universe
- The Nanoleaf Remote Shaped Universe
- How to setup your Nanoleaf Remote
- What is the Nanoleaf Remote?
- What’s in the Nanoleaf Remote Box?
- What’s Your Configuration?
- The Apple Home App Setup
- The Nanoleaf App Setup
- Adding the Nanoleaf Remote in the Nanoleaf App
- Configuring the Nanoleaf Remote in the Nanoleaf App
- Customize the Remote using only Aurora Scenes
- Customize the Remote using HomeKit Scenes and Aurora Scenes
- Customize the Remote using existing HomeKit Scenes, which already include Aurora Scenes
- Customize the Remote HomeKit scenes from the Nanoleaf App
- Just Pairing with the Nanoleaf Rhythm Setup
- Conclusion
The Story of Hippasus
We’re in Southern Italy, around 465 BC. Little is known about this time, so here are some theories. Hippasus just figured out how to construct a dodecahedron inside a sphere. He is the first Pythagorean philosopher to mention “a sphere of 12 pentagons”. So, while he is constructing his dodecahedron, he might have discovered irrational numbers.
Some say this could have happened on a boat, but that would be a terrible coincidence because what happens next is sad. The gods, or fellow Pythagoreans, throw him into the sea and he drowns.
We don’t know the exact details, but discovering irrational numbers was obviously not so cool back then. It’s not that irrational numbers are crazy, they just cannot be written down as a ratio or simple fraction. Famous irrationals like Pi or Phi, the Golden Ratio, or so many square roots. Discovering that irrational numbers exist, was a shock to the Pythagorean world.
Plato’s Shape of the Universe
Some 105 years later, it’s around 360 BC, and we are in Athens.
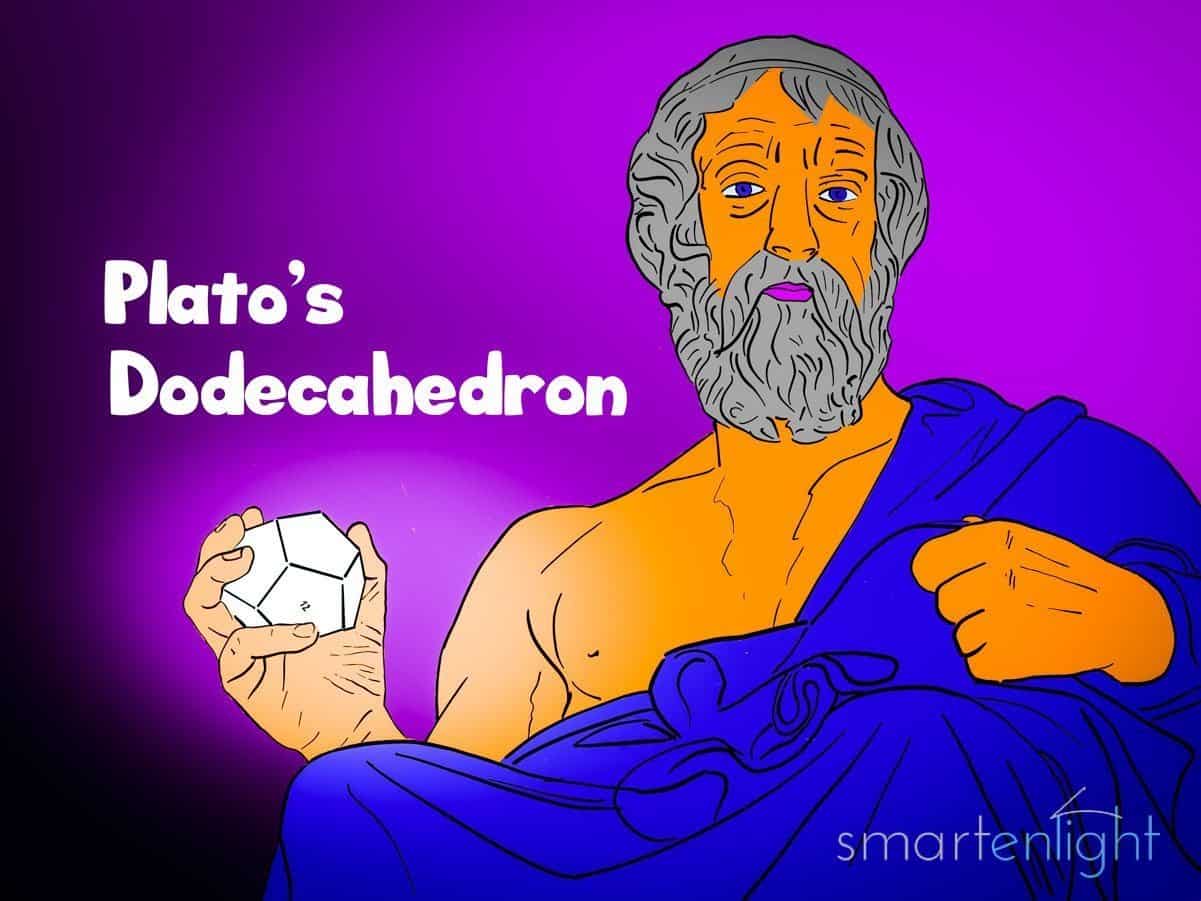
Plato is writing a long monologue in his dialogue “Timaeus”, and goes to great lengths trying to explain to us, everything. Like, really, he tries to explain the answer to life, the universe, and everything. In 42 pages.
Just kidding (HGTTG fans), “Timaeus” is only 40 pages long, not fun to read, but inspired many great thinkers.
Plato, while explaining the four elements, Fire, Earth, Air, and Water, assigns solids to them: Fire has the shape of a Tetrahedron, Earth has the shape of a Cube, Air has the shape of an Octahedron and Water the shape of an Icosahedron. This will later become famous as “Platonic Solids”.
Now, is the right moment to interrupt his monologue and ask: “But Plato, what about our Nanoleaf Remote? Um, the Dodecahedron?”
Plato answers: “There remained one construction, the fifth; and the creator used it for the whole [universe], making a pattern of animal figures thereon.”
Wow, the universe! But, animal patterns? Well, back then, maybe he meant something like the Zodiac, the star formations across the night sky. Makes sense, 12 sides equals the 12 months of the year. But, maybe it’s just a bad translation? Maybe he meant something completely different. Maybe he meant “painting” or “embroidering figures” or, actually “delineating the whole”?
The dodecahedron is like a geometrical matrix in the formation of Plato’s physical universe because its shape expresses the other 4 elements in there. Bonus, it has the largest volume of all five shapes when inscribed in the same sphere.
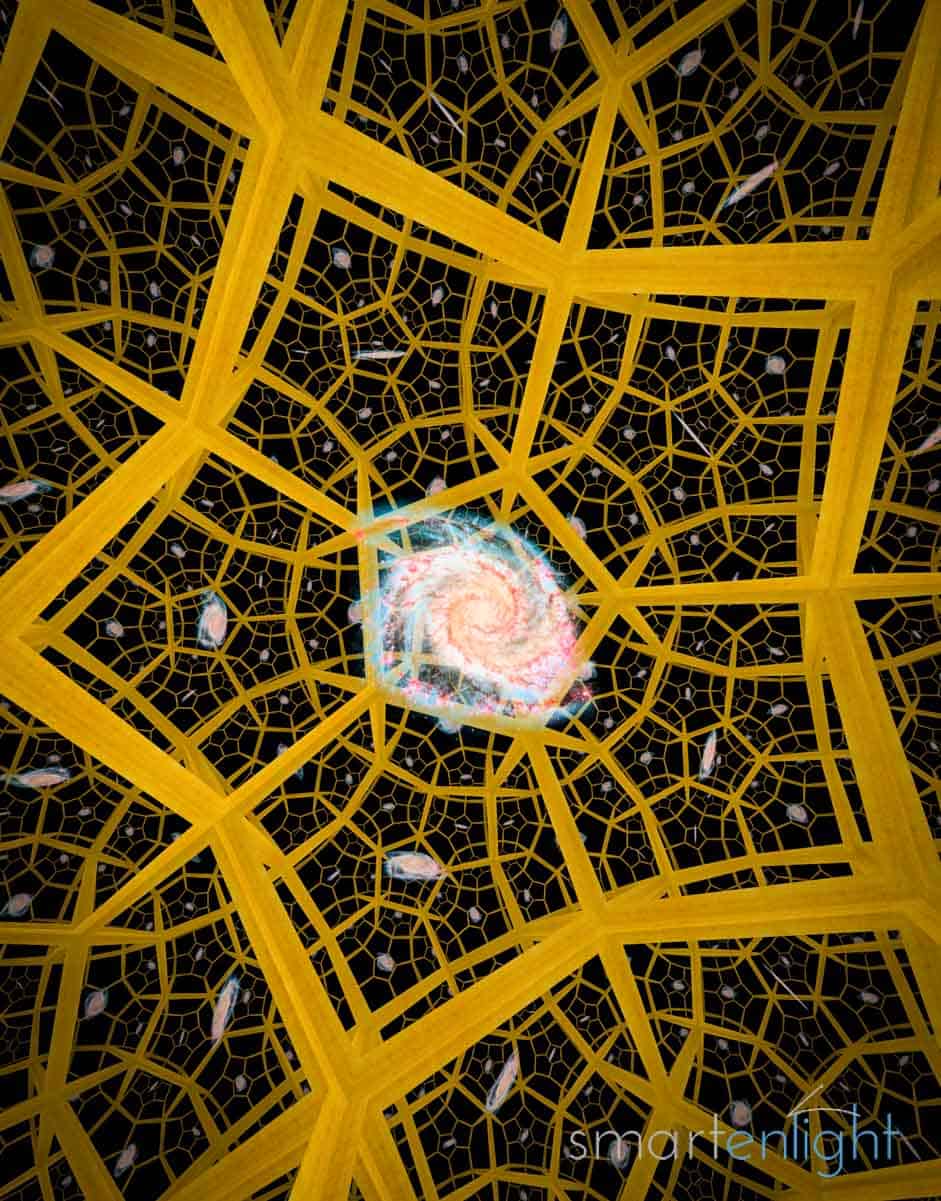
The Nanoleaf Remote Shaped Universe
Let’s time travel to 2003.
While the ‘standard model’ of cosmology predicts the universe as infinite and flat, Dr. Jean-Pierre Luminet, Jeff Weeks, and friends suggest that the universe is finite and shaped like a dodecahedron.
Let’s repeat that: Our whole universe inside the shape of one giant Nanoleaf Remote.
They are looking at the data of the NASA WMAP satellite, which measures the temperature of the cosmic microwave background. But something is missing in this data. Large waves are cut off. So, what if the universe is too small to produce these fluctuations? Like a ukulele, which cannot sound like a guitar? What if the universe is finite?
The problem with a finite universe is that we would expect a boundary, the edge of the universe. But what’s on the other side then? A philosophical question haunting us since the days of Ancient Greece. No way, we expect our universe to be infinite and without boundary, right?
Well, being infinite and not having a boundary is not the same thing. So, our universe could be finite and without a boundary, but what’s on the other side then? Easy, the same shape repeats. To us, this looks infinite because in whichever direction we move, space goes on, but interestingly, we would always end up, where we started.
And the best “shape” or model, which fits the data is the Poincaré dodecahedral space. Here’s how this looks like, explained by Jeff himself (I’ve forwarded to our Nanoleaf Remote, but you might enjoy the whole lecture):
Note, Jeff has developed a couple of apps including games which he uses in the lecture above. They are available for free at the Apple’s App Store and the Google Play Store. The app which you see in the clip above is called “Curved Spaces”. You can find a link to all apps at the end of this post.
If you follow Jeff’s lecture, you’ll see that with data from 2012 the dodecahedral shape was no longer helpful to explain the missing fluctuations. Though this could still be the shape of our universe, there is no more reason to prefer this model over any other.
Please note, that the feedback from fellow cosmologists, already the same day Dr. Jean-Pierre Luminet, Jeff Weeks and friends published their paper in the science journal “nature” in 2003, was considered by the New York Times as getting “sharp kicks”. So maybe you avoid this story when talking to Sheldon, Leonard, Howard or Rajesh, as it might turn into a longer discussion.
Another space story: remember the picture of the black hole from the Event Horizon Telescope, released two days ago? Dr. Jean-Pierre Luminet was the first who hand-plotted a black hole picture based on a computer model already 40 years ago.
Note, check out the links at the end of this post for his paper with pictures, including references to the movie “Interstellar”.
Time to close our story chapter. I hope you found some of the stories interesting, and worth sharing when explaining your Nanoleaf Remote. Now it’s time to get our Nanoleaf Remote properly set up.
How to setup your Nanoleaf Remote
Let’s first check the features of our Nanoleaf Remote and what’s in the box. Since there are many ways to set up the remote, we will first examine your configuration and then take it from there.
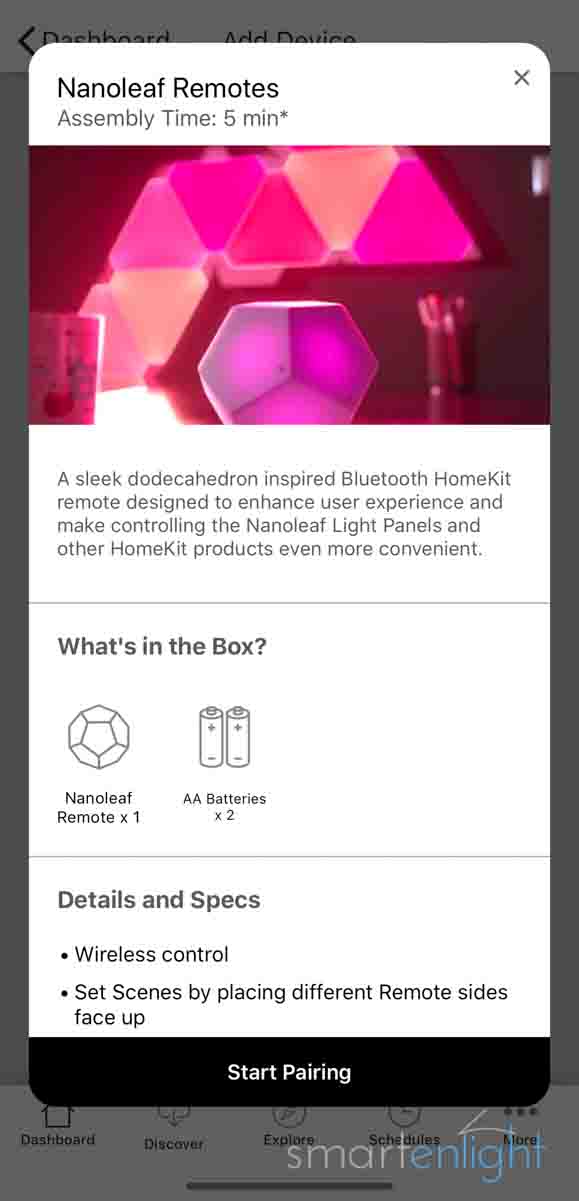
What is the Nanoleaf Remote?
The Nanoleaf Remote is a dodecahedron shaped, Bluetooth HomeKit remote control and has following features:
- When you place it on one of its 12 sides, it can activate your HomeKit scenes or directly control HomeKit devices, including your Nanoleaf Aurora (which in fact is a HomeKit device). HomeKit is Apples home automation framework. So you can use it, even without any other Nanoleaf product to control your HomeKit devices.
- If you own a Nanoleaf Rhythm, you can additionally dim and brighten your Nanoleaf Aurora by turning the remote counterclockwise or clockwise. (Note, this won’t work for any 3rd party lights, only for the Nanoleaf Aurora).
- Changing a scene or the brightness will light up the Nanoleaf Remote. Every side will bring up its own color, which is independent of any scene colors.
- Also, you will feel a soft vibration as haptic feedback indicating, that the Remote sensed a change.
What’s in the Nanoleaf Remote Box?
When you open the package, you’ll find the Nanoleaf Remote in halves, two AA batteries, and a setup booklet. Do not put the halves together yet, because we’ll need the HomeKit code, which is inside on the battery case (or on the booklet).
Note, there’s a small hole next to the battery case, through which we can reset the remote, in case something goes wrong during setup. But please be very careful if you have to do that, it needs just a gentle push, otherwise, you could break the reset mechanism. Also note, when you’re ready to assemble the Nanoleaf Remote, align the sides 6 and 7.
Put the batteries inside (one goes up, one down) and if the remote does not welcome you by lightening up, switch the batteries, or use fresh ones. Now, that the Nanoleaf Remote gave us a light signal, we are good to go.
What’s Your Configuration?
The following setup process depends on your setup:
- If you do not have any other Nanoleaf Products and just want to control your HomeKit devices, check out the Apple Home App Setup
- If you have a Nanoleaf Aurora and Rhythm Module check out the Nanoleaf App Setup
- If you have a Nanoleaf Aurora and Rhythm Module and you don’t want to use any app at all check out the Just Pairing with the Nanoleaf Rhythm Setup
The Apple Home App Setup
With this setup, we won’t need the Nanoleaf app, as we will set up and configure everything in the Apple Home app to control our HomeKit devices.
Please note, as HomeKit does not support changing the brightness through HomeKit accessories (yet), you will not be able to use the dimming gesture of the Nanoleaf Remote.
Adding the Nanoleaf Remote in the Apple Home App
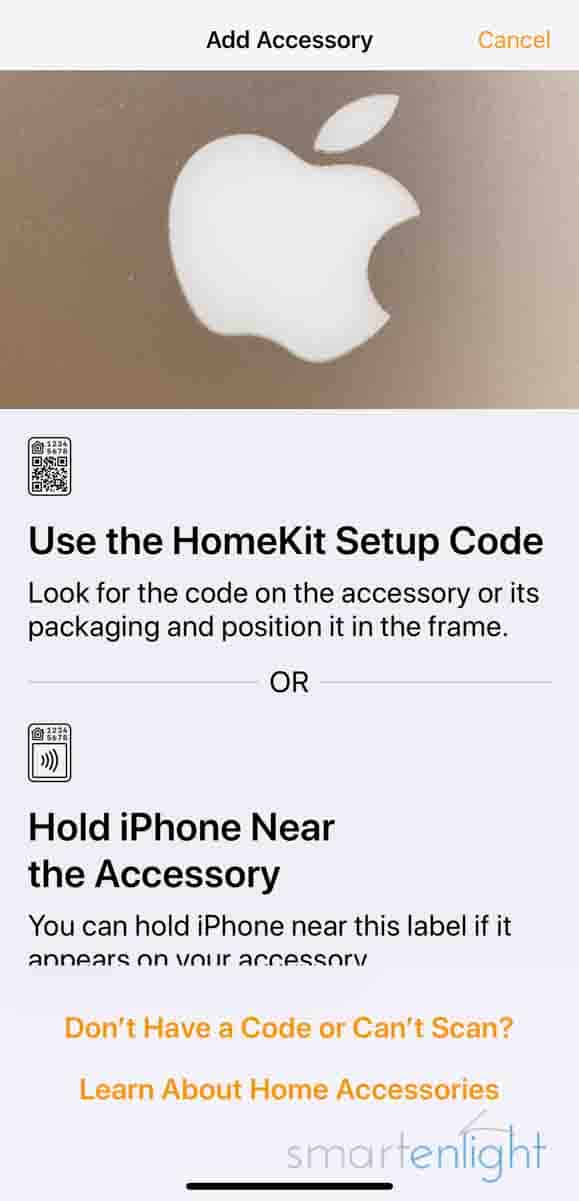
- Open the Apple Home app and tap the “+” in the upper right corner
- Choose “Add Accessory” from the list
- Scan the HomeKit code of your Nanoleaf Remote
- Keep your phone close to the remote and wait until you see “accessory added” – your Nanoleaf Remote will quickly vibrate four times, to indicate that it’s paired.
- Select the HomeKit room for your Nanoleaf Remote.
- Give your remote a nicer name.
- Confirm by tapping “Done” in the upper right.
Configuring the Nanoleaf Remote in the Apple Home App
How to best utilize the 12 sides of your Nanoleaf Remote? This is of course completely up to you, but here are some recommendations:
- As the sides 1 and 12 are opposite to each other, it makes sense to use side 1 to turn the HomeKit devices in your room on. They will light up in their previous state.
- Use the side 12 to switch the HomeKit devices in your room off.
The sides 2-6 are around side 1 (the “on” side), sides 7-11 are around side 12 (the “off” side). This creates the “halves” we have put together and can help you to structure and memorize your HomeKit scenes.
Pro-tip: For the next step, make sure your lights are off, to only save their on/off state, not their brightness and color settings.
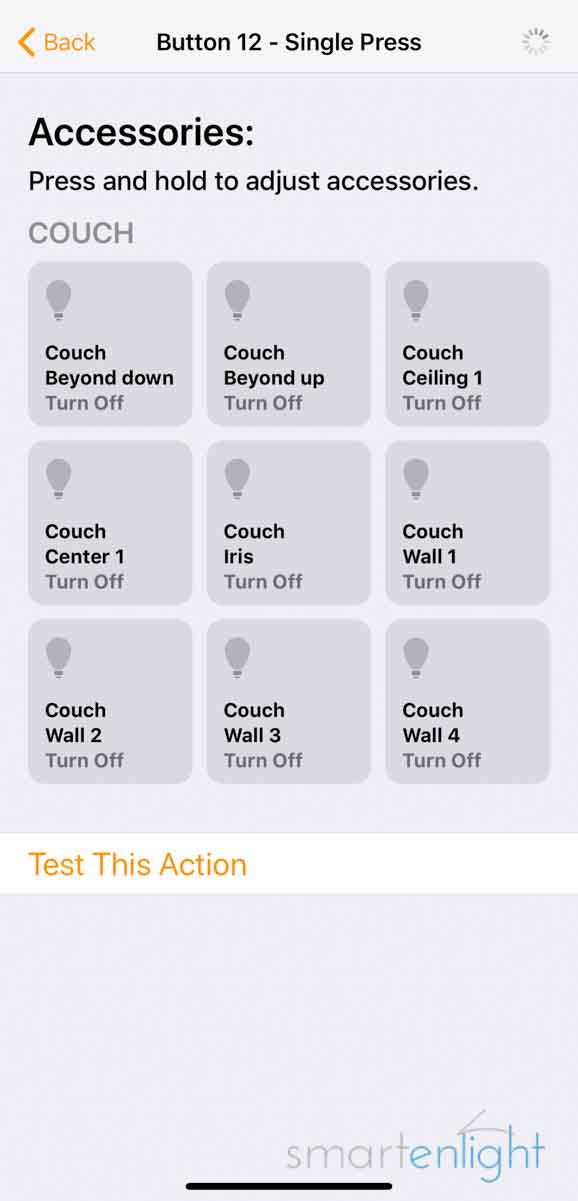
To configure your HomeKit devices to turn on/off:
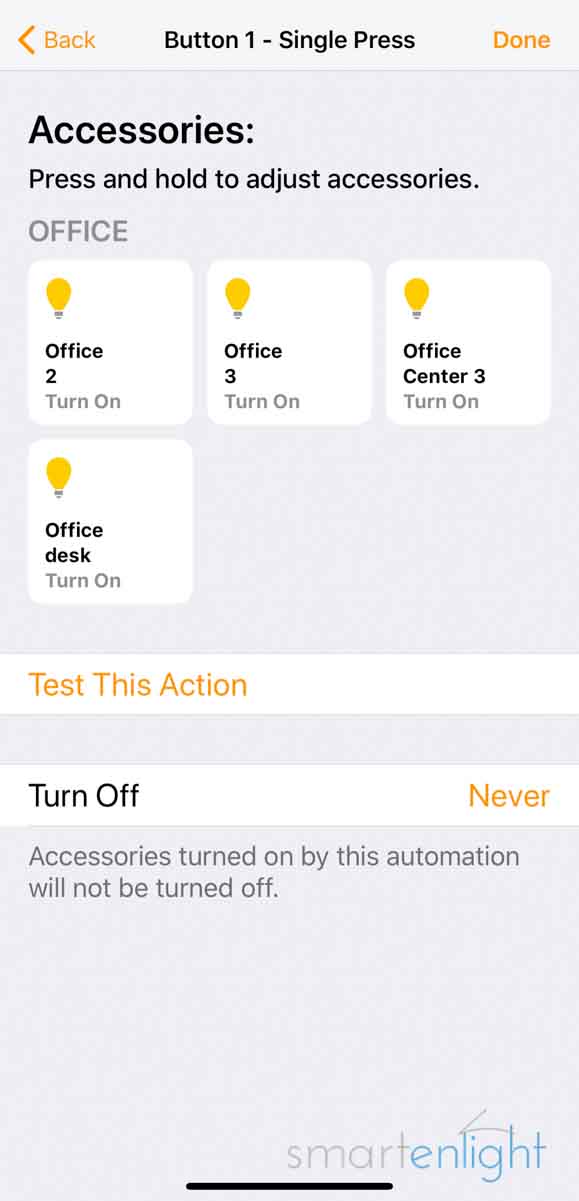
- Force/long press on the Nanoleaf Remote icon in your Apple Home app
- Tap on settings at the bottom of the screen
- Select the side (here indicated by Button) to configure
- Scroll all the way down past your HomeKit screens, until you see the devices grouped by rooms and tap on select all devices of this room
- On the next screen tap on the devices to reflect the state you want (on or off)
- Tap “Done” at the top right
You could set the 5 scenes, which you mostly use around side 1 and the 5 scenes you occasionally use around side 12.
To configure your HomeKit devices to set a scene:
- Force/long press on the Nanoleaf Remote icon in your Apple Home app
- Tap on settings at the bottom of the screen
- Select the side (here indicated by Button) to configure
- Select the HomeKit scene(s) which should be activated
- Tap “Done” at the top right
Our Nanoleaf Remote HomeKit Configuration (without Rhythm)

If you have your remote e.g. at the couch table, you could map the sides 2-6 to couch scenes, controlling only the lights in your couch area, and the sides 7-11 to living room scenes, where you control your entire living room lights.
We use the default Philips Hue scenes, which are not colorful, but reflect the “natural” color temperature of the sun over the course of a day (of course in combination with fitting colorful Nanoleaf Aurora Dynamic Scenes): Energize = side 2/7, Concentrate = side 3/8, Read = side 4/9, Relax = side 5/10, Nightlight = side 6/11. So, in our case, the first Nanoleaf Remote half controls the couch area (or where the remote is lying around) and the second half controls all the living room lights (or all the lights visible around us).
The Nanoleaf App Setup
Great, you have a Nanoleaf Rhythm, so you will soon be able to additionally use the rotating gesture for dimming and brightening your Aurora. For this setup, we will need the Nanoleaf app.
Adding the Nanoleaf Remote in the Nanoleaf App
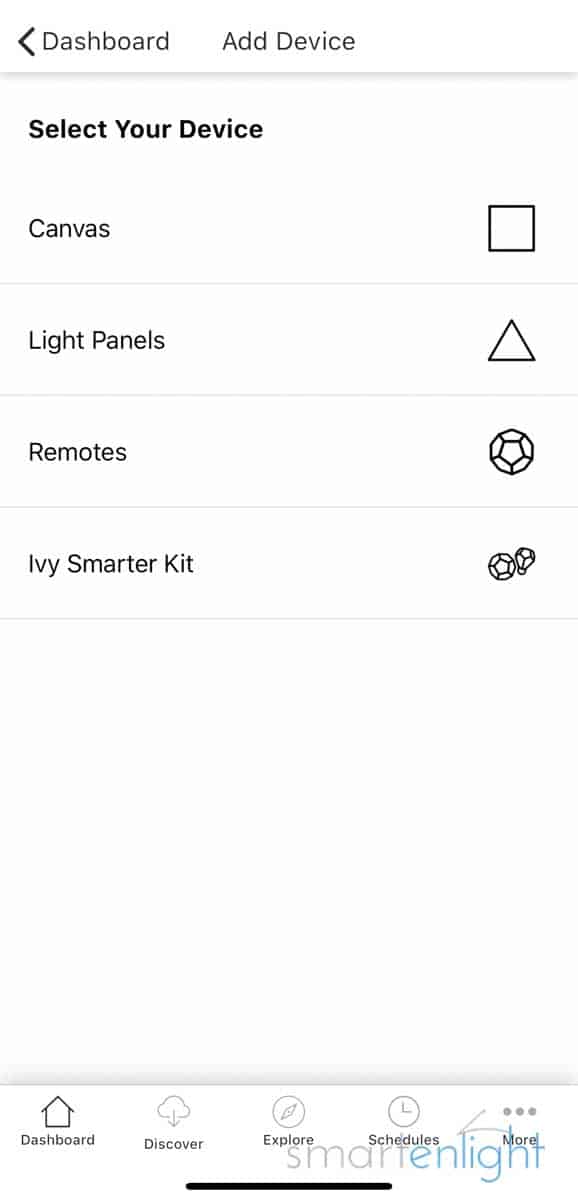
- From the “…” More Menu (Android: Sidebar Menu) tap on “My Devices”
- Tap the “+” on the top right to add a device and then on “Remotes”
- On iOS: tap on “Start Pairing” and
- scan the HomeKit Code.
- Wait for the Nanoleaf App to add your remote to the HomeKit accessories.
- Select the room your remote is located in and click “Done” on the right
- Tap next to start the remote pairing
- On Android: tap “Get Started” to start the remote pairing
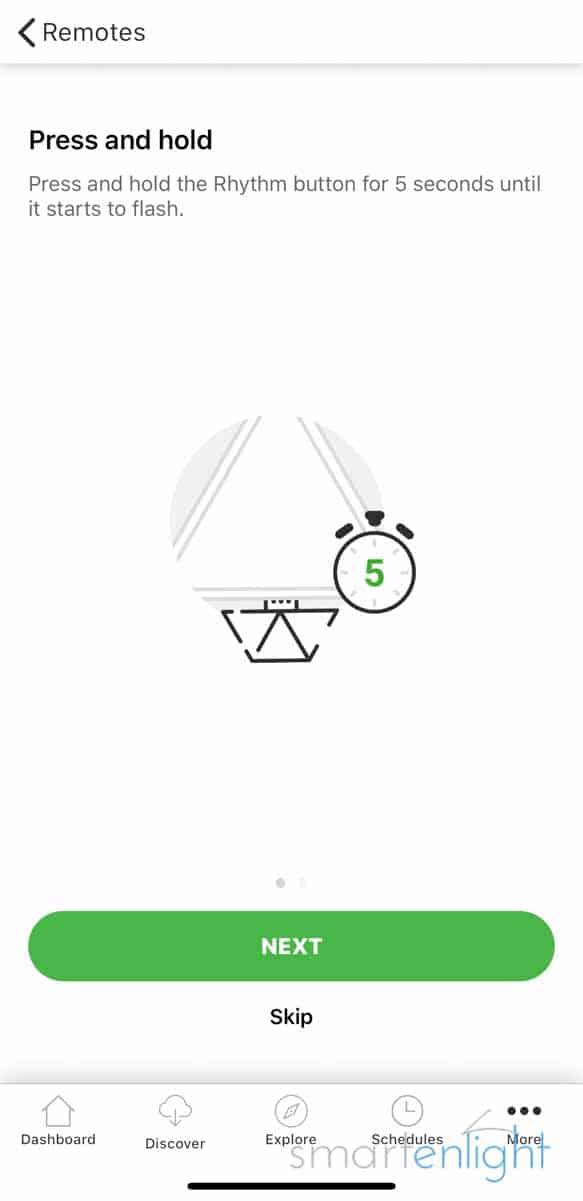
- Press the button on your Nanoleaf Rhythm for 5 seconds until it blinks
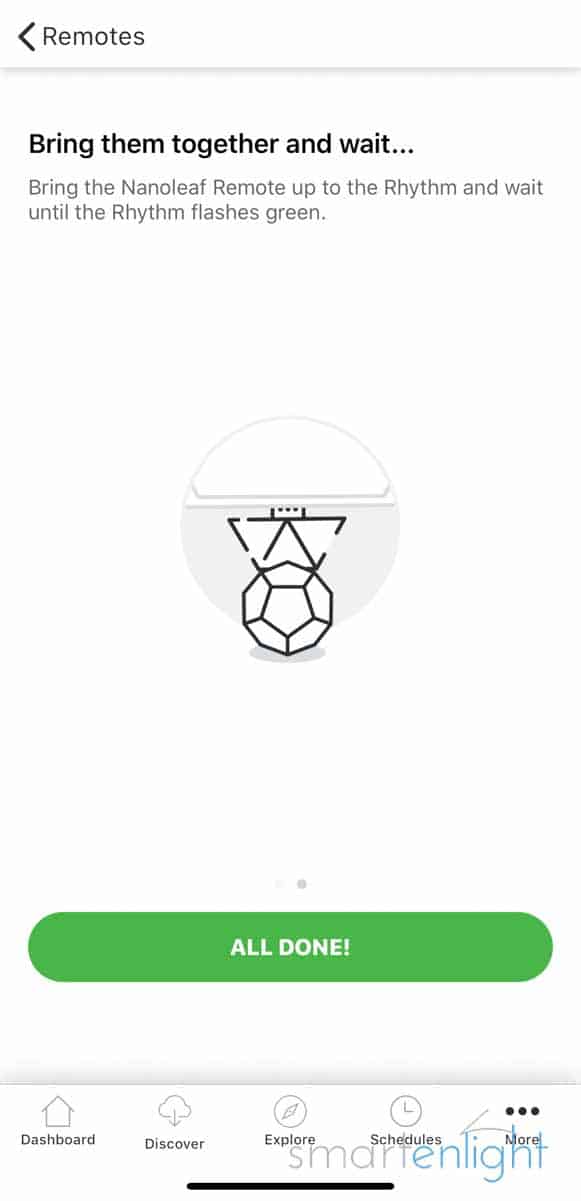
- Hold your Nanoleaf Remote close to your Nanoleaf Rhythm and wait until both flash green
Configuring the Nanoleaf Remote in the Nanoleaf App
How to best utilize the 12 sides of your Nanoleaf Remote? Well, with this setup Nanoleaf has already installed a recommendation.
When you tap on the “…” More Menu (Android: Sidebar Menu) and then on “Remotes” you will find
- Side 1 mapped to switching your Nanoleaf Aurora on
- Side 2-6 mapped to Dynamic scenes from your Nanoleaf Dashboard
- Side 7-11 mapped to Rhythm scenes from your Nanoleaf Dashboard
- Side 12 mapped to switching your Nanoleaf Aurora off
This is a good recommendation, as we can memorize:
- Side 1 and the opposite Side 12 for on/off
- Every Side around Side 1 half is a Dynamic Scene
- Every Side around Side 12 is a Rhythm Scene
The only problem is, that the Nanoleaf selection of scenes appears quite random. So let’s customize it. Assuming you like the Side 1/12 on/off configuration let’s leave them for now as they are.
Tap on the Side you’d like to configure and you will see 3 sections:
- The Nickname of the Side
- Under the Devices section, the Nanoleaf Aurora Scene (which pre-fills the Nickname)
- (On iOS) Under the HomeKit section, with a “Configure in Home App” link, your HomeKit Scenes
Customize the Remote using only Aurora Scenes
To change the scene, tap on the side you would like to customize, then
- Select the Nanoleaf Scene
- Tap on the “Color” Tab for Color Scenes or Tap on the “Rhythm” tab for Rhythm Scenes
- Select the Scene you would like to activate
Customize the Remote using HomeKit Scenes and Aurora Scenes
To combine existing HomeKit Scenes with Aurora Scenes, tap on the side you would like to customize, then:
- Select the Nanoleaf Scene
- Tap on the “Color” Tab for Color Scenes or pap on the “Rhythm” tab for Rhythm Scenes
- Select the Nanoleaf Scene you would like to activate
- Select the HomeKit Scene(s) you would like to activate
Customize the Remote using existing HomeKit Scenes, which already include Aurora Scenes
If you have already mapped your Nanoleaf Aurora Scenes to your HomeKit scenes (like we have for the post Siri and Nanoleaf Aurora: Setup and Voice Commands) remove the Nanoleaf scenes to avoid possible conflicts with your HomeKit scenes:
- Tap on the Nanoleaf Scene
- Tap on the “Simple” Tab (!)
- Select “Unassigned”
- Select the HomeKit Scene which already includes your Nanoleaf Scene
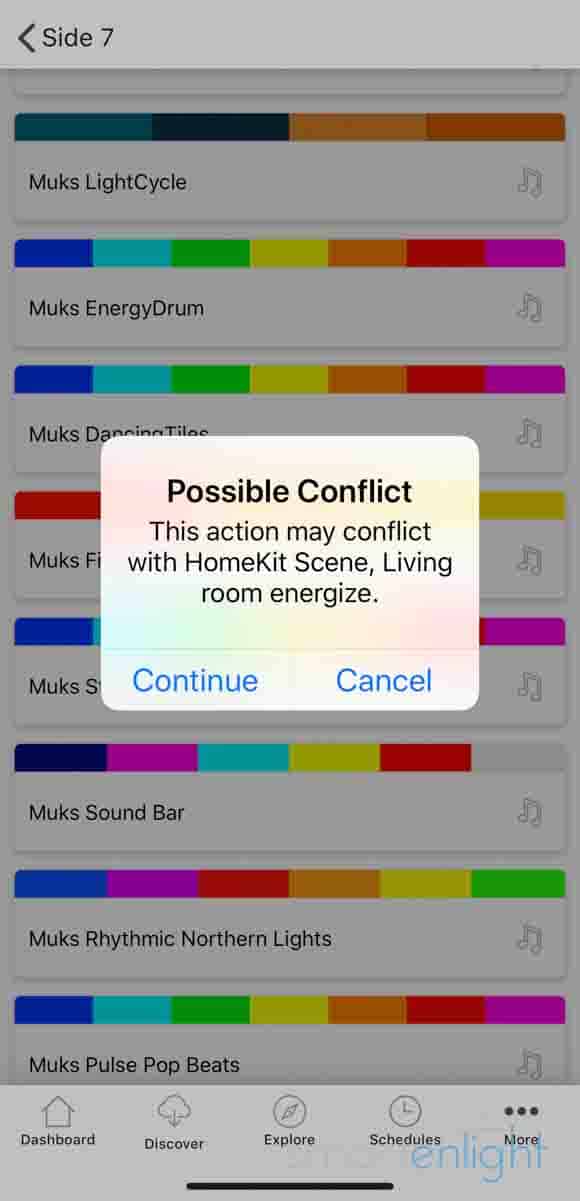
Pro Tip: The Nanoleaf app will indicate if there is a “possible conflict” between a Nanoleaf scene and a HomeKit scene which includes a Nanoleaf scene. This will help you to avoid mistakes in complex setups, where multiple, conflicting scenes could be sent to your Nanoleaf Aurora.
Customize the Remote HomeKit scenes from the Nanoleaf App
You might have noticed by now, that we can configure our Nanoleaf Remote in the Nanoleaf app as well as in the Apple Home app. Both offer (almost) the same features and it’s up to you which you prefer. Though we can mix and match what we configure in which app it’s recommended to stick to one app for a particular remote side.
However, there is one feature missing in the Nanoleaf app, where we have to use the Apple Home app: We cannot directly control HomeKit devices, only through HomeKit Scenes.
A final example. Let’s configure Side 1 to turn specific HomeKit devices on, and Side 12 to switch them off, in the Apple Home app, through the Nanoleaf app:
- In the Nanoleaf App, tap on the side you would like to customize
- Tap on the “Configure in Home App” link to open the Apple Home app
- Force/long press on the Nanoleaf Remote icon in your Apple Home app
- Tap on settings at the bottom of the screen
- Select the side (here indicated by Button) which you’d like to customize
- Scroll all the way down past your HomeKit screens, until you see the devices grouped by rooms and tap on select all devices of this room (or the individual devices)
- On the next screen tap on the devices to reflect the state you want (on or off)
- Tap “Done” at the top right
Just Pairing with the Nanoleaf Rhythm Setup
This is the “quick and dirty” setup version, which is not recommended since you won’t be able to change the Nanoleaf Remote configuration without an app. But in the rare case that you would not like to use any app at all, you can pair your Nanoleaf Remote with your Nanoleaf Rhythm Module with just these 2 steps:
- Press the button on your Nanoleaf Rhythm for 5 seconds until it blinks
- Hold your Nanoleaf Remote close to your Nanoleaf Rhythm and wait until both flash green
Your Nanoleaf Remote will have the following configuration:
- Side 1 will turn your Nanoleaf Aurora on
- Side 2-6 will activate a Color scene from your Dashboard
- Side 7-11 will activate a Rhythm scene from your Dashboard
- Side 12 will switch your Nanoleaf Aurora off
Conclusion
The Nanoleaf Remote surprises not only with its exceptional, enlightened shape and unique gestures. The 12 sides offer plenty of possibilities to activate different scenes, but you’ll need a little bit of structure to memorize your configuration.
You can use it as your HomeKit remote, even if you don’t have other Nanoleaf Products. If you own a Nanoleaf Aurora with a Rhythm Module, the Nanoleaf Remote is a great add-on for your smart home, giving you the option to change the brightness of your Aurora.
The flexibility to set up the Nanoleaf Remote in the Nanoleaf app and in the Apple Home app is impressive and might appear a bit overwhelming. It would be helpful if the Nanoleaf App could display the name of the selected HomeKit Scenes along with the Nanoleaf scenes in the Nanoleaf Remote configuration. However, the indicator that there is a “possible conflict” between a Nanoleaf scene and a HomeKit scene which includes a Nanoleaf scene, will help you to avoid mistakes in complex setups.
I hope you’ve enjoyed this extensive Nanoleaf Remote post including the dodecahedron background stories! For more information please check the links below. If you have any questions or simply would like to share your feedback, please leave a note in the comment section!
Happy HomeKit Remote!
P.S. You can find our Nanoleaf Aurora post here: Nanoleaf Aurora How To – Setup and Configuration to the Muks! For the Nanoleaf Rhythm post, please see Nanoleaf Aurora and the Rhythm Module: Visualize Your Music
Siri, Alexa, and Google related Nanoleaf posts are here:
- Siri and Nanoleaf Aurora: Setup and Voice Commands
- Alexa and Nanoleaf Aurora: Setup and Voice Commands
- Google Home and Nanoleaf Aurora: Setup and Voice Commands
For a comparison of all assistants with Nanoleaf Aurora, see: Assistant Showdown with Nanoleaf Aurora: Who will win, Siri, Alexa or Google?
Looking for More Information?
The Story of Hippasus:
Plato’s Shape of the Universe:
- Timaeus by Plato – From Project Gutenberg
- Platonic Solid – From Wikipedia the free encyclopedia
- The Dodecahedron in Plato’s Timaeus – by Ronald F. Kotrc
The Nanoleaf Remote Shaped Universe:
- Is the universe a dodecahedron? – from physicsworld
- Dodecahedral space topology as an explanation for weak wide-angle temperature correlations in the cosmic microwave background – by Jean-Pierre Luminet, Jeffrey R. Weeks, Alain Riazuelo, Roland Lehoucq & Jean-Philippe Uzan
- Cosmic Soccer Ball? Theory Already Takes Sharp Kicks – by NYT
- The Poincaré Dodecahedral Space and the Mystery of the Missing Fluctuations – by Jeffrey Weeks from the American Mathematical Society
- Topology and Geometry Software – by Jeff Weeks
- Seeing Black Holes – from the Computer to the Telescope – by Jean-Pierre Luminet

