
It’s been quite a while since we’ve looked into the setup and configuration of our Nanoleaf Aurora. Meanwhile, Nanoloeaf renamed the Aurora into “Light Panels”, redesigned the Nanoleaf app, added new features and we’ve extended our setup to the max set of panels. We call it Nano Muks.
The Nanoleaf Aurora is quite different from other smart lights. It consists of triangular LED panels, which you put together in your own design. You attach the panels to your wall and fill them with colors and animations.
You can control your Aurora with the Nanoleaf app, Siri, Alexa, and Google, as well as with the Nanoleaf Remote. And if you are into music, you can plug in the Nanoleaf Aurora Rhythm to visualize your favorite songs on your Aurora.
Note, obviously we are deliberately ignoring the changed product name here, because according to Google, you like the name “Aurora” much more. So do we.
In this post, we will look into:
- Who is Nanoleaf and what are their products?
- How to create your own design and picture it on your wall? Note, all you’ll need is the Nanoleaf app!
- How to mount your design? For this, you’ll need the panels =) and
- All the options in the Nanoleaf app to fill your Aurora with different animations. By all, we really mean all options! No worries, we’ll guide you through “quick wins” for beginners and “I want to create my very own animation” for aspiring light designers.
In the updated assistants posts, we will set up Siri, Alexa, and Google Assistant to control our Nanoleaf Aurora with voice commands and automations.
Who is Nanoleaf?
Nanoleaf was founded in 2013 by Gimmy Chu (CEO), Tom Rodinger (CTO) and Christian Yan (COO). With offices in Shenzhen, Hong Kong, and Toronto, Nanoleaf manufactures smart lighting based upon their patented technology for sustainable manufacturing and energy efficiency. So far, so boring. Here’s the story:
One day these guys were walking through a lighting trade show in China and were wondering, why all the products looked the same: typical light bulbs, not very energy efficient.
They knew that the underlying LED technology had the potential to be twice as energy efficient. They knew that the common shape of bulbs was purely historical, and actually not natural. Glass encasements were only needed for incandescent bulbs to protect the filament from oxidation. And you had to screw the bulbs into a fixture because it heated up to 300 degrees. But with LED technology all of that became irrelevant, still, everybody was fitting LED technology into bulbs.
So they modeled lighting inspired by the best natural light source we have, the sky, and Nanoleaf Aurora was born.
This was Nanoleaf’s way of shattering the traditional way of lighting by thinking beyond the light bulb. Something, which back then remained unquestioned for a century.
Note, if you like this story, you might like Gimmy Chu’s 10-minute TedX talk about the key to great ideas. You can find the link at the end of this post.
Nanoleaf’s Product Range
Nanoleaf One was the companies first product released on Kickstarter 2013. The dimmable Nanoleaf Bloom followed in 2014 and their bestselling product Nanoleaf Gem was released in 2015. Nanoleaf Ivy released end of 2015 supports HomeKit and is listed as the world’s most energy efficient bulb.
In November 2016 Nanoleaf released the Aurora as first color changing product with Siri, Google Home, and Alexa support. The Nanoleaf Aurora Rhythm module was released in October 2017, followed by the Nanoleaf Remote in June 2018.
The newest product is the Nanoleaf Canvas released in December 2018. It consists of touch sensitive, square-shaped panels, which can also be used to play games. And that’s not the only reason, why we are going to test them soon.
How to create your own Aurora design?
There are some questions which immediately come to mind when dealing with a product which is intended as a tool for “self-expression” and “creativity”:
- Which shape expresses my “personal style”?
- How many panels will I need?
- How will it look on my wall?
Since you know that you are going to mount the panels on your wall, probably with adhesive tape, you better get it right the first time, right?
There are different paths which lead to your individual answers.
Gimme some Aurora design inspiration, now!
Ok, you want some instant inspiration? Just download the Nanoleaf Aurora Light Panels Inspirations and check out the different shapes for:
- 9 Panels, keep it simple!
- 12-15 Panels, let’s get creative!
- 18-24 Panels, for the adventurous!
- 30 Panels, unleash your inner artist!
There’s also an online Nanoleaf Aurora Layout Drawer. You can define how many panels to use and specify additional size constraints, hit the “Gimme” button, and it will come up with a random shape, which you … cannot change.
This won’t answer how your favorite design will look on your wall, but if you’re confident enough that you have enough space, and you are fine with a suggested or random shape you’re basically done. If you want to check how this design looks on your wall, just keep reading.
But, but I want to design my own shape!
Welcome to the club! Our shape(s) are not covered in Nanoleaf’s inspirations and don’t come up randomly, because: it’s our shapes!
When we started our Nanoleaf Aurora journey years ago, we went through a lengthy process of cutting out little paper triangles and playing around with them. Though this was kind of fun, today there’s an easier way: Augmented Reality.
The Nanoleaf app will let you design your own shape and will “augment” your view, when you look through your smartphone camera at your wall, by generating a picture of your own design. So you can walk around, and check your creation from different angles.
Yes, you can do that before ordering anything from Nanoleaf, for free. You just need to download the app.
Do you want to extend your design later on?
Chances are, that you start with a simple design, maybe the 9 panels from the starter kit and later feel like wanting more panels for a bigger design. At least, that’s what happened to us.
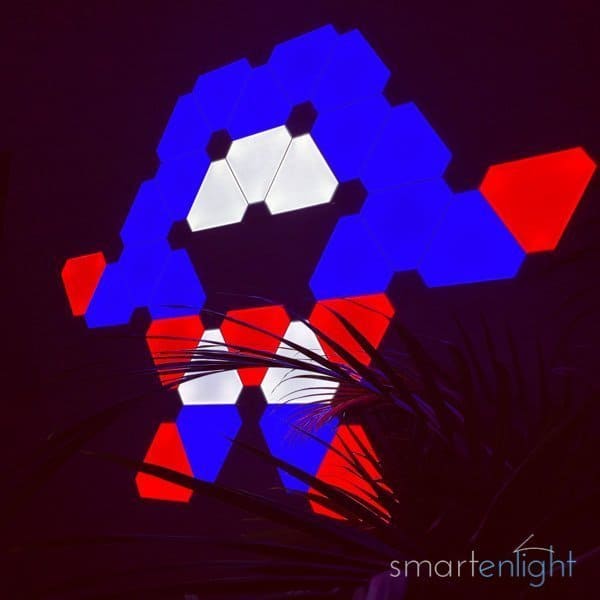
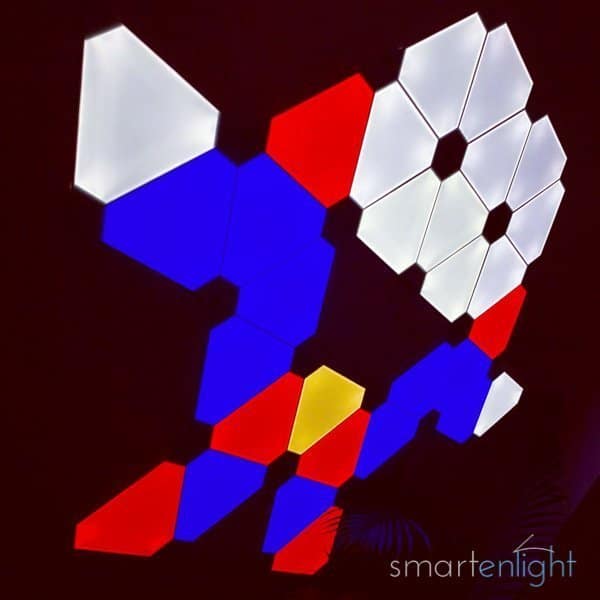
We started with 18 tiles and built a hexagon shape. Later on, we wanted to extend the setup to the maximum 30 tiles (supported by a single controller). Since the 18 tiles were glued to the wall, we were not keen to figure out how much paint will come off, when taking them off to redesign our shape. So we looked into ways to extend our existing design with the additional panels: that’s how Nano Muks was born.
Keep in mind, that an extendable design comes handy when you want to extend your Nanoleaf Aurora without the hassle of dismounting your initial design!
Note, we wouldn’t be brave, creative testers if we wouldn’t try to completely peel off Nano Muks to design a new shape. For testing purposes, we have currently only removed Muks right hand (2 panels), and it worked fine. When we are ready to repaint the wall, just in case, we will remove everything, create a new design and post pictures (scheduled for this spring)!
Creating your own design with the Nanoleaf App

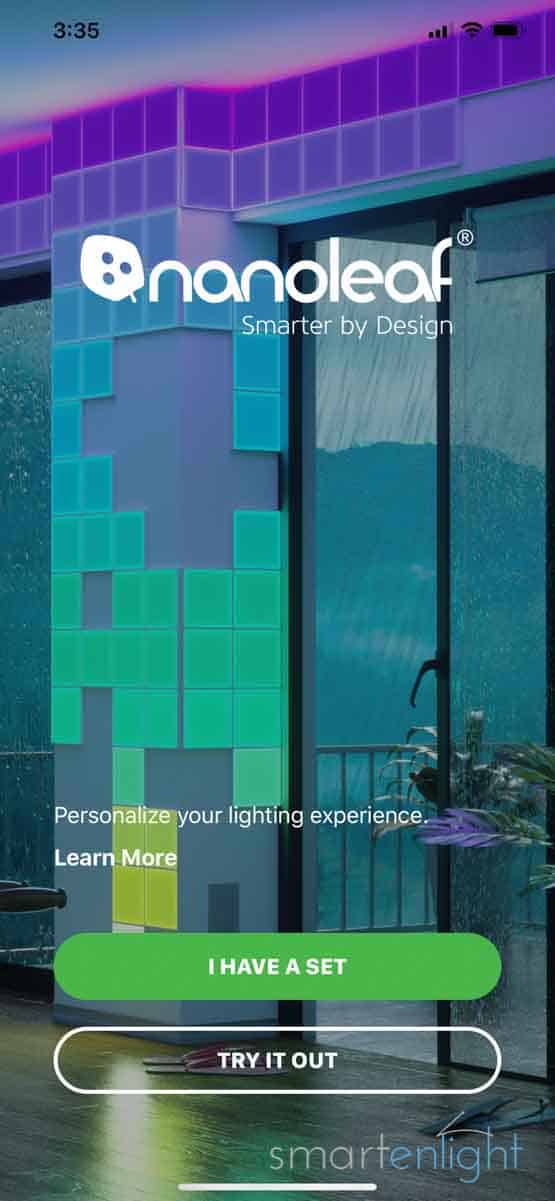
- Download the Nanoleaf Smarter Series app, from your Apple App Store or your Google Play store.
- On the start screen, tap on “try it out” and it will take you directly to the Layout Assistant. Note, later on, you can find the layout assistant under the bottom right “…” More tab, or just swipe left on the dashboard upper screen.
- Here’s where you can play around and construct your own design.
- Get inspired by creating random shapes through the “shuffle” button on the bottom left and change the shapes by dragging the tiles around.
- If you need more tiles, you can just add them from the top of the screen.
- Once you have something which fits your taste, you can tap the little eye in the bottom center of the screen.
Now there are two options, depending on your smartphone:
- A dialog guides you to download a QR code, which you can directly send from your smartphone to your printer (or you can download the QR code here or find it on the back of newer packages). Stick the printed page on the wall, where you would like to mount your Aurora and point your smartphone at it and your design appears through your cam on your wall.
- Your iPhone tries to detect a surface and you need to move your phone in a well-lit area and point at a textured surface (Apple ARKit). Good luck with finding textures on your wall. If you don’t have a picture hanging there for calibration, a post-it will help. Once you see a yellow square on the screen, the calibration is finished. Just tap on it.
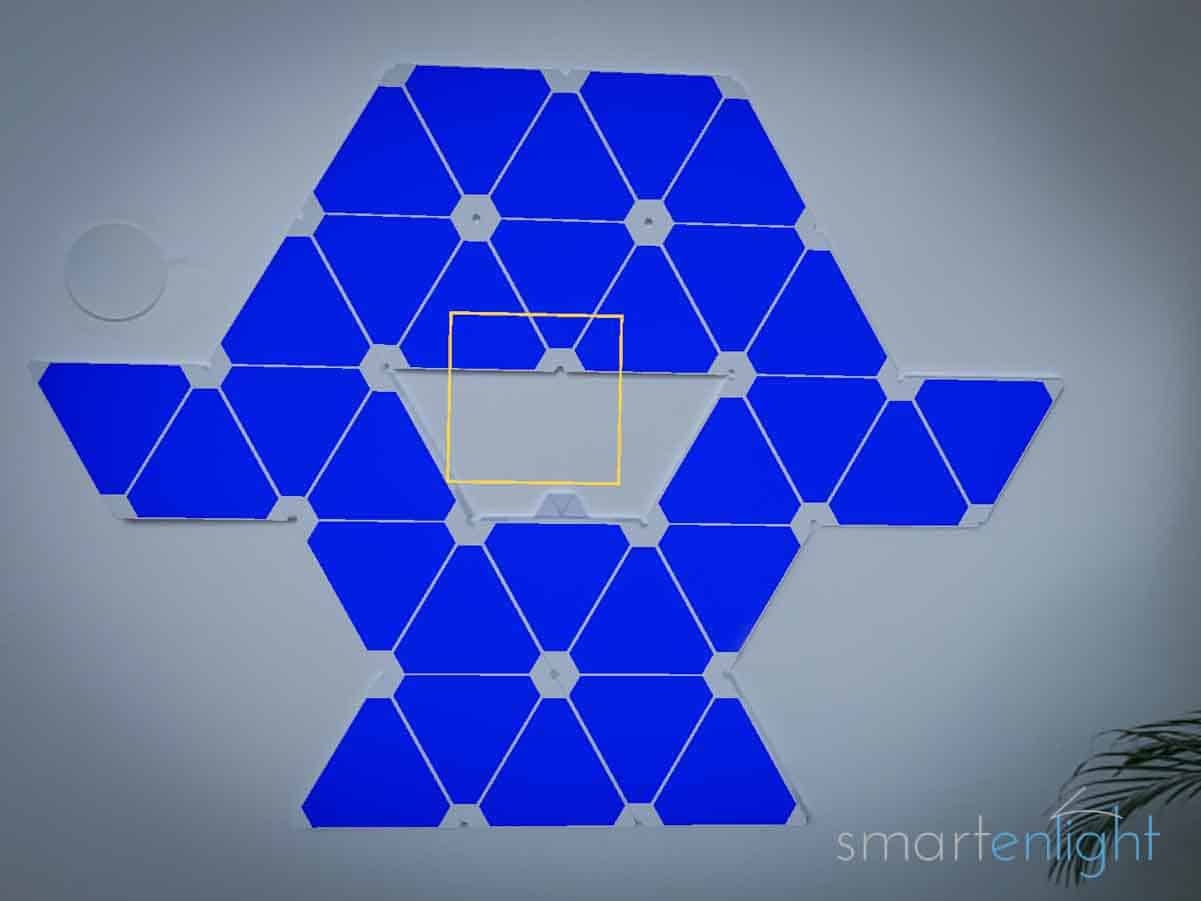
Looking through your cam, your design appears on your wall. Take a step back, rotate and position your virtual design more precisely, the initial size of the tiles is quite accurate. You can walk around, examine your creation, take screenshots and once you are happy, you know exactly how it will look like on your wall.
Note, for flexible designs, like shapes around corners, you’ll need to order Aurora flex-links. You can’t simulate flex shapes with the layout assistant.
Nanoleaf Aurora: First Contact
When you open your Aurora box, you will find that there is surprisingly little documentation coming with it. This is because some of the information is online, in the app, or smartenlight =). Nanoleaf has developed tutorials covering many different aspects of mounting and dismounting your Aurora including their new mounting kits. We will link to their YouTube videos throughout this post.
First things first: It is recommended that you check the panels and pair your Aurora before mounting it (it’s very unlikely, but you wouldn’t like to glue a non-working setup to your wall!). Lay your tiles on a flat surface, connect them with the linkers, plug into the power and then connect the controller to the panels. If you have not downloaded the Nanoleaf Smarter Series app yet, now is a good time to do so.
Aurora takes up to 2 minutes to boot and indicates being ready by loading the Northern Lights scene. Don’t let Aurora’s initial brightness confuse you (100 Lumen per panel during boot up on bright white, is a lot of light!), you will be able to configure this and much more with the app.
Connecting Aurora to your WiFi
Here’s the happy day scenario to pair your Aurora to your WiFi:
- On the start screen of the Nanoleaf app, tap “I have a set”.
- Alternatively swipe left on the dashboards top screen and tap on “Add New Device”,
- or tap on the “…” More button on the bottom right, click on “My Devices” and then the “+” button on the top right.
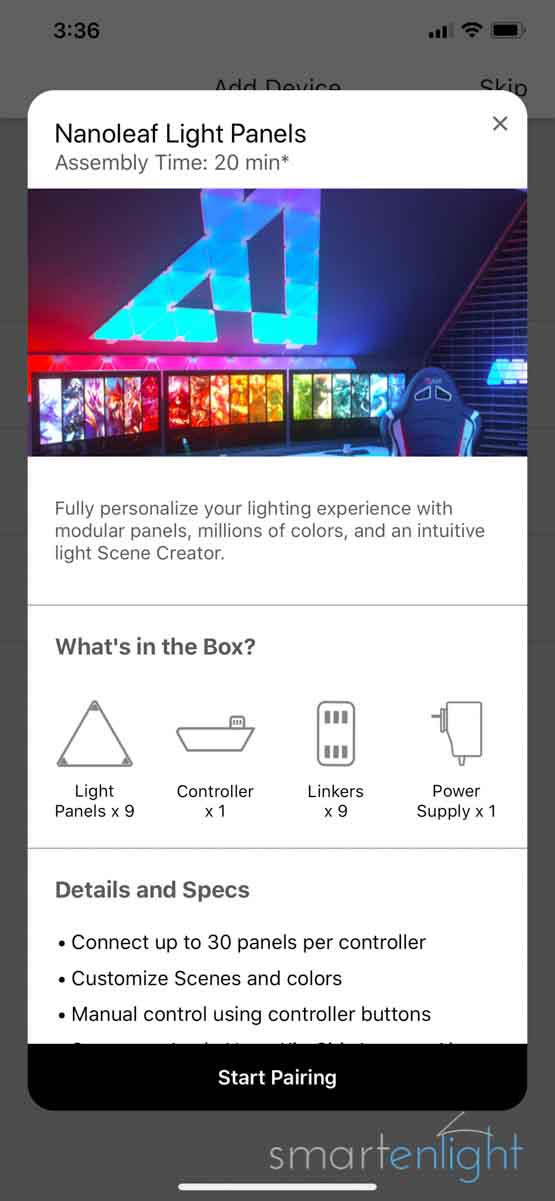
- Select Light Panels (triangle shape) from the list.
- Tap on “Start Pairing” at the bottom of the screen.
Now, we need patience. The app will eventually come back with “Aurora XX:XX:XX” in the list, whereby the “XX:XX:XX” is half of the MAC address of your Aurora (take a screenshot, this might be helpful for troubleshooting).
Tap on the “Aurora XX:XX:XX” and give it time. The app will disconnect your smartphone from your WiFi, try to connect to your Aurora, which runs a hotspot for the setup process, pass your WiFi settings to Aurora and then connect back to your WiFi. Somewhere in the middle of this process, you will see the Message Box “Add Accessory to Network”, tap “Allow”. When everything works well, your Aurora will flash green when it joins your network. Yay!

If you’re having problems pairing your Aurora, you might find the next chapter helpful. If everything went fine: don’t play too long with the many features in the app, we will examine them later, it’s time to mount your design!
Troubleshooting Connecting Aurora to your WiFi
Nanoleaf Aurora supports only 2.4 GHz WiFi. If you have a dual-band router (2.4 and 5 GHz), it should automatically connect to the 2.4 GHz. However, if you have a more complex setup, like a router plus an extender, running the same SSID (WiFi-Name) in a pseudo mesh network fashion, and the router transmits in 5 GHz and the extender in 2.4 GHz, prepare yourself for some network access control exercises. (This is the configuration we had the most troubles with).
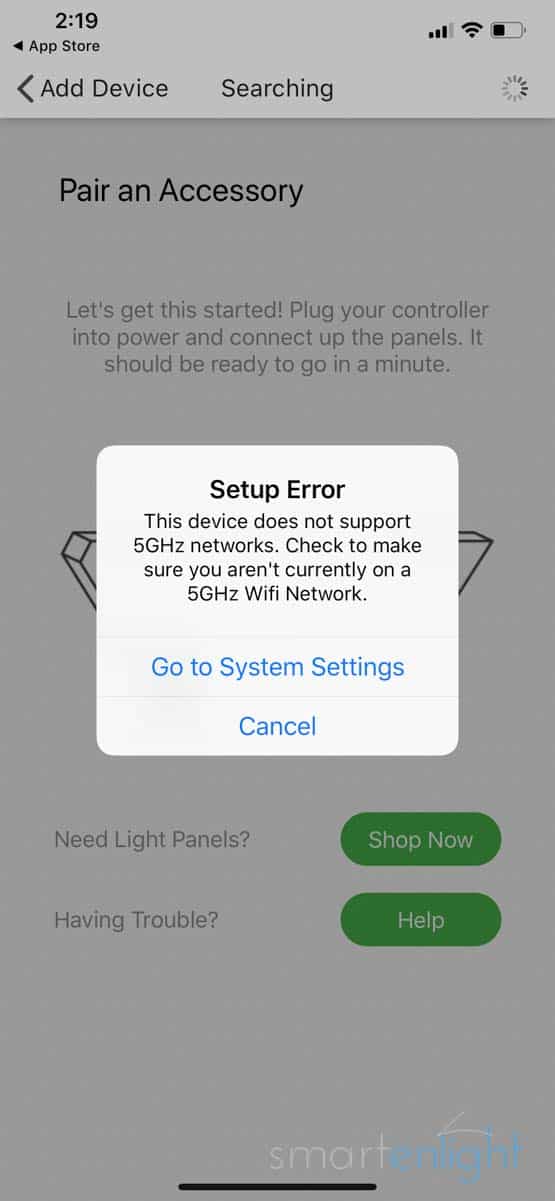
If you see the “Setup Error: This device does not support 5GHz WiFi networks …” your smartphone is most likely on the 5GHz connection and tries to pass this connection to the Aurora. You need to block your smartphone from connecting to the 5GHz connection, through the access control page of the admin panel of your router, reset the Aurora and try again.
There are 3 resets, which can help you to bring Aurora into it’s pairing state when troubleshooting network connections. Note, this assumes your Aurora is up and running after the boot-up sequence (for about 1-3 minutes):
- The WiFi Reset (this resets only the network configuration)
- Press and Hold the two buttons on the controller for 5 seconds.
- Let go when the status LED on the controller lights up.
- The Soft Reset (this resets the network configuration, pairing information, but leaves your scenes):
- Press and Hold the two buttons on the controller for 15 seconds.
- Let go when the status LED on the controller starts flashing.
- Wait a minute until Aurora reboots.
- The Full Reset (this resets everything and restores factory settings and scenes):
- Unplug your Aurora from power.
- Press and keep holding the two buttons on the controller while plugging the Aurora back into power
- Wait until the status LED flashes rapidly (around 7 seconds), release the buttons.
- Wait 3 minutes for the Aurora reboot and restore factory settings.
If you’ve already successfully paired your Aurora but find it now unreachable, make sure:
- you are on the same WiFi with your smartphone (toggle WiFi on your phone off and back on).
- Power cycle your Aurora.
- Power cycle your router.
Yes, the pairing process can be paved by many attempts. If you feel there are way too many, you’ll need to contact Nanoleaf support and in the unlikely worst case, potentially prepare for a controller replacement.
Mounting Your Aurora
Take a picture of the back of the controller (or better: never, ever glue it to the wall as we did, the painting came off when checking the serial number and the result is too ugly to show here). The link on the controller should be strong enough to keep it in place. It contains the serial number and the connection code for the assistants, which we will need later on. You can also find this information on the cover of the little setup booklet in the box. Just make sure, you don’t lose it.
There are 4 ways to mount your Aurora on your wall:
The quickest: 3M Command strips (nowadays included)
Note, that dependent on how greasy or textured your walls are, your Aurora might come off (anecdotally usually at night, but this actually never happened to us):
3M command tapes have a non-sticky removal tab, which you can pull away from the panels, so it loses it’s stickiness, and comes easily off, without ruining your wall. The red side goes on your panels, the black side is for the wall. If you don’t care about removal tabs sticking slightly out of your Aurora design, this is the quickest way of mounting your Aurora with minimal risk to pull off paint when dismounting it. Just make sure, as with every adhesive tape, to clean your wall first and let it dry before mounting. Also, press firmly down at least 30-60 seconds to make sure it makes a good bond.
If you really don’t like the aesthetics of non-sticky removal tabs around (or at the corners of) your Aurora, do not cut them off! Just hide the whole thing behind the panels. You can use dental floss to remove the panels when you have to, and the removal tabs will still come handy when peeling their remains off the wall.
Note, this is how we added the hands, legs, and face of Nano Muks and could confirm by removing and re-mounting his right hand, that it works without removing paint!
The semi-permanent: 3M Scotch tape (back then included)
It’s green on both sides and is considered according to Nanoleafs marketing team a semi- or even permanent connection. Well, nobody told us that back then and we went on sticking them even across the panels to create 3-4 panel parts, for easier mounting. That might explain, why our Aurora never fell off the wall but leaves us anxiously curious how the dental floss technique will work with Scotch tape. Note, we will cover this part in a later update.
The community favored: 3M Velcro strips (not included)
The Aurora online community has agreed that these are the best strips, as you can completely hide them behind the panels and easily dismount your panels and remove them if you have to. Neither Nanoleaf nor we have tested this (wish we would have known that back then), still, according to the feedback of many, these are the best way to go. You might want to order some separately, as they are not included.
The most robust: Nanoleaf Screw Mount Kit (not included)
A must have if you want to mount your Aurora on your ceiling or angled wall. It includes plastic mounts which you can cut to the shape needed, as well as anchors and screws for drywall, plaster, and wood. In case foam tapes do not work on your greasy or textured wall, you’ll need these.
Should I use stencils?
There are stencils included in the box, which you can use to “test” your design on the wall. This is especially helpful if you’d like to create a flex shape around a corner and need to check the correct spacing. If you find this stencil process helpful, especially if you feel safer to mark the position of the individual panels with a pencil on your wall, go for it.
We were a bit impatient and just marked the lower edge of our shape with the help of a level. We split the initial hexagon shape into 4 parts with each consisting of 4-5 panels. Starting with the bottom 5 tiles, aligned with a level, it was quick and straightforward to stick the rest of the tiles on top of each other. Later on, Nano Muks legs, hands and face were also combined before, and easy to attach to the existing design.
Note, we have mixed feelings, whether grouping panels through overlapping strips was a good idea. Though it definitely makes the mounting process easier, during the dismount with dental floss, these areas seem tougher to cut through to remove the design panel by panel. Nowadays, we would keep the overlap to a minimum towards one side of the shape and start dismounting from there.
But, I want to go bigger than Muks!
Do not connect more than 30 panels to one controller, you could damage the panels! You’ll need more controllers for larger setups. You’ll be able to group them in the “Group” panel in the Nanoleaf app to display the same scene.
The Mounting Checklist (with strips)!
- Keep cool!
- Clean the wall with alcohol or soap and water and give it time to dry!
- Use the stencils to test your shape on your wall
- Don’t cut the non-sticky removal tabs off, rather hide them if you don’t like to see them.
- It’s recommended to use 3 strips per panel, ideally near the corners.
- Keep pressing the stripes both on the panels and later on the wall, for 30 – 60 seconds.
- Be proud!
Ok, we’ve covered everything you should know for mounting your Aurora. If you have not already, it’s a good time to mount it now, before we look into the Nanoleaf app.
The Dismounting Checklist (with strips)!
- Be patient!
- Use dental floss. Slowly and carefully saw between panels and wall, close to the panels.
- Watch out that the dental floss isn’t trapped where the linkers go.
- Never, ever pull the panels towards yourself, always away from the Aurora, as you might break the non-flexible linkers!
- Carefully remove the strip remains from the wall (ideally by pulling the removal tabs to the side).
- Be relieved!
Exploring the Nanoleaf App
We are going to structure this chapter into “basic concepts” and the “sections of the app”, which you should be aware of, before diving into the app. Then you can start with the “quick setup”, which will guide you to download top community scenes and later with the “pro setup”, which will go into all the details of creating your own scenes and sharing them with the community.
Basic Concepts
Before we look into the app, let’s look into some basic concepts, which are helpful to understand the structure of the app:
- An Aurora “Scene” is a set of configurations which define what your Aurora will display. In it’s simplest form it is just one single color, that’s called a “Basic” scene.
- A “Palette” is a set of colors, which you can define to be used in your “Color” scenes
- “Color” scenes, are split up into
- static “Paint” scenes, where you can define/paint the color and brightness of each and every panel based on the selected palette,
- “Dynamic” scenes, where you can select an animation, based on a “motion” and a palette, and
- “Rhythm” scenes, which are dynamic scenes animated by the Nanoleaf Rhythm to visualize the music it picks up (see Nanoleaf Aurora and the Rhythm Module: Visualize Your Music).
Sections of the App
The app is structured (tabs from bottom left to right) into:
- the Dashboard: this is the screen you will use to control your Aurora. The lower section lists all your “scenes” (currently only the ones preconfigured). To rename/edit/delete scenes, swipe left on a scene in this list. The tabs on the top of the scenes list, let you switch between basic, color and rhythm scenes as well as groups. Groups are e.g. for multiple Auroras or scenes which are downloaded from your HomeKit configuration (you’ll recognize them). You can edit them to include your Aurora in existing scenes.
The quick control section at the top allows you to quickly turn your Aurora on/off and change the brightness. The bucket in the quick control section lets you quickly set a single color. The pencil lets you quickly edit the current scene. The plus on the top right lets you create a new scene. - the Discover tab: is where you can find all the community scenes, preview them and download to your Aurora. They are structured into “color”, “rhythm” and “interactive” scenes (the latter are for the Canvas product). The community scenes can be sorted/filtered by “most popular”, “most recent”, “by Nanoleaf” and “Motions”.
- the Explore tab: lists some tutorials for the Nanoleaf products and the Nanoleaf App.
- the Schedules tab: here you can define (recurring) schedules for your Aurora. Note, if you’re using Siri/HomeKit, Alexa or Google, you might want to automate your Aurora from the routines there, to also include your other smart home devices or music in one routine.
- the “…” More tab: lists all the different settings: Your Account, Your Devices, Rooms, Homes, Remotes, Users, Settings, and the Layout Assistant.
Your Nanoleaf Cloud Account
If you want to control your Aurora with Siri, Alexa, and Google, you’ll need to create a Nanoleaf cloud account. Head over to the Settings, My Account and enter your e-mail and a password. Don’t forget to confirm the e-mail you’ll receive!
The Preconfigured Aurora Scenes

Before we go on and change our Aurora configuration to our liking, it’s good to have a look at which scenes come preconfigured with our Aurora. Some of them are very basic functional lighting scenes, some are cool dynamic color scenes.
Open the dashboard and tap the “basic” tab. You will see 3 preconfigured basic scenes, which serve well as functional lighting, simulating natural color temperatures (color temperature is measured in Kelvin and naturally changes in the sky over the progress of a day, more on that in our post Natural Smart Lighting: Feeling Better With Smart Light):
- Daylight (5000 K)
- Reading Light (4000 K)
- Warm White (2700 K)
Now, tap on the Color “tab”, where you can find 8 preconfigured dynamic color scenes:
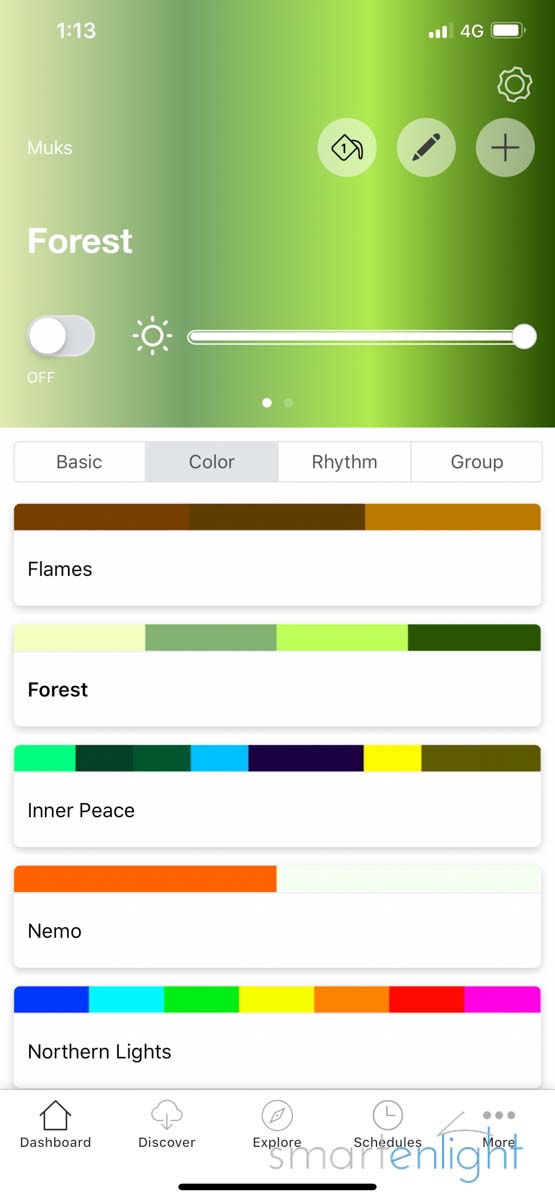
- Color Burst (based on the “Burst” motion)
- Flames (based on the “Highlight” motion)
- Forest (based on the “Random” motion)
- Inner Peace (based on the “Fade” motion)
- Nemo (based on the “Highlight” motion)
- Northern Lights (based on the “Wheel” motion)
- Romantic (based on the “Highlight” motion)
- Snowfall (based on the “Wheel” motion)
If you’re just starting with your Aurora, and look for a quick setup of cool dynamic scenes, first check out these preconfigured scenes. Note, you can also switch between those with the scene button on your controller.
If you’d like to create your very own dynamic scenes, take note of the motions listed next to the preconfigured scenes. Those motions define how a scene looks like. A scene is defined by a motion and a color palette, whereby every motion has different options. In the “Pro Setup” we will look into the different options you can play with to create your very own dynamic scenes.
Quick Setup: Give me some great Aurora animations, now!
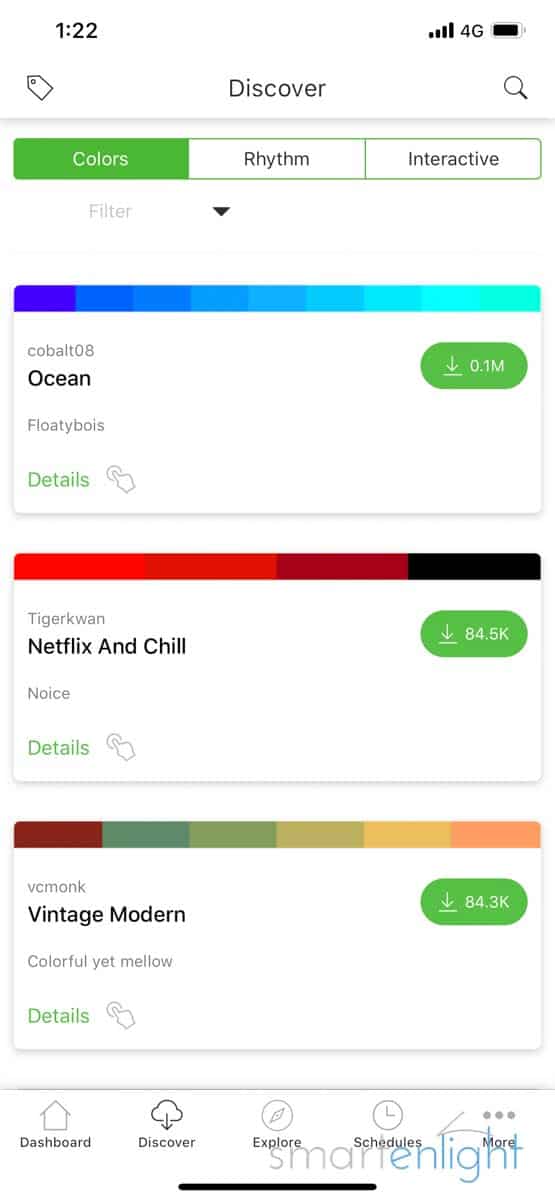
Now, that we’ve examined the preconfigured scenes, let’s check out what the community has created. Head over to the “Discover” section in the app and make sure that the “Colors” tab is active. Set the sorting underneath to “Most Popular” and you will see the most popular dynamic scenes listed.
When you tap on one of the scenes, a preview is loaded to your Aurora. Do you like what you see? If yes, click on “Download” at the top right. You can now define your name for the scene.
Note, if you want to control your Aurora with Siri, Alexa and Google, we’d recommend adding the name of your Aurora to the scene name, e.g. “Muks energize”, to avoid collisions with other scenes you might already have.
Keep on searching through the community scenes, until you feel you have a good set of dynamic scenes in your scenes list to enjoy your Aurora.
What’s a good set of scenes?
That’s quite individual. For instance, here’s a concept we’ve borrowed from Philips Hue and covered in our post Natural Smart Lighting: Feeling Better With Smart Light. If you examine the sky throughout the day, it changes its color temperature. Now, if you’d like to mimic this natural phenomenon with your Aurora, you could pick your favorite scenes for different times of the day:
- Early Morning: Check out our upcoming “Muks Energize” scene
- Noonish: Check out our upcoming “Muks Concentrate” scene
- Afternoon: Check out our upcoming “Muks Read” scene
- Evening: Check out our upcoming “Muks Relax” scene
- Night: “Muks Nightlight” this one is only a paint scene, we don’t like animations at night.
Apart from this everyday “natural” scene setup, it’s of course fun to have seasonal scenes for Christmas, Thanks Giving, Halloween, Easter, Valentines, New Years, etc.
Or activity related scenes for throwing a party, working out, meditating, doing your household chores, watching your favorite sports team or your favorite series, listening to your favorite music, etc.
Or maybe mood-related scenes: feeling blue, need some uplifting colors or just want to let yourself go in melancholy? Or something romantic, happy, etc.
You can combine your scenes to work with other smart lights and even more fun, you can combine them with your favorite music playlists, so it’s just one voice command, which switches to the right music and sets the light to your favorite settings. We’ll look into this in detail in the assistant posts.
Note, all the scenes in your scenes list will be synchronized with Siri, Alexa, and Google. Make sure you don’t lose the overview and delete the scenes you don’t like by swiping left and delete.
Pro Setup: I want to create my own dynamic scenes!
Welcome to the club! Though most of our – newly created and uploaded – scenes are inspired by either Nanoleaf or community scenes, we adapted them to fit our liking. In this chapter, we will look into how dynamic color scenes are built up to make full creative use of our Nanoleaf Aurora.
Remember, dynamic scenes are animated based on:
- the selected color palette,
- 6 different preloaded motions and
- a couple of options per motion.
Sounds complex, but it isn’t, once you get the hang of it.
Apart from brightness and speed, which you can always set, the availability of other options depends on the type of motion:
- Random: Colors your panels randomly with the palette colors. You can additionally specify a delay, for how long your scene will pause for each color in your palette.
- Flow: Each color of the palette flows into the direction you choose. You can specify if it should run once or loop continuously. Additionally, you can specify the delay for how long your scene will pause for each color in your palette.
- Wheel: Will displays a moving gradient created from the palette colors. You can choose direction and loop. Additionally, you can specify how many colors from your palette are shown at once.
- Highlight: Works like random but highlights the first color in your palette. Background probability defines how often the first color should be used.
- Fade: Cycles through your palette colors. You can adapt loop and delay.
- Burst: Displays palette colors bursting from the center of your Aurora. You can adapt loop and delay.
That’s not helpful, where to start?
Here’s a little step-by-step, which helped us to create our own dynamic scenes, with ascending complexity.
1. Adapt color palettes

If you like some Nanoleaf or community dynamic scenes in general, but you don’t like some or all colors, create your own palette for this scene and adapt it until it’s yours.
2. Adapt existing motion options
If you like some Nanoleaf or community dynamic scenes, but you don’t like the speed or direction of the motion or some other motion options, play around until you like them and the scene is yours.
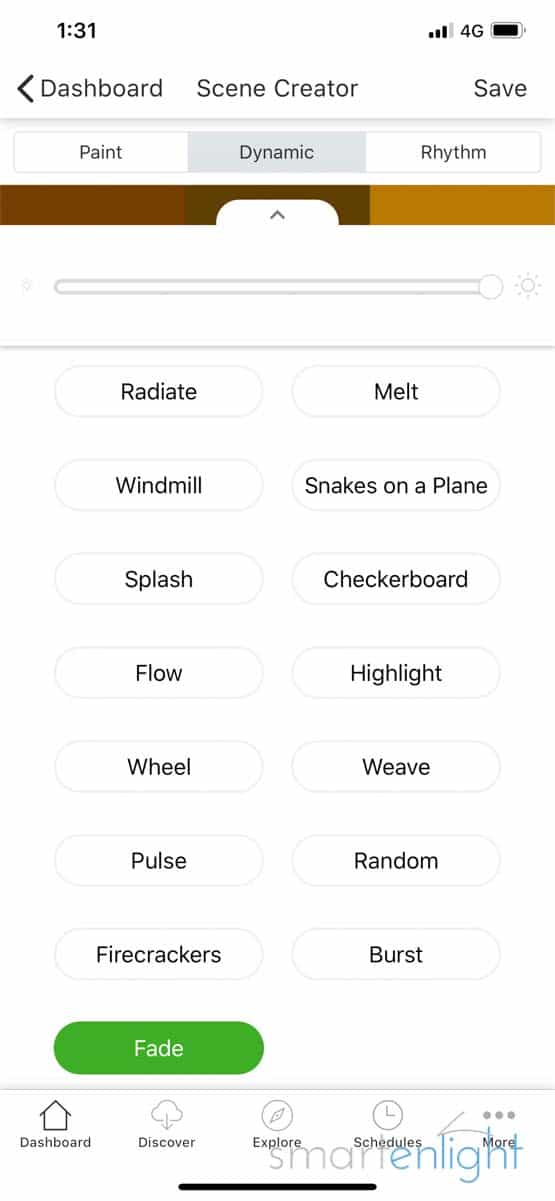
3. Download additional motions
No, it does not stop with the 6 preloaded motions, there’s more to download from the “Explore” section, just set the filter to “Motions” (or tap on “more motions” when creating a scene.
You will find the following 9 additional scenes/motions. All of them support the loop, speed and delay options (unless otherwise indicated):
- Checkerboard: a checkerboard, of triangles
- Radiate: radiates colors of your palette from different points of your design
- Firecrackers: lines of color, burst into filling your design
- Windmill: a windmill spinning across your design through your color palette
- Melt: fades softly through your palette with a blur effect
- Snakes on a plane: not sure what this is, but it looks fun (supports only the speed option)
- Weave: A weaving checkerboard across your design, from one end to the other (supports additionally the direction option)
- Pulse: a dreamy animation, pulsing like a heartbeat
- Splash: splashes of your colors, across your design (does not support the loop option)
Note, you might have to restart the Nanoleaf app, to display the downloaded motions when creating a new scene.
4. Play around, until you’re happy!
Designing your own scenes is a fun, iterative process. You will play with color palettes, tweak the options of a motion and maybe want to change it the next day.
Eventually, you will have your favorite color palettes defined and figured out your favorite motions and option settings. Blend those to your very personal, unique scenes.
5. Share your artwork with the community!
You don’t hide your masterpiece at home, share it with the Aurora community!
Swipe left on your favorite scene, tap the 3 vertical dots and “Upload to Discover”. You can rename your scene for the community, add a nice description (for Pros, it makes sense to add the motion your scene is based on) and mood and color tags.
What about Siri, Alexa, and Google?
We have already updated the assistant posts with new features:
- Siri and Nanoleaf Aurora: Setup and Voice Commands
- Alexa and Nanoleaf Aurora: Setup and Voice Commands
- Google Home and Nanoleaf Aurora: Setup and Voice Commands
For a comparison of all assistants with Nanoleaf Aurora, see: Assistant Showdown with Nanoleaf Aurora: Who will win, Siri, Alexa or Google?
For more details around Nanoleaf Rhythm, please see Nanoleaf Aurora and the Rhythm Module: Visualize Your Music
The post for the Nanoleaf Remote is here: Nanoleaf Remote Setup – The Shape of the Universe?
If you are interested in smart ideas for your smart lighting, check out:
- Natural Light with Smart Lighting
- The Many Ways of Controlling Smart Lighting
- Presence controlled Smart Lighting
- Sleeping Better with Smart Lighting
I want to know more!
Here are some online resources you might like:
Nanoleaf Troubleshooting Guides
- To make sure, your (networking) environment supports the Aurora, please see: Requirements needed to setup the Nanoleaf Leaf Panels
- The 4 states of Aurora’s LED indicator: What does the LED on the Controller mean?
- How to optimize your Aurora’s wireless range & network reception: Optimizing Light Panels (Network) Performance
- 4 reasons why your Aurora might appear unreachable: My Light Panels are Showing Up as Unreachable or Not Connected
- Soft and Hard Resetting your Aurora (e.g. for changing the network): How do I reset my Light Panels?
- If you have a enterprise grade router (also at home), you might need to whitelist Aurora: I’m setting up my Light Panels at school or work
- Direct connection to your Aurora (last resort, in case you cannot tweak enterprise grade routers): How do I enable hotspot mode?
- Your Aurora might appear unresponsive when updating the firmware: My firmware is not updating on my Light Panel controller
- I’ve changed my Wifi/router and my Light Panels are not connecting, you need to perform a Soft Reset!
- All my panels are lighting up only white – it’s normal during boot-up, but if this remains, you might need to contact Nanoleaf Support (link below).
- Submit a support request to Nanoleaf
Conclusion
Ok, here we go, we’ll let Dr. Bruce Banner speak:
“The Nanoleaf Aurora is a very special product. It will delight and challenge you on many levels and that’s why I love it. Though, you might want to track your heart rate, just like I do, to avoid turning into Hulk, when something does not work as expected or when you worry about your wall.”
“But unlike other smart lighting products, the Nanoleaf Aurora will inspire your creativity and uncover your self-expression, if you just let it. This is the closest encounter of a lighting product and art, I’ve seen up to now. You’ll only understand what personal smart lighting is if you try it.”
“Hey Siri, set Muks Relax.”
“Sorry, some of your devices are not responding”
“Siri …?”
*heart rate alarm beep*
