We are mainly composed of water. The air we exhale is completely saturated with water. But, do you know the humidity of the 2,641 gallons (10,000 liters) of indoor air that you inhale, per day?
It starts with a dry nose and throat. We notice scaly skin, itchy eyes or cracked lips. It can cause respiratory ailments such as asthma, sinusitis, bronchitis, and nosebleeds. It dries the mucus that usually traps infections, and we’re more likely to get a cold.
Dry air in our homes, we usually notice it when it’s too late. Fortunately, there are smart home devices that can help us to reach and maintain healthy humidity.
In this post, we will examine what causes dry air, and how humidifiers, especially Venta Airwashers can help us to avoid it. We are going to set up an automation that will control our humidifiers with smart plugs to maintain a healthy humidity level throughout our home. Finally, we’re going to explore how we can control our humidifiers using Alexa, Google, and Siri.
Estimated reading time: 22 minutes
Table of contents
- What causes dry indoor air?
- What is Healthy Humidity?
- What is a Humidifier?
- Who is Venta?
- What is special about Venta Airwashers?
- Venta Airwasher Models
- What is a Smart Plug?
- Healthy Humidity Automation with IFTTT
- Controlling your Humidifier with Alexa
- Controlling your Humidifier with Google
- Control your Humidifier with Siri
- Conclusion
What causes dry indoor air?
Dry air means low humidity. Humidity is the amount of water vapor held in the air and it varies greatly depending on the temperature. That’s why we usually talk about relative humidity, which takes temperature into account.
Note, while absolute humidity describes the water content of air in grams per cubic meter, relative humidity (RH) tells us the percentage of the current absolute humidity in relation to the maximum humidity possible with the current temperature.
Dry air comes with cold weather. Cold outdoor air can hold less water vapor than the warm air indoors. After ventilating our homes, as we heat the fresh air, it can absorb more water vapor. Relative humidity drops, and we’ve created a dry indoor climate, that can cause the nasty symptoms listed above.
Ventilating our homes is important, especially nowadays, and a humidifier can help us to bring low humidity back to a healthy level.
Humidity has also an effect on the spread of virus-like particles indoors. Recent research showed that a humidity level of lower than 30% resulted in more than double the amount of aerosolized particles compared to humidity levels of 60% or higher. Researchers suggest that using humidifiers may help to limit infections during times when window ventilation is not possible.
What is Healthy Humidity?
To measure indoor humidity, we need a hygrometer. Recommended healthy humidity ranges from 30-60%, depending on who you ask (30-50% Mayo Clinic, 30-60% Oxford, 30-55% Health Canada, etc.).
Dr Stephanie Taylor, infection control consultant at Harvard Medical School, over summer launched a petition to the WHO, which has been signed by thousands of people. The petition calls for “regulations on indoor air quality to include a humidity level of 40-60% relative humidity”.
“We … have set some guidance on ideal relative humidity of between 50 and 60%“, answered Dr Maria van Kerkhove, an epidemiologist leading the WHO’s Covid response.
With all of this information, we might want to reach 60% humidity and maybe more, but it turns out that relative humidity above 60% is harmful to yourself and your home.
Our favorite smart hygrometer, the Netatmo Weather Station:
High humidity supports the growth of fungi and mold, as well as an increased number of dust mites. It can rot your wooden furniture and ruin your books and instruments. If you’re struggling with high humidity you might need a dehumidifier.
As with all things relative and individual, our ideal relative humidity is currently between 54 and 56%, but it’s likely that you will find other levels more comfortable for you and your family.
What is a Humidifier?
A humidifier is a device that increases humidity in a room or an entire building. Point-of-use humidifiers moisturize a single room, while central humidifiers connect to a home’s HVAC system to humidify the whole house.
Different types of humidifiers take different approaches to bring water vapor into air:
- Steam Vaporizers use electricity to create steam that cools down into a warm mist before leaving the machine. Note, doctors warn against using these if you have kids because of the risk of burns.
- Impeller humidifiers produce a cool mist with a rotating disk.
- Ultrasonic humidifiers produce a cool mist with super-fast vibrations.
- Evaporative humidifiers, like the Venta Airwashers, use a fan to blow air through a wet wick or filter. They are simple and safe because they’re less likely to release bacteria and minerals into the air, but only if you regularly clean them and change the filters.
Who is Venta?
“People should always be able to breathe fresh air, even indoors.” In 1981, Venta’s founder Fred Hitzler invented the Airwasher. He recognized that indoor air is often too dry and contaminated with harmful substances. His solution was the principle of trapping air impurities in water and simultaneously humidifying the air. The Venta “Airwasher” was born.
Venta is “Made in Germany”, with the head office in Weingarten and subsidiaries in the U.S., Switzerland, Netherlands, and Austria.
What is special about Venta Airwashers?
The first thing you will notice: Venta Airwashers are expensive. When you evaluate the high up-front cost, keep in mind that they are very energy efficient and draw just a fraction the wattage of other humidifiers (3-8 watts).
Traditional humidifiers continuously pump moisture into the air, which can cause over-humidification. Constant humidity levels above 60% can become a home for mold and bacteria. Venta humidifiers utilize natural cold evaporation which ensures that the air only takes the moisture it needs.
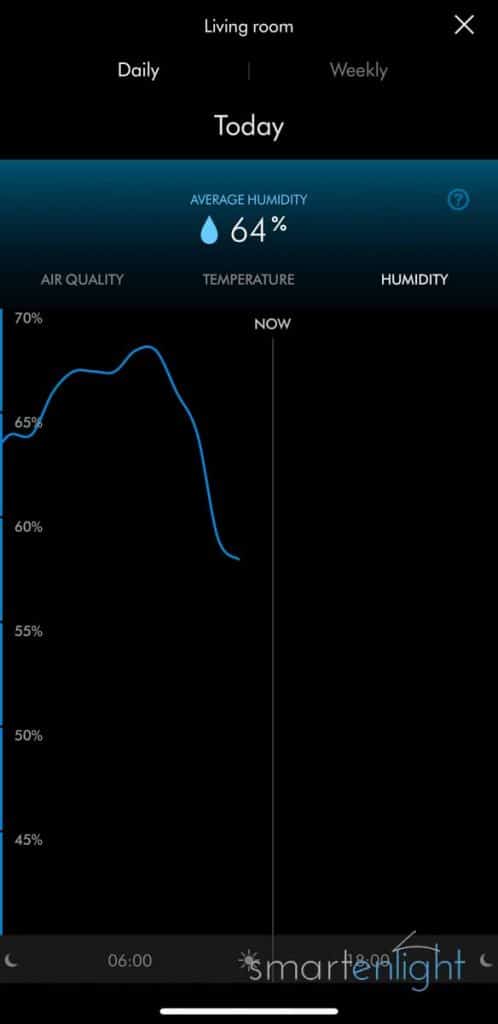
Please note, when running a Venta LW45 on the highest level, we could measure short periods with humidity above 65% (that’s why we’ve created our IFTTT humidity automation below, and Venta their Comfort Plus model).
Dirty vaporizers and ultrasonic humidifiers can be breeding grounds for mold and bacteria. Venta Airwashers pull dry, dirty air into the unit where it then passes over rotating, moistured disc stacks. Airborne particles stick to the discs, eventually falling into the water where they remain. Only moisturized air exits the unit, while particles such as bacteria, dust, and pollen do not evaporate.
Venta Airwashers don’t need a filter, as regular tap water is the filter. They require less-frequent cleaning and refilling:
- The first time you fill the water tray, you need to add the “Venta Hygiene Additive” and regularly top up the water tray with fresh water. The additive does not evaporate. It prevents odors and mineral deposits, and increases the efficiency of the Disc Stack.
Pro-Tip: Use a watering can to top up the water in your Venta Airwasher. Especially the larger models are quite heavy when full.
2. Every two weeks, rinse the unit, change the water, and add new hygiene additive (35 ounces for around 5 months of use).
3. Every six months, the “Venta Cleaner” liquid should be used for a thorough cleaning (one cleaning).
Aromatherapy: Venta has developed six different mood-enhancing “Venta fragrance oils”, which can be used in the 4 and 5 Series Airwashers:
- Citrus Garden (blend of citrus oils)
- Refreshing Fragrance (blend of orange scents)
- Relaxing Fragrance (cinnamon, grapefruit and carnation)
- Vanilla Fragrance (our favorite)
- Winter Dream Fragrance (cinnamon and citrus)
Venta Airwasher Models
We started over a decade ago with an Original LW45 in our living room. It lasted for many years, but once, after cleaning, fell into the bathtub and started to leak due to a hairline crack. We replaced the Original LW45 four years ago and added an Original LW15 in our bedroom. Both are automated through the IFTTT automation below, and can also be automated with Alexa and Google Routines, and Siri HomeKit and Shortcuts.
Please tilt your smartphone for a better table overview.
| Original LW15 | Original LW25 | Original LW45 | Comfort Plus LW25 | Comfort Plus LW45 | |
|---|---|---|---|---|---|
| Hygrometer | No | No | No | Yes | Yes |
| Coverage | 270 ft² / 25 m² | 430 ft² / 40 m² | 600 ft² / 55 m² | 485 ft² / 45 m² | 645 ft² / 60 m² |
| Water Capacity | 1.3 gallons / 5 liters | 1.8 gallons / 7 liters | 2.6 gallons / 10 liters | 1.8 gallons / 7 liters | 2.6 gallons / 10 liters |
| Power Levels | 2 | 3 | 3 | 3 + Auto | 3 + Auto |
| Sound levels | 22 / 32 dBA | 24 / 34 / 44 dBA | 24 / 35 / 45 dBA | 24 / 34 / 44 dBA | 24 / 35 / 45 dBA |
| Energy usage | 3 / 4 watts | 3 / 5 / 8 watts | 3 / 5 / 8 watts | 3 / 5 / 8 watts | 3 / 5 / 8 watts |
| View on Amazon.com | 🛒 | 🛒 | 🛒 | 🛒 | 🛒 |
| View on Amazon.co.uk | 🛒 | 🛒 | 🛒 | 🛒 | 🛒 |
Venta Series 5
If you’re new to Venta Airwashers you should first refer to the table above to see if the coverage fits your room-size (e.g. “Original LW25” covers up to “430 ft² / 40 m²”).
You then need to decide if you’re happy with an Original model or prefer the slightly pricier Comfort Plus, which additionally supports a sleep mode to dim the LCD display and switch to the lowest level. It also provides an auto-mode to turn off if the humidity rises above a preset level. This is similar to what our free IFTTT automation below does, so you can skip this part if you have a Comfort Plus model.
To control Venta Airwashers with voice or through Alexa and Google Routines, and Siri HomeKit and Shortcuts, we’ll need a smart plug.
Venta Series 6
If you need to humidify much larger rooms have a look at the Venta Series 6 Air-washers and air purifiers. They feature a touchscreen, WiFi connectivity and remote control access through an app (View on Amazon.com).
Venta air washers come in white-grey or anthracite metallic.
What is a Smart Plug?
Smart plugs help us to smarten up our not so smart devices. We just need to plug them into an outlet, and add a lamp, fan, coffee maker, kettle, slow cooker, Christmas tree lights, or in this case a humidifier. Some smart plugs can measure device usage and some even the energy consumption of the devices plugged in.
Please note, smart plugs work with devices that keep their power switch on when you unplug and plug them back in. Some devices (e.g. our toaster) automatically switch the power button off when we unplug them. We can’t control such devices with a smart plug.
Smart plugs usually connect through Wi-Fi to the manufacturers cloud service. You need to download an app from the manufacturer of your choice and create an account, which we will then use to link IFTTT, Alexa and Google.
When searching for a smart plug, look for plugs, that are compatible to IFTTT and the voice assistant(s) of your choice. There are many “cheap” smart plugs brands on the market. Keep in mind that most smart plugs rely on a reliable cloud service and require regular updates. Pick a brand you trust, and avoid no-names.
We are currently using Belkin WeMo, Eve Energy (which can monitor consumption) and Amazon smart plugs, mainly because those were the first supporting voice assistant integrations. But there are now also good smart plugs by Wyze and Kasa TP-Link.
Healthy Humidity Automation with IFTTT
For our healthy humidity automation we will need (per room):
- A free IFTTT account
- A smart hygrometer that works with IFTTT
- A smart plug that works with IFTTT
- A humidifier that works with a smart plug
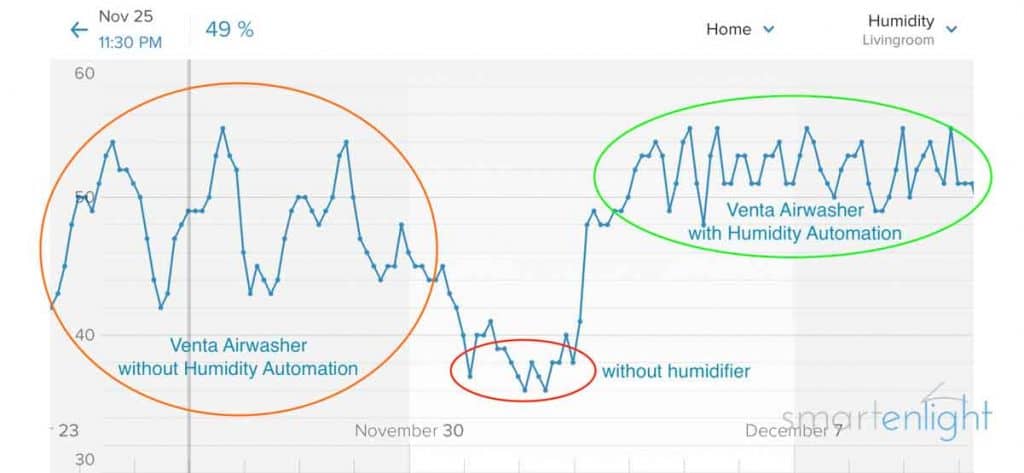
IFTTT, short for “If This Then That”, provides a free web-service to connect different services with simple conditions, through so called “applets”. IFTTT supports up to three simple applets for free, per account. We will only need two applets per room:
- If humidity drops below 55%, then turn our Venta Airwasher on.
- If humidity raises above 55%, then turn our Venta Airwasher off.
Our smart hygrometer is the Netatmo Weatherstation, but you can use any hygrometer that supports IFTTT.
We use a WeMo Smart Plug for this example, but you can use any smart plug that works with IFTTT.
We will use our Venta Airwashers as humidifiers, but you can use any humidifier that works with a smart plug.
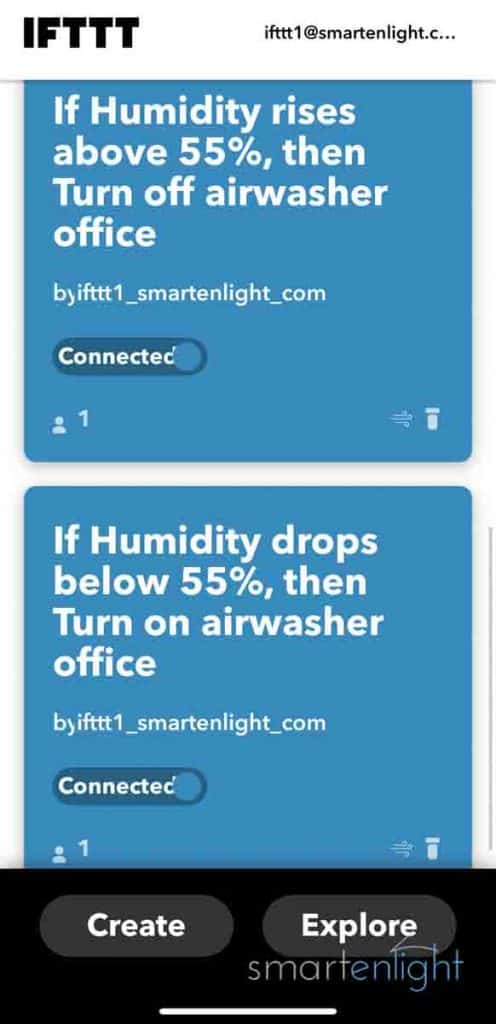
- Open the IFTTT website and download the iOS or the Android app, if you prefer to configure it on your smartphone/tablet, or register on the website if you want to use your desktop browser.
- Once you have created your free IFTTT account, on your preferred platform, you need to link the hygrometer service:
- Tap on “Explore” and search for “Netatmo” (or your IFTTT compatible hygrometer)
- Select the “Netatmo Weather Station” service (or your IFTTT compatible hygrometer)
- Tap on “Connect”
- Log into your hygrometer service
- Accept, that IFTTT can access your hygrometer(s)
- Now we need to link a IFTTT compatible smart plug:
- Tap on “Explore” and search for “WeMo” (or your IFTTT compatible smart plug)
- Select the “WeMo Smart Plug” service (or your IFTTT compatible smart plug)
- Tap on “Connect”
- Log into your smart plug service
- Allow, that IFTTT can access your smart plug(s)
- We can now create our first applet: if the humidity drops below 55% then turn our humidifier on:
- Tap on “Create” and then on the “If this”
- Search for your hygrometer service (Netatmo Weather Station in our case)
- Scroll down and tap on “Humidity drops below”
- Select which Netatmo station (the room, if you’re using multiple indoor sensors)
- Set your target humidity percentage (55 in our case).
- Tap on “Create Trigger”
- Tap on “Then that”
- Search for your smart plug service (WeMo Smart Plug in our case)
- Tap on “Turn on”
- Select the smart plug which controls your humidifier.
- Tap on “Create Action”
- We’re ready, tap on “Continue” and then on “Finish”
- Similar to our first applet we will create our second applet. But this time if the humidity raises above 55%, we will turn our humidifier off:
- Tap on “Create” and then on the “If this”
- Search for your hygrometer service (Netatmo Weather Station in our case)
- Tap on “Humidity rises above”
- Select which Netatmo station (the room, if you’re using multiple indoor sensors)
- Set your target humidity percentage (55 in our case).
- Tap on “Create trigger”
- Tap on “Then that”
- Search for your smart plug service (WeMo Smart Plug in our case)
- Tap on “Turn off”
- Select the smart plug which controls your humidifier.
- Tap on create action
- We’re ready, tap on “Continue” and then on “Finish”
- Make sure that your humidifier is on.
- Check your current humidity and turn your smart plug either on (if below 55%) or off (if above 55%).
Congratulations! You have just automated your humidifier to automatically stay at a healthy humidity level. Repeat the process for every room and humidifier in your home.
Please note, this automation will keep humidity between 54-56%, which seems to work fine with our way to ventilate the home, your milage may vary.
Controlling your Humidifier with Alexa
Adding our smart plug in the Alexa app, does not only allow us to control it with our voice. We can group it with other smart devices to control all of them with one voice command. And, we can control the smart plug as one of many actions in an Alexa Routine.
Connect your Smart Plug in the Alexa App
To link your Alexa compatible smart plug in the Alexa app:
- Open the Alexa app, and tap on Devices (at the bottom)
- Scroll all the way down and tap on “Your Smart Home Skills”
- Select “Enable Smart Home Skills”
- Tap on the Search button 🔍 (top right) and search for the brand of your smart plug (e.g. “WeMo”) and tap on it. Note, if you can’t find the brand, your smart plug most likely doesn’t support Alexa.
- Select on “Enable to use” and enter your smart plug login information
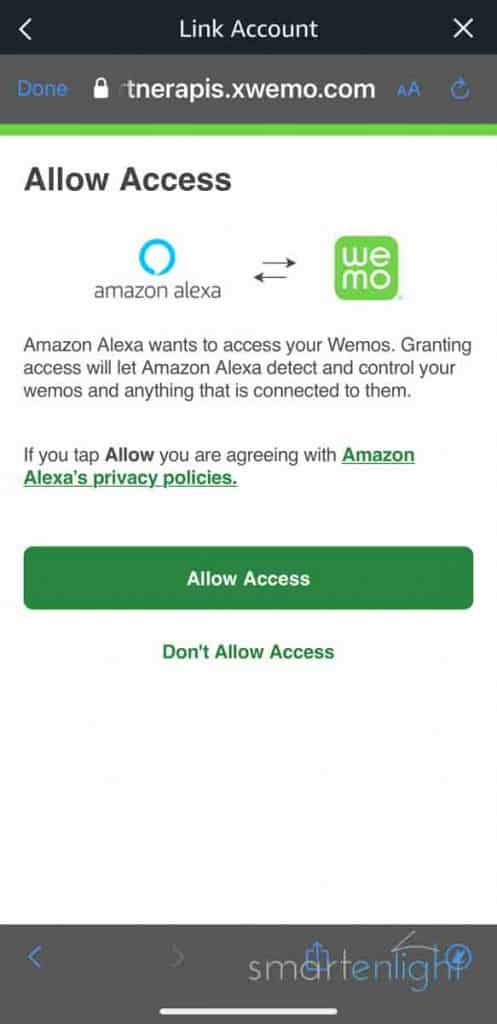
- Tap on “Allow access” to let Alexa control your WeMos.
- Select “Close” and “Discover Devices” and wait a moment
- You will find your smart plug under “Plugs” on the “Devices” page
Please note, next time when you add a smart plug from the same brand, you just need to say “Alexa, discover devices”.
Customize your Smart Plug in the Alexa App
To change the name and type of your smart plug in the Alexa app:
- Open the Alexa app, and tap on Devices (at the bottom)
- Tap on “Plugs” at the top of the devices screen (note, you can swipe left if you have many smart home categories of devices)
- Tap on the smart plug you’d like to customize
- Tap on the Settings icon ⚙️ (top right)
- You can edit the name of the plug which you can use in voice commands, e.g. “office airwasher”
- (You can change the “type” in case you are controlling a lamp to “light” to enable Alexa’s light voice commands.)
Another way to customize smart plugs in the Alexa app is to group them into an Alexa smart home group. Groups can represent a group of devices, a room, or larger areas:
- Go to the devices (bottom right) screen in your Alexa app.
- If you’ve already created a group, select it and click “Edit” at the top right, otherwise click on the “+” at the top right and
- select “Add Group”
- Name the group (e.g. “Office”)
- tap the “Next” button
- Select all the devices which should be part of this group, this includes
- Your Amazon Echo Device (it must not be part of any other group)
- Your smart lights
- Any smart plugs
- Any other smart home devices
Alexa Voice Commands for your Smart Plug
There are not too many voice commands for a smart plug:
- Alexa, turn <smart plug name> on/off
Pro-Tip: There are some synonyms we can use instead of “turn”:
Alexa, activate / switch / change / make / set <smart plug name> (on/off)
If you’ve assigned your smart plug to an Alexa group, it will be controlled with all smart devices in the group:
- Alexa, turn on office
- Alexa, turn off downstairs
If you’ve set your smart plug type to “light”, and grouped it into a room together with an Echo, it will be controlled together with your smart lights (e.g. Philips Hue):
- Alexa, lights
- Alexa, turn the lights on
- Alexa, lights off
For more Alexa smart light voice commands, please see our post: Alexa and Philips Hue: Setup, Voice Commands and New Tips and Tricks!
Alexa Routines for your Smart Plug
Alexa Routines are as easy as: When ‘something’ happens, Alexa will perform one or more ‘actions’. One of these actions can be to control our smart plug. This way, we can integrate our humidifier into our morning or goodnight routines along with many other actions.
Here’s Alexa, explaining her routines and creating one. You can find more routine examples in our post: Alexa Routines: How to Automate your Life with your Amazon Echo.
To integrate our smart plug into an Alexa Routine, we just need to:
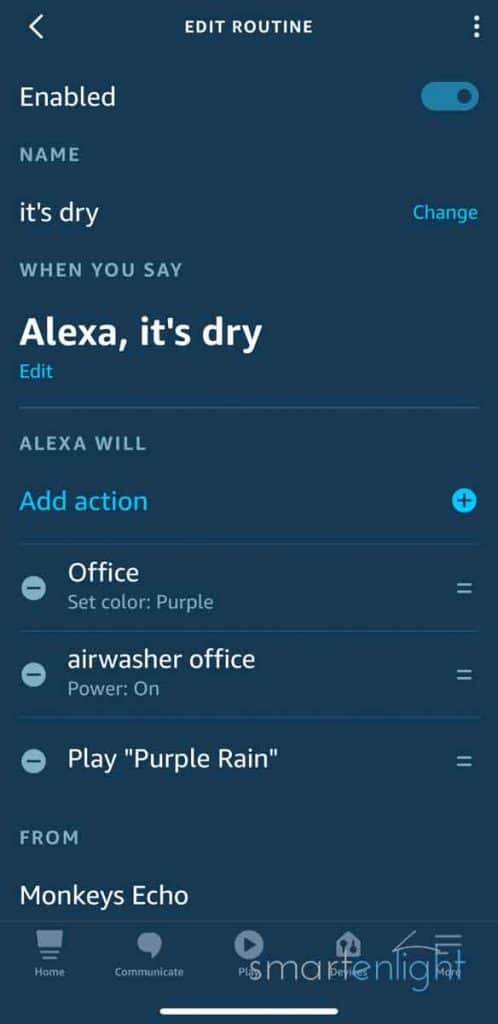
- Tap “Add Action” within a routine
- Tap “All Devices” and select the smart plug
- Select ‘Power’ and switch it to ‘on’ or ‘off’
- Tap ‘Next’
You can add as many smart home actions as you like, along with music or any of the 23 available actions.
Controlling your Humidifier with Google
When we link our smart plug in the Google Home app, we can control our humidifier with voice commands and through Google Routines.
Connecting your Smart Plug in the Google Home App
To link your smart plug in the Google Home app:
- Open the Google Home app, and tap on ‘+’ (at the top left)
- Select “Set up device”
- Tap on “Works with Google”
- Tap on the Search button 🔍 (top right) and search for the brand of your smart plug (e.g. “WeMo”). Note, if you can’t find the brand, your smart plug most likely doesn’t support Google Assistant.
- Enter your smart plug login information
- Tap on “Allow access” to let Google control your e.g. WeMos.
- Google will search for your smart plugs and display a choose device screen to customise your plugs
- Tap on the smart plug you’d like to customize and select the home, tap ‘Next’
- Select the room and tap ‘Next’
- You will find your smart plug in the room you’ve selected in the Google Home app
Please note, when you later add a smart plug from the same brand, you just need to say “Hey Google, sync my devices”.
Customize your Smart Plug in the Google Home App
To change the name and type of your smart plug in the Google Home app:
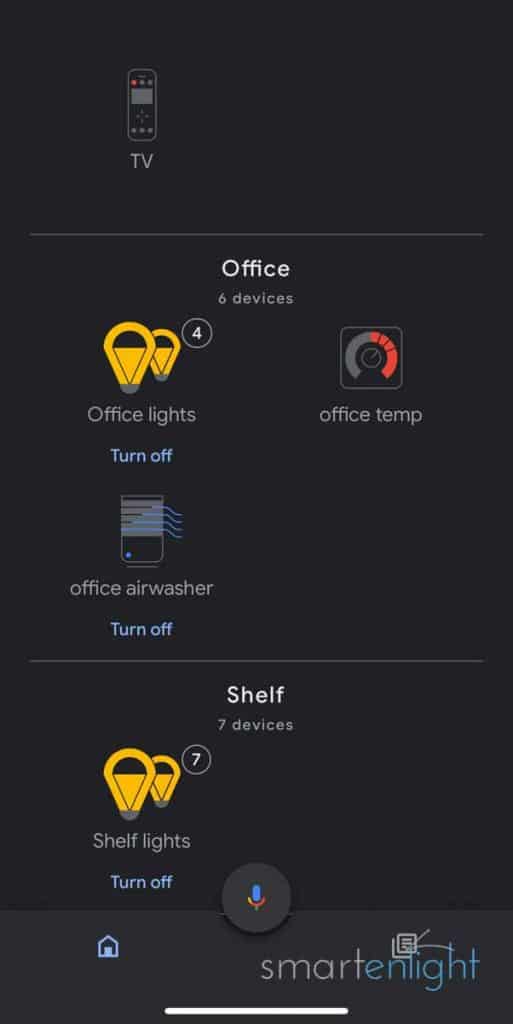
- Open the Google Home app, and scroll to the room the device is assigned to
- Tap on the smart plug you’d like to customize
- Tap on the Settings icon ⚙️ (top right)
- You can edit the name of the plug which will be used in the voice commands. Note, if you’re using “air washer” make sure to have a blank in there.
- You can change the “Device Type” and select “Humidifier”
- You will find your smart plug with a humidifier symbol in the Google Home app
Google Voice Commands for your Smart Plug
There are not too many voice commands for a smart plug:
- Hey Google, turn <smart plug name> on/off
Pro-Tip: There are some commands we can use instead of “turn”:
OK Google, switch / change / make / set / activate / deactivate <smart plug name> (on/off)
If you’ve assigned your smart plug to a room, it will be controlled with all smart devices in the group:
- Hey Google, turn on office
If you’ve set your smart plug type to “light”, and grouped it into a room together with an Google Nest device, it will be controlled together with your smart lights (e.g. Philips Hue) in this room:
- Ok Google, lights (on)
- Hey Google, let there be light!
- Hey Google, lights off
For more Google smart light voice commands, see our post: Google and Philips Hue – Setup and Voice Commands.
Google Routines for your Smart Plug
Google Routines are as easy as: When we say ‘something’ (or at a certain time), Google will perform one or more ‘actions’. One of these actions can be to control our smart plug. This way, we can integrate our humidifier into our morning or goodnight routines along with many other actions.
Here’s Google, explaining his routines and creating one. More examples are listed in our post: Google Routines: How to Automate your Life with Google Assistant.
To integrate our smart plug into a Google Routine, we just need to:
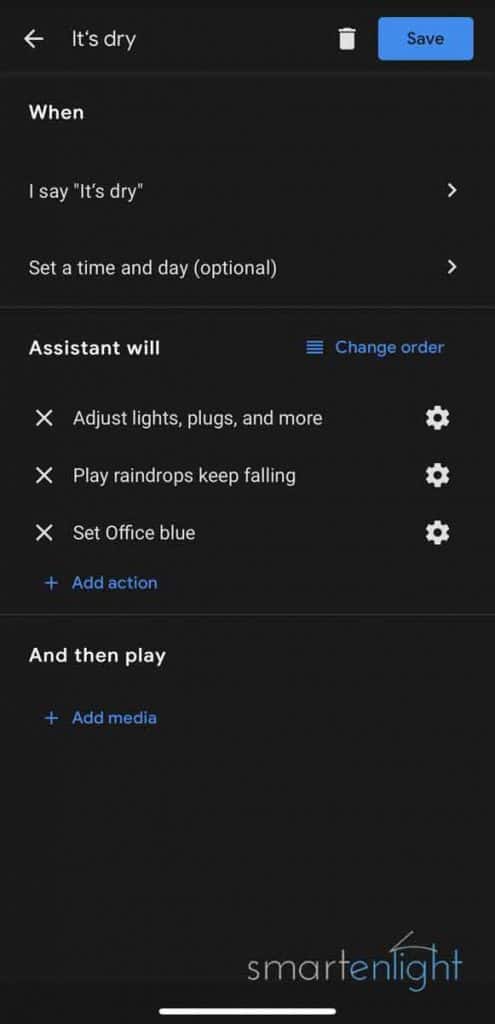
- Tap “Add Action” within a routine
- Select “Browse popular actions”
- Tap on the settings icon ⚙️ next to “Adjust lights, plugs, and more”
- Scroll to your smart plug and select “Turn on” or “Turn off”
- Tap ‘Add’ at the top right
You can add as many actions as you like, by entering the voice command or picking any of the 27 available popular actions.
Control your Humidifier with Siri
To speech enable our humidifier with Siri, we need a HomeKit compatible smart plug. When we add a HomeKit accessory in Apple’s Home app, we can control it with voice through Siri on all our Apple devices, and through HomeKit Scenes and Automations, as well as Siri Shortcuts.
Add your HomeKit Smart Plug in the Apple Home App
To add your HomeKit smart plug in the Apple Home app:
- Open the Home app, and tap on ‘+’ (at the top right)
- Scan the HomeKit setup code on the device and wait for your phone to find the smart plug
- Select the device found by your iPhone and wait until your smart plug connects to your HomeKit hub
- Name your smart plug, pick your HomeKit room and tap ‘Continue’
- You will find your smart plug as Favorite on the Home screen and in the Room screen you’ve assigned it to
Customize your Smart Plug in the Apple Home App
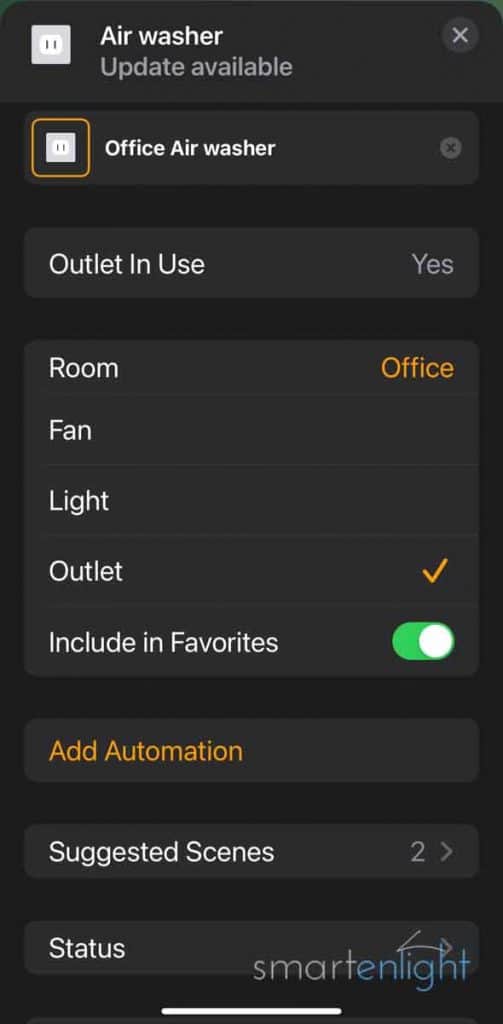
We can change the name and type of the smart plug in Apple’s Home app:
- Open the Home app, and press and hold the outlet you’d like to configure
- Tap on the ‘Settings’ icon ⚙️ (bottom right)
- You can edit the name of the plug here, change its room, and set the type to e.g. ‘Fan’ for an animated icon in the Home app.
- If you don’t want to show the humidifier in your Home dashboard favorites, uncheck “Include in Favorites”
Siri Voice Commands for your Smart Plug
Voice commands for a smart plug are naturally limited:
- Hey Siri, turn <smart plug name> on/off
Pro-Tip: There are some commands we can use instead of “turn”:
Hey Siri, switch / change / make / set / activate / deactivate (<smart plug name> (on/off)
The smart plug can also be controlled with all smart devices in the room:
- Hey Siri, turn on office
If you’ve set your smart plug type to “light”, and grouped it into a room together with a HomePod, it will be controlled together with your smart lights (e.g. Philips Hue) in this room:
- Hey Siri, lights (on/off)
- Hey Siri, turn off upstairs
For more Siri smart light voice commands, please see our post: Siri and Philips Hue: HomeKit Setup, Voice Commands and Siri Shortcuts.
Siri HomeKit Automations and Scenes for your Smart Plug
Here’s a quick overview of the Shortcuts and the Home app, explained by Siri (one minute snippet from our Siri’s HomeKit Scenes and Shortcuts: Immersive Storytelling How-To cartoon). More HomeKit scenes and Siri Shortcut examples are in our post: iOS 14 – A Siri, HomeKit, Home App and Shortcuts Overview.
To create a HomeKit scene controlling our humidifier:
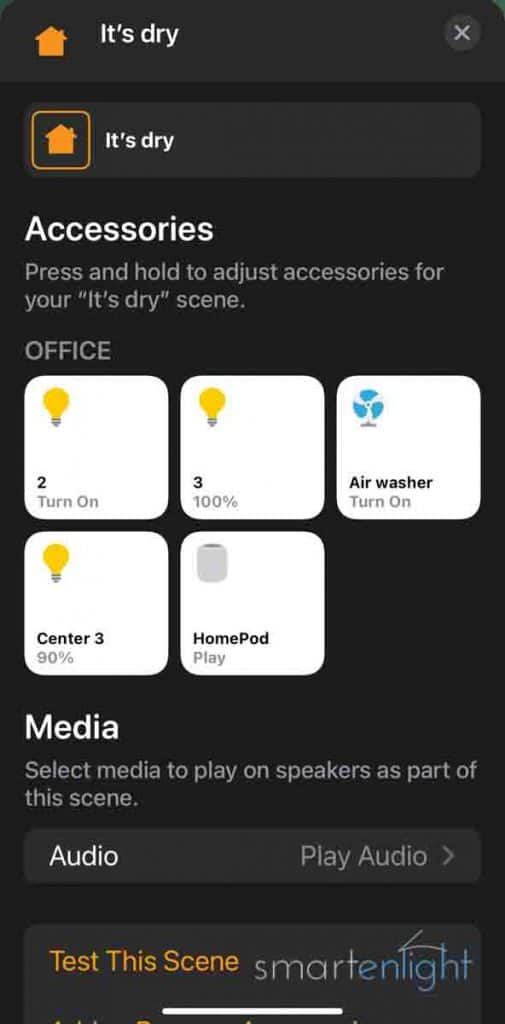
- Open your Home app and tap on the ‘+’ (top right)
- Select “Add Scene” and tap on “Custom”
- Name your scene, e.g. “it’s dry”
- Tap on “Add Accessories” and scroll to the room where your smart plug is located
- Select your smart plug, smart lights, and HomePod
- Customize your accessories by press and hold and set them to the desired state (humidifier on, light brightness and color).
- To play music with the scene, tap on ‘Audio’, “Choose Audio” and pick a song, e.g. “It’s raining again”.
- Tap ‘Done’ at the top right.
- “Hey Siri, it’s dry!”
Conclusion
As we use Venta humidifiers now for over a decade, and rarely suffer from dry indoor air, we almost forgot to share our automation with you. Dry air at home can be problem, especially during cold weather. You can easily fix it with a humidifier.
If you already have a humidifier and it works with a smart plug, we hope you’ll try the free IFTTT automation to keep the humidity automatically at a healthy level. And, if you own a smart plug that works with Alexa, Google and Siri, we hope you found some inspiration how to control not only your humidifier, but any not so smart device. With voice, through routines, scenes and shortcuts.
Happy Healthy Humidity!
P.S. If you’re interested in purifying the air in your home, have a look at our post: Breathe! Dyson Pure Cool with Siri, Alexa and Google. We mostly use our humidifier in combination with a purifier.
P.P.S. you can find more posts here:


Useful and great content! came to know a lot.
Thank you Samuel!