

In this post, we will shed some light on the basic principles of smart lighting and the Philips Hue product family and generations. We will look into efficiently setting up – just a couple and also many – lights with the Philips Hue app and prepare a setup which we can easily integrate with our voice assistants: Siri, Alexa, and Google.
Philips Hue is a personal wireless lighting system, which you can control and automate from your smartphone, through smart accessories and smart assistants like Siri, Alexa, and Google.
There are many smart lighting vendors: Osram with Lightify, LIFX, Hive, Nanoleaf and lately IKEA with TRÅDFRI, just to name a few. Philips is the world leader in lighting for over 125 years and a pioneer in smart lighting, who has developed a broad product range and thriving third-party app ecosystem throughout the years.
For a general introduction to smart lighting, please see Introduction to Smart Lighting: A Very Brief History of Light.
Who is Philips and who is Signify?
Royal Philips is headquartered in the Netherlands and was founded 1891 by Gerard Philips and no, he did not invent the Phillips screwdriver. Today, Philips is one of the largest electronic companies in the world focussing on healthcare, electronics, and lighting.
Already back in 2008 Philips demonstrated the future of lighting with the LivingColors LED lamps mood lights, before stepping 2012 into the smart lighting era.
In 2016, Philips Lighting spun off from Philips, becoming a separate company. In May 2018, Philips Lighting changed its name into Signify, but it continues to use the Philips brand.
The name Signify originates “from the fact that light becomes an intelligent language, which connects and conveys meaning”. “We are driven by the principle that light is essential,” Signify CEO Eric Rondolat states. “And by connecting it to networks, software, and cloud computing, we open the door to a smarter world where light delivers value beyond illumination.”
If you are interested in the vision and mission of Signify, you can find a link to an interview with Eric Rondolat at the end of this post.
What is Smart Lighting?
Smart lighting is not only about energy efficiency. We consume a lot of energy for our lighting and by using optimized LEDs, which are programmable and controllable through sensors, we can not only streamline and minimize our energy consumption but also increase comfort and convenience.
Looking back at 6 years of expanding our Philips Hue setup throughout our smart home, there appear some basic principles. If I would have known them from the beginning, they could have saved me time and nerves. Let me share these insights with you, as it might help you to get the most out of your Philips Hue lights.
Our Smart Lighting Journey
If you’re completely new to smart lighting, you might think of smart lights as gadgets, which are “smart”, because you can control them with an app. You put them into your existing light fixtures and keep controlling them with your existing light switches.
No. Sorry, that’s not the idea.
1. Forget about your existing light switches
They need to stay on, always! It’s going to take a while, as you and your family use your light switches automatically. It helps initially to stick post-its on them or use some adhesive tape to have them always on. Better looking options are a case on top of your existing switches, or to rewire them. You could also replace them with smart switches or get rid of them altogether.
The reason why this is important is that although you and your family will adapt to leave your existing light switches alone, your guests won’t. And once the power is off, your smart lights can’t respond.
Still, to make our life easier, also after a power outage, the Philips Hue app lets us configure the power-on behavior for our lights:
- the Philips Hue default, which is Warm White in full brightness,
- the last used color and brightness, or
- a custom color and brightness.
You might worry now, that you’ll need your smartphone for simple actions like turning your lights on and off. You won’t, as there are many other options, but let us first examine the second principle of smart lighting that I had to learn:
2. Think in Scenes
It’s not only about switching your smart lights on and off. You can now set the brightness and dependent on which Philips Hue bulbs you choose, also the color temperature and color. You can customize each individual light in a room and save all the settings of a room into a scene.
Scenes are not only colorful mood or party scenes. The Philips Hue app contains clinically proven light scenes, which energize you in the morning, help you to concentrate when you work, provide the best lighting when you read and help you to relax in the evening.
Realizing, that so many scenes need to be controlled by other means than a simple on/off switch, I encountered the third principle of smart lighting:
3. Control & Automate
This is where the actual power of smart lighting is hidden. There are now many ways to control your smart lights and you need to figure out what fits best for you and your family.
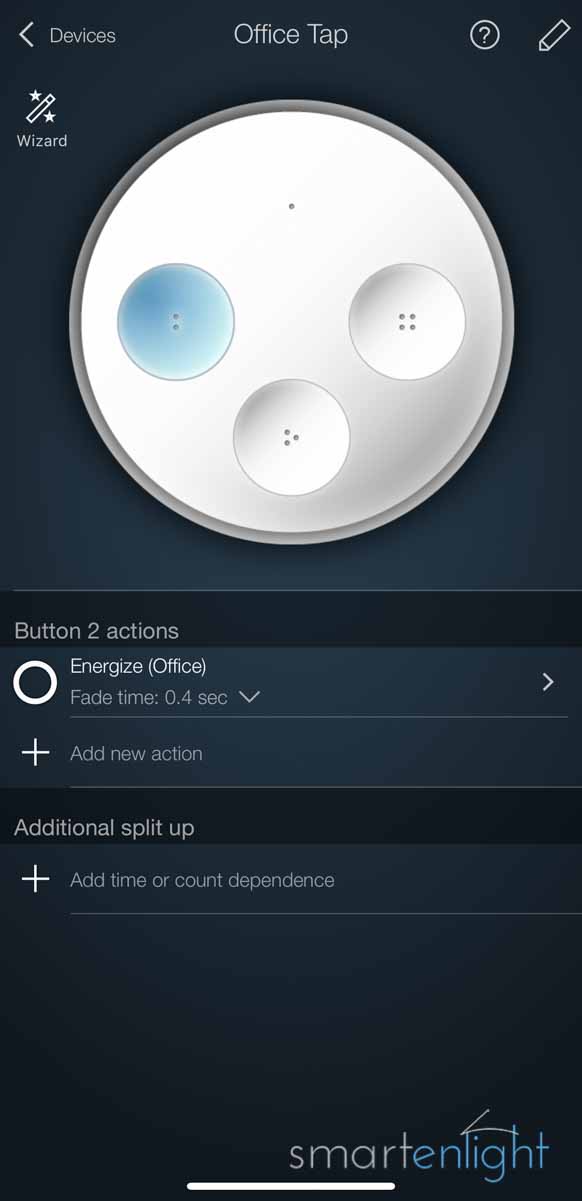
The Philips Hue Tap and Dimmer
From initially fumbling around with your smartphone, which wears off fairly quickly, you might realize that a smart switch is very powerful. It can be programmed to do smart things, like activating different scenes, dependent on how many times or how long you press the buttons. It can also activate different scenes at different times of the day.
In our case we rarely use them, still, it’s good to know that they are there, as fallback.
Note, you can use any HomeKit remote to control your Philips Hue lights, like the Nanoleaf Remote – The Shape of the Universe?
The Philips Hue Motion Sensor
A smart motion sensor can do the same, activating different scenes in the morning or during the night, as soon as it registers movement. And there’s a nice side-effect: nobody will search for a switch.
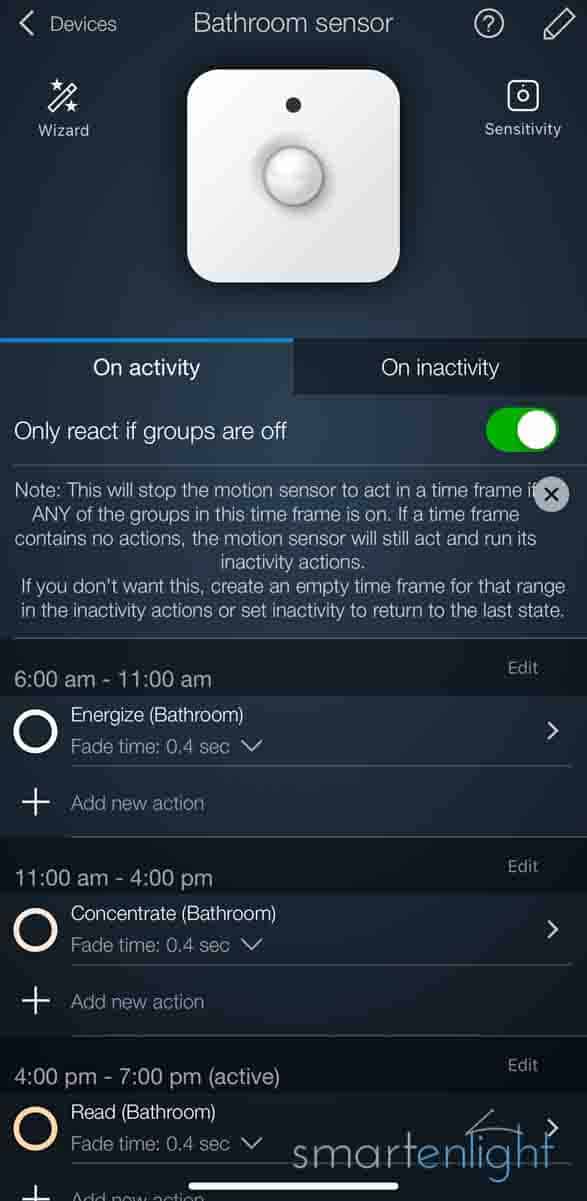
Motion sensors work best in areas you walk through, at the entrance, corridors, and stairs but with a longer timer also in bathrooms and restrooms. We also use them to light up our kitchen worktops, independent of the other kitchen lights. If you are single you could also try them in your bedroom.
Scheduled Scenes
You can also program your smart lights, automate them to set specific scenes at specific times of the day. Of course, only when someone is at home.
You can even program natural effects like gradually brightening your lights for a “sunrise” effect in the morning, which gives you an extra energy kick. Or you can program them to gradually dim your lights for a “sunset” effect, which makes you sleepy and prepares you for bed.
Note, this feature is so essential, that Google and Philips Hue recently released them as specific voice commands in Google Home. And, Alexa recently also added wake-up lighting and a sleep lighting timer along with Light Dimming / Brightening Routines.
Voice Control
And last but definitely not least, you might notice, that using your voice to control the many scenes is – as crazy as it sounds – by far the most efficient option. No need to walk to a switch or search for a remote. No need to memorize how many times to press the switch, just say “set living room relax” and it’s set.
Please note, voice is for many tasks, which have many options the most efficient interface. Think of just having to say one simple voice command to access your favorite song in a multi-million songs music library.
Our Automated Setup
Throughout this transformational journey, we fully automated our smart lights for many different use-cases. We only sporadically use a smart switch or remote as everything is happening automagically. And for the rare case, that we want a different scene, we just say it.
The Downside
There appears to be a downside. We feel a little bit lost when visiting family and friends without smart lights when running into dark rooms. It also feels strange when staying at hotels during our vacations. This is because we always have to relearn the ancient need for light switches and remote controls.
4. Be Creative & Have Fun
The last and most important principle of smart lighting I’ve learned is: the journey is never over. Sure, we can synchronize our smart lights to music and even the movie we are watching for an immersive experience. But it does not stop with entertainment, there are many use-cases where smart lighting can support us.
Here is some inspiration from the Philips Hue reddit Community:
- Use the “sunset” feature to make your kids sleepy and go to bed timely (also in your bathroom!).
- Use colors as indicators for kids when it’s time to go to bed/school.
- Have a light by your door change to the corresponding trash/recycling can color on the days that it needs to go out.
- Use a motion sensor on the stairs to trigger a lamp in your bedroom, when you don’t want to be surprised by your kids.
- Use a motion sensor by the backdoor to let your dog flash the smart lights, so you know when to let him out.
- Synchronize the colors of a lamp to the weather forecast.
- Synchronize the colors of a lamp to the CO2 measurements in the room, so you know when it’s time to let fresh air in.
- Use a smart switch in the bedroom to activate a nightlight when you need to feed the baby (or go to the toilet).
- Flash your smart lights, when somebody rings the door or when a (kitchen) timer is done.
- Set the right scene for watching a movie, set it automatically back, when the movie is over.
- And, don’t forget our post: How to create your own Easter Eggs with Siri, Alexa, and Google
Philips Hue Generations
Philips Hue was introduced in October 2012 and received many updates over the years. Dependent on when you obtained your bridge and bulbs you might have Generation 1, 2 or 3.
- Generation 1 features a round bridge,
- Generation 2 comes in a square shaped bridge and adds support for Apples HomeKit and Siri, as well as brighter bulbs and LED strips. You also need the Gen 2 bridge for Alexa Scene and Color support.
- Generation 3 is an update of the Color Ambiance bulbs with an improved color presentation.
- There was a silent update in December 2017, though not a new Generation, the E26/E27 bulbs are now a bit lighter and a bit more energy efficient.
- We could call the new Bluetooth/ZigBee bulbs a new Generation, but Philips Hue doesn’t do that.
Philips Hue Product Range
Let’s have a look at the different components of a Philips Hue setup.
Philips Hue Bridge
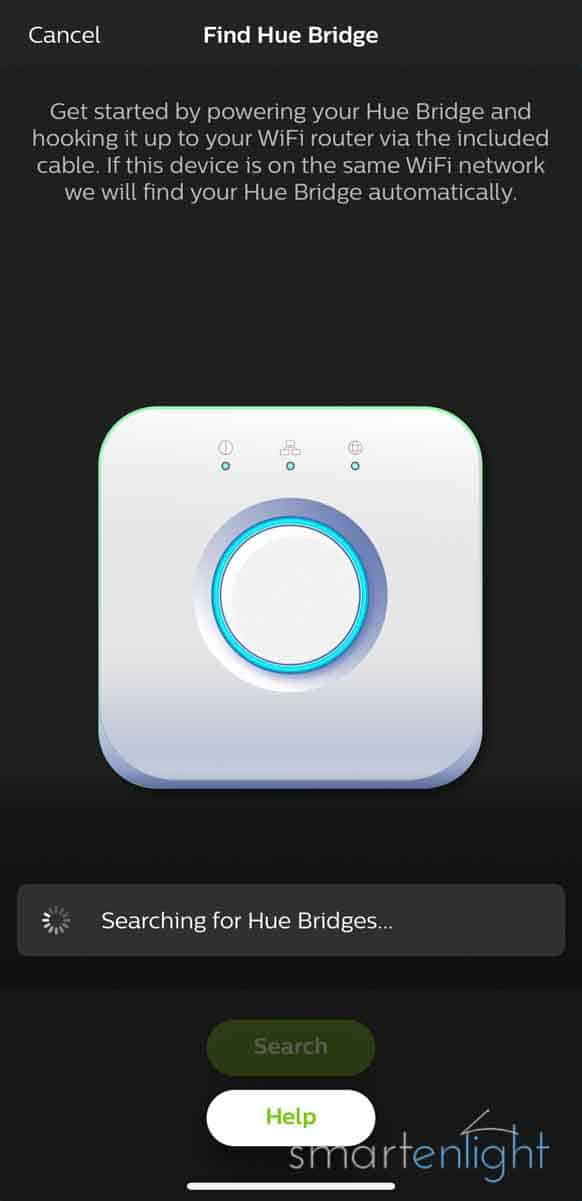
The Hue Bridge serves as the central hub for all the devices. You need to connect it to your router with the included ethernet cable. The bridge itself communicates with the bulbs and accessories through the open mesh network standard ZigBee. If the Philips Hue bridge cannot reach a light, you can add a bulb in between to expand the ZigBee signal.
Pro-Tip: If some of your lights or accessories are not responding, it might be due to ZigBee and 2.4 GHz WiFi existing in the same frequency space. Try first to place the Philips Hue bridge away from your router and if this doesn’t help, try changing the ZigBee channel in the Philips Hue app. ZigBee needs some time to build up the mesh network, so please be patient.
Philips Hue Bulbs
The Philips Hue product range covers spots (GU10) and bulbs (E26/27, BR30, B22, E12/E14, PAR38) in “White”, “White Ambiance” and “White and Color Ambiance”. They are designed to fit into your standardized fixtures.
- “White” bulbs have a fixed color temperature of 2700 Kelvin.
- “White Ambiance” supports warm white to cool daylight, and
- “White and Color Ambiance” bulbs support warm white to cool daylight and 16 million colors.
You can find Starter Kit bundles, which contain a Hue Bridge, 2-4 bulbs and a Dimmer or the new Smart Button.
The New Philips Hue Bluetooth/ZigBee Bulbs
If you already have a Philips Hue Bridge and Philips Hue Bulbs, you could actually skip this chapter. But, if you’re thinking of giving someone – who has no Hue lights yet – a Hue gift, please keep reading.
To attract Hue newcomers, which up to now had to start with a pricey Philips Hue Starter Kit, Signify is replacing the ZigBee chip with a dual Bluetooth/ZigBee chip, starting with their E26/27 (A19) and BR30 bulbs.
This means, that we can now start with only one of these new Hue bulbs and don’t need the Hue Bridge! This is great for beginners, who just start to experiment with Philips Hue, but has the following limitations:
- There is a new “Philips Hue Bluetooth” App with limited functionality (no rooms, no timers, limited settings). Note, you can download the app from the store and try the demo mode.
- Out of home control is naturally not supported unless you have Alexa or Google.
- Bluetooth works only for up to 10 lights, then you’ll need to upgrade to the Hue Bridge which uses ZigBee.
- Bluetooth will most likely work only in one room.
- For Siri/HomeKit you need to upgrade to the Hue Bridge.
- Alexa supports the Bluetooth connection with the Amazon Echo Dot (3rd Gen). The Echo Plus, Echo Show (2nd Gen), Echo Show 5 and the new Echo Show 8 and Echo Studio can already talk to Hue Bulbs through ZigBee. Alexa, of course, supports more features through the Hue Bridge.
- Google support is coming soon, according to the original press release (link below). Until then, you will need a Philips Hue bridge.
The focus of this bulb update is an easy setup process, which – once you have downloaded the app – doesn’t require internet anymore:
- Screw in your new Smart bulb
- Download the free Philips Hue Bluetooth app
- Note, to find your light, your phone needs to be within 3 feet distance.
- Design your room with light
The A19, BR30, E26 and the new GU10 and vintage bulbs currently support Bluetooth. The bulbs come in the usual versions “White”, “White Ambiance” and “White and Color Ambiance”.
So, while this Philips Hue update does not impact Philips Hue enthusiasts with Philips Hue Bridges at all, suddenly making a Philips Hue present became a lot cheaper and it will work – with limitations – also in households without internet. A very clever move to grow the Philips Hue community.
Philips Hue Accessories
- The wireless and portable Philips Hue Tap Switch does not need batteries as it’s powered by your touch.
- The Philips Hue Dimmer Switch is battery powered and is both a wall switch and remote control which you can remove from the magnetic base plate.
- The battery-powered Philips Hue Motion Sensor can be placed anywhere in the home. It has a built-in daylight and temperature sensor and you can program the motion sensor sensitivity.
- The battery-powered Philips Hue Outdoor Sensor offers additionally weather resistance.
Pro-Tip: All these accessories are compatible with Siri/HomeKit, so you can also use them to control HomeKit devices from other manufacturers.
Philips Hue Light Strips
- The Philips Hue Lightstrip Plus Base is 78.7 inch / 200 cm long and can be extended with up to 8 Lightstrip Plus Extensions, one is 39.4 inch / 100 cm long. You can also cut them at the scissor markers.
- The Philips Hue Lightstrip Outdoor is fully weatherproof and comes in 2 lengths: 80/197 inch or 200/500 cm. You cannot cut or extend the outdoor light strip.
All light strips are flexible and support 16 million colors.
Philips Hue Lamps
Philips offers countless lamps with built-in Hue technology.
- For your ceiling, you can find ceiling, suspension and pendant lamps, spotlights and recessed spotlights.
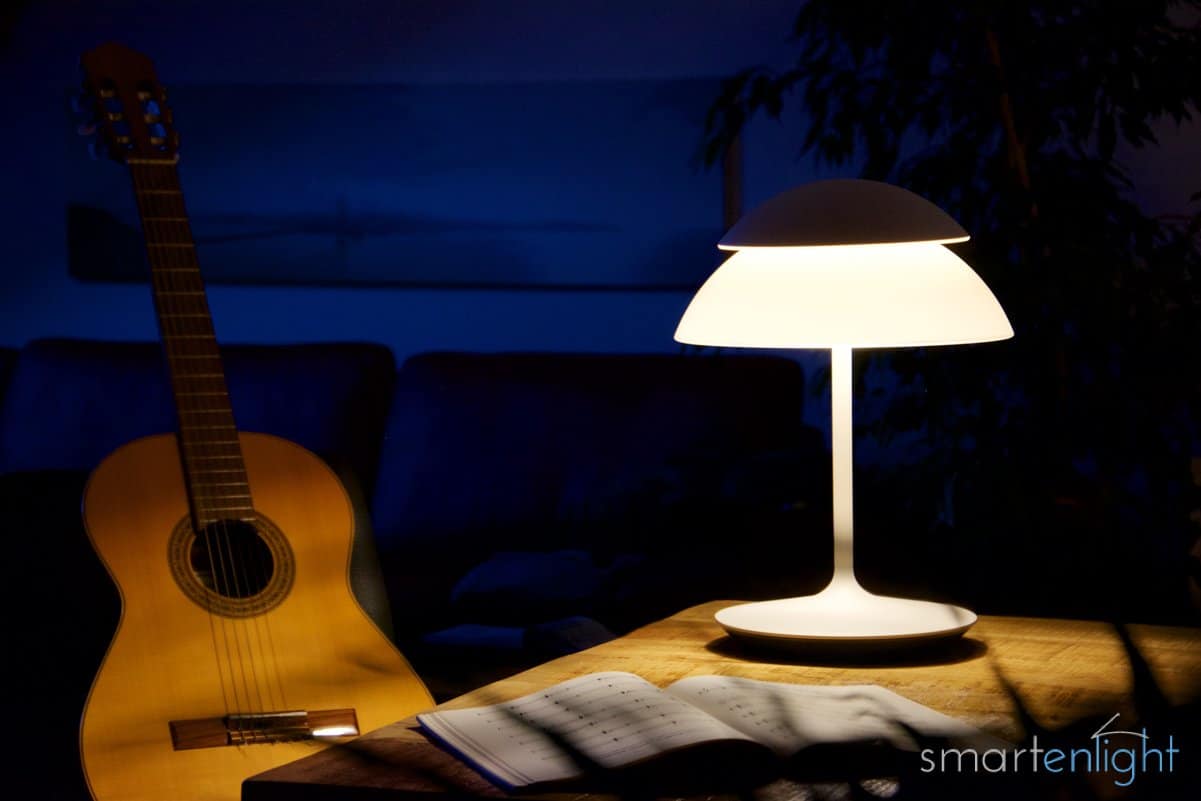
- There is a dedicated table lamp, as well as the Iris, the Bloom and the portable Go light.
- You can mount light bars on your TV, to synchronize the lighting to the movie you are watching with the Hue Sync app (the Hue Sync app supports all ambient color lights).
- You can also find bathroom lighted mirrors which are Hue compatible.
- There are numerous wall lights for indoor and outdoor use.
- And last but not least you can find outdoor spotlights, floodlights and pedestal lights.
Philips Hue New Additions Fall 2019
It was a busy September for Philips Hue at IFA, where they introduced many new additions to the Hue lineup:
- The Philips Hue Vintage-Style LED Bulbs use diodes as filaments which are preset to warm 2100 K.
- A new Philips Hue Go comes in a 2nd Generation with improved brightness and battery life and additional Bluetooth support.
- A Philips Hue White Candelabra LED with E12 fitting and new Philips Hue White and Color Ambiance and Hue White Ambiance GU10 Spotlights with higher lumen, improved colors and new, smaller design.
- The Philips Hue Smart Plug turns any dumb lamp into a Hue light and lets you control them via app, accessory or voice.
- The new Philips Hue Smart Button lets you control and dim your Hue lights with a single button press.
Another newcomer is the Philips Hue Play HDMI Sync Box. We already have the option to synchronize the content of our PC and Mac displays with up to 10 Hue lights through the Hue Sync app. The HDMI sync box lets us synchronize our lights directly with up to 4 HDMI, 4K HDR channels from our home-theater system.
This new category of responsive TV bias lighting creates immersive music and video/game experiences and plays well with the Philips Hue Play light bars, placed behind monitors and TVs.
The Basic Setup
The setup process as documented by Philips are 4 simple steps:
- Power your light sources
- Set up your bridge
- Download the Philips hue app and connect to your bridge
- Play around and experience light in ways you had never imagined
Chances are, that you are beginning with a starter pack and your lights will be preconfigured. Following the above steps will quickly lead you through the process. If you, however, plan to add additional lamps to your existing system and want to voice-enable your setup with Siri, Alexa or Google Assistant, here are some helpful tips and tricks.
The Advanced Setup
Let’s start with some vital information, especially for larger setups: According to Philips, you can connect up to 50 lights to one bridge. Furthermore, you can connect up to 25 Hue taps and up to 7 dimmers or a combination thereof. Last but not least you can connect up to 12 motion sensors, but only if you do not have any taps and dimmers connected (otherwise its less).
What does this mean?
This cryptic information basically tells us, that the storage on the bridge is limited. Behind the curtain, every time you create rules, add sensors, schedules, and lights, or try a new animation or Hue Labs formula, all of this consumes memory on the bridge. Even worse, some apps leave their configurations on the bridge and never delete them, filling up your bridge over time. When the bridge hits its limit, which is defined by your personal configuration of the restrictions above, you get a notification that your bridges memory is full and you cannot save additional rules, sensors or schedules anymore.
Do I need multiple bridges?
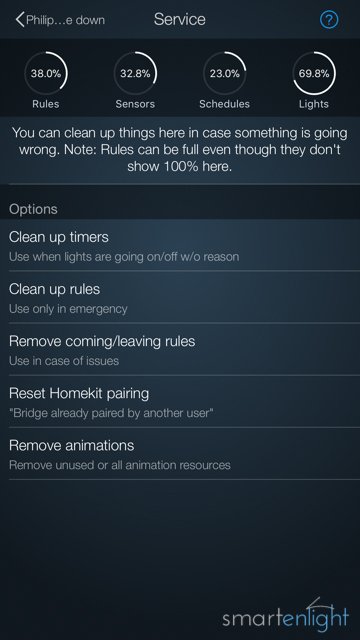
You might end up having to split a setup of fewer than 50 lights (in our case it was around 30), because of the many rules which are saved per dimmer on your bridge. Extending to a second hub does not only add overhead during the setup, but it also adds complexity and limitations when setting up Hue for Siri, Alexa, and Google. Since there is no way of monitoring the memory usage of your bridge in the Philips app, I’d recommend using one of the third-party apps to avoid running unconsciously into the bridge-memory-limitation-wall.

In case you require two or more bridges for your setup, you’ll need to split up your rooms in a way, where lights, dimmers and motion sensors belonging together, are on the same bridge.
Unless you are using a third-party app with multi-bridge support, you need to manually switch between the bridges on the Philips Hue app before you can control the other rooms.
Do I need third party apps?
There are some restrictions in the Philips Hue app. One of them is the mentioned multiple Bridge support. One was the missing group support.
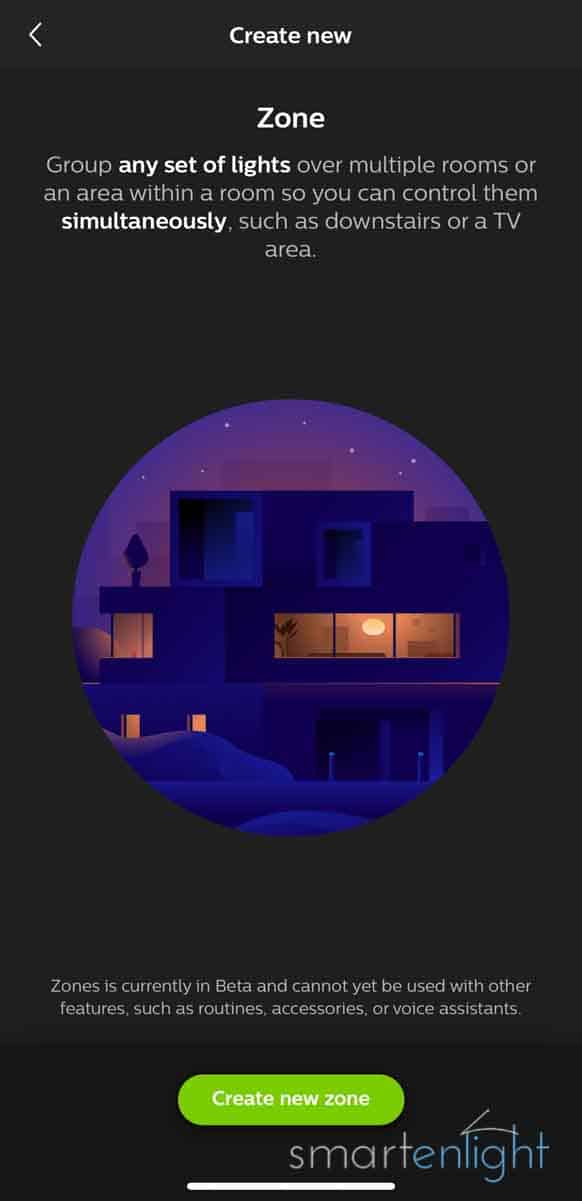
Philips has recently updated the Hue app to support Zones along with Rooms. We can create zones to combine multiple rooms to e.g. floors like downstairs/upstairs, but also create zones as areas within a room. Zones support scenes just like rooms. This feature is currently in beta and does not work for accessories or across multiple Hue bridges! Zones currently also work only partially for voice assistants (except for Alexa!), so this feature helps you currently only, when you use the Hue app to control your lights manually.
Since we are looking to set up our system to be compatible with Siri, Alexa and Google, we have to use the Philips app!
Pro-Tip: For certain use-cases like light group support, advanced accessories control, advanced dimming features, advanced geofencing, etc. you can additionally use a third party app. It should not interfere with your Philips Hue app setup. We are mainly using iConnectHue (iOS).
Take a Note of your Serials
Before powering your light sources, make sure you note down the six character serial numbers of each of your lights, especially the ones which are difficult to reach. The Philips app offers a search function to find your lights, but if this fails, the serial numbers are the most reliable way to add your lights. You don’t want to carry a ladder around during the setup process to look up the serial of every undiscovered light. In case you plan to move the lights from one bridge to another, you will definitely need the serial numbers to migrate them.
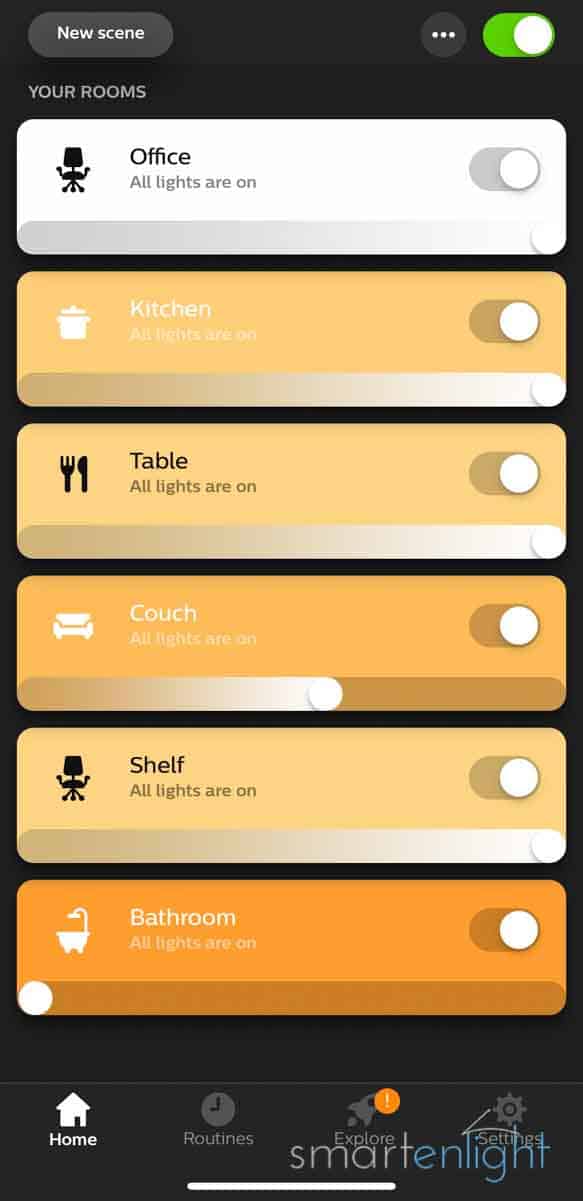
Creating Rooms
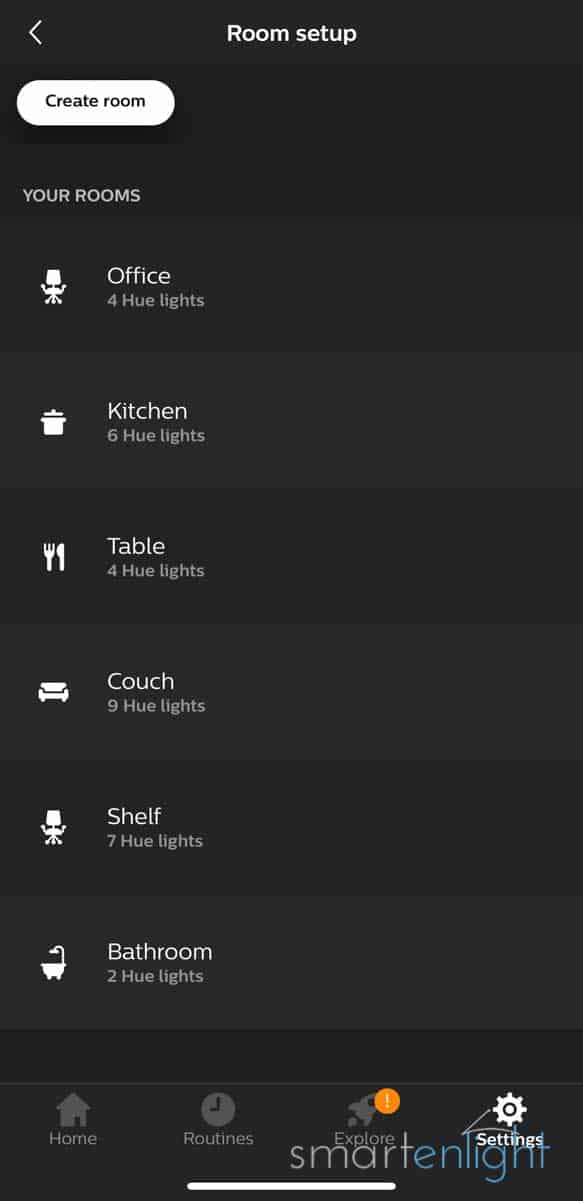
After connecting to your (first) bridge, the Philips Hue app will guide you to create your first room. Rooms are an important concept in Philips (and HomeKit). You can create multiple scenes per room, which will control the light settings of all the lights within this room.
As mentioned earlier, except for the new Philips Hue Zones (beta) feature, the Philips Hue app does not support grouping one light into more than one room, which would come handy if you have a larger e.g. living room and would like to create multiple groups within this room, to be able to “read” at the table and “relax” on the couch.
Also, the concept of “fixtures” containing multiple bulbs within one room is barely supported. However, you can re/group lights in the color picker of a room. You can pull lights out of groups, regroup them, and change their brightness with the slider on the top. It’s well hidden and only helpful if you control your lights with the Philips Hue app. You cannot control light groups through accessories and you cannot save scenes per light group.
Since there are ways to later re-group your Philips Hue app rooms into a larger area for Siri and Google you can segment your large rooms at this point into smaller rooms, eg create a couch, table, shelf room instead of one large living room.
For Alexa you can already use the Philips Hue Zones (beta) to group your lights into zones like living-room/downstairs/upstairs, etc.
Note, You can only group up to 4 rooms later to HomeKit/Siri scenes with the Hue app.
Step by Step
Dependent on how big your setup is, it makes sense to add your lights in iterations, so you don’t have to run around your house identifying the lights. Start with powering on the lights that are in the room where your bridge is located and search for them. After a minute the app will return with (almost) all the lights you powered on. You do not need to wait for the process to finish, as new lights are dynamically added to the list.
Adding and Naming Lights
The Philips Hue app names your lights as type and number, eg “Hue Color Spot 17”. By tapping on the light, it will blink so you can locate/identify it. Rename your lights in a way which you can remember and which works for you as voice command if you want to control the lights individually. Siri, Alexa, and Google will recognize these names.
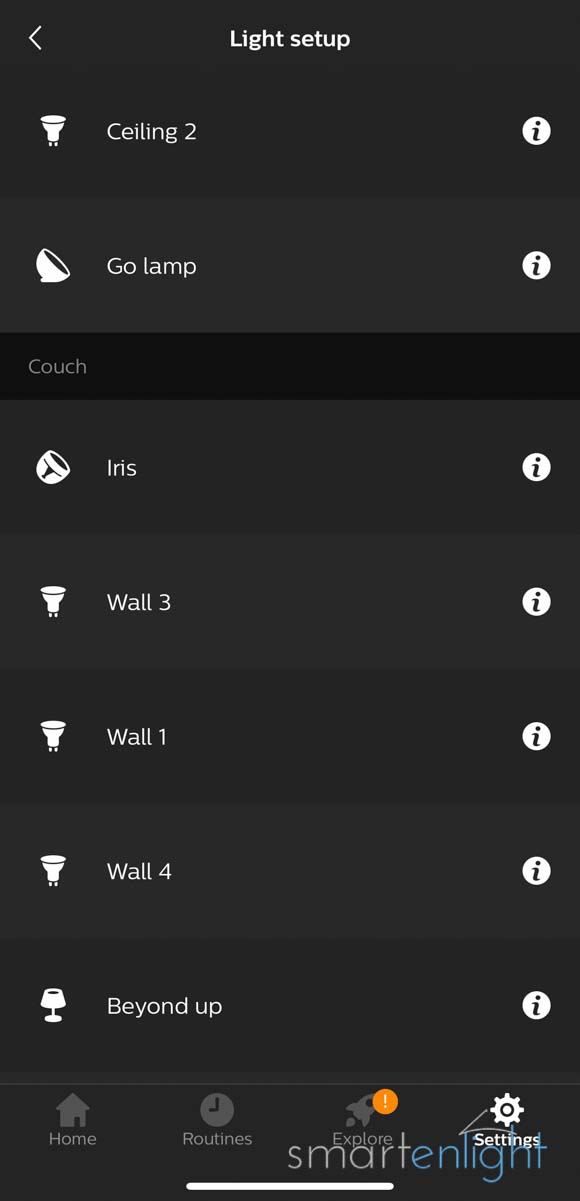
A combination of the location of the light and a number is usually easy to remember, eg Ceiling 2, Center 3, Shelf 5, etc. You can run the search again to find any light, which was not found during the first search. If all lights are connected the app will come back with the message “no new lights found”.
From here you can start the next iteration, turn on the lights in the next room and search for them. The app will come back with the newly found lights (on the bottom of the list), you can identify them by their default names and the green tag “New”. Rename them like you did in the first step and move on to the next room.
Pro-Tip for Google users: If you name your lights with the method above e.g. Ceiling 1-4, you’ll be able to address the lights as a group “ceiling”: “Hey Google set the ceiling lights to sunset”.
Pro-Tip for Alexa users: Avoid naming your lights like a room. A “Bedroom 1” light and a room bedroom, will most likely let Alexa respond: “I’ve found several devices with that name, which one do you want?”
Adding Lights to Rooms
Now, that we have our rooms and lights named, it is time to add the lights to the rooms in the Room Setup. If you are using Hue spots, the location of the spot and the room/section it points to might differ, eg the spot in your entrance named “Entrance 5” points to the kitchen, hence make it part of the Kitchen room.
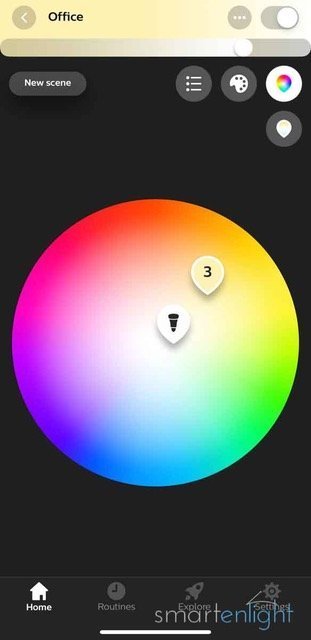
Defining Scenes
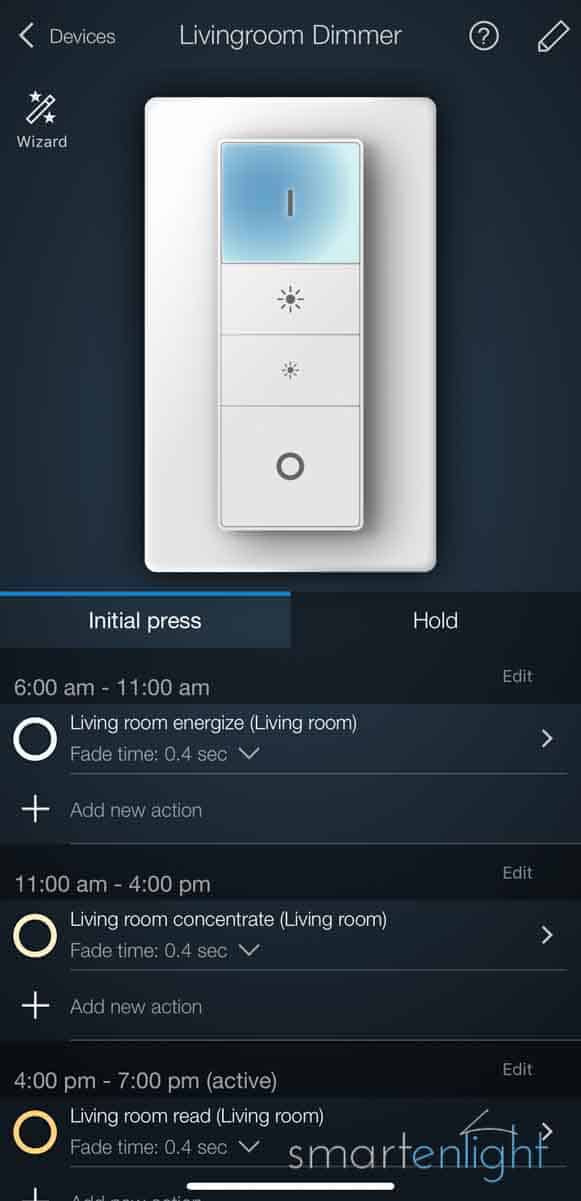
Scenes – which define the state (color/hue, brightness) – for a group of lights, are saved in the Philips app per room.
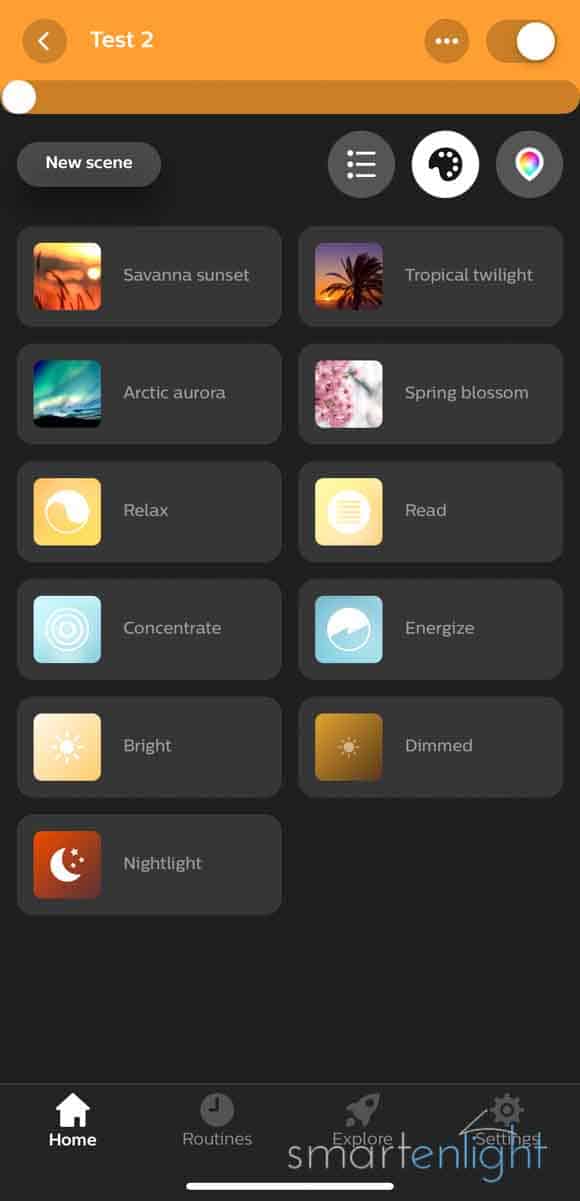
Philips comes with pre-configured scenes to “energize”, “concentrate”, “relax”, “read”, as well as a “bright”, “dimmed” and “nightlight” scene.
Grouping your lights into rooms will make these preconfigured scenes automatically available in the app.
This is a good time to create your own, personal scenes.
Siri, Alexa, and Google
Having our lights configured so far, we can finally speech-enable the setup with
- Siri and Philips Hue – Setup and Review
- Alexa and Philips Hue – Setup and Review
- Google Assistant and Philips Hue
For a comparison of the assistants in combination with Philips Hue, please see: Philips Hue: Who will win, Siri, Alexa or Google?
I hope you’ve enjoyed this post and it helps you to get the most out of your Philips Hue setup! If you have any questions or would like to share your experience with Philips Hue, please leave a comment in the section below.
More Information
For smart ideas around smart lighting, please see:
- Natural Smart Lighting
- Sleeping Better with Smart Lighting
- The Many Ways of Controlling Smart Lighting
- Presence controlled Smart Lighting
Philips Hue Websites:
- Philips Hue US website
- Philips Hue UK website
- Philips Hue CA website
- Philips Hue AU website
- June 27, 2019 press-release: Set the perfect look and feel in your room with new Philips Hue with Bluetooth
- September 5, 2019 press-release: Signify unveils new Philips Hue smart lighting products
Light Design:
“In ‘See the light’ you will learn how such a new, humanistic view of lighting technology can inspire solutions that incorporate the use of shadows, transparency, reflections, glare, and color, among many other lighting dimensions.” – Svante Pettersson, Creative Director Philips Lighting Nordic
Interview with Eric Rondolat – Brighter Lives: The Future in Connected LED Light


Added the new Philips Hue New Additions Fall 2019, product links and updated date.
Added the “The New Philips Hue Bluetooth/ZigBee Bulbs”. Since this is a bigger change, updating the publishing date.
Siri, Alexa, and Google posts, as well as the comparison post, are now up to date!
Added the Philips Lighting University Webinar ‘See the light’ by Svante Pettersson, Creative Director Philips Lighting Nordic. How light levels, light distribution, shadows, transparency, reflections, glare, light color and surface color influence our perception of light.
Update: Added the new “Zones” feature currently in beta!
Big post update! Hope you like it!
I have just started with a starter kit without too many problems but one problem with my living room light is a 3 bulb light but can only get 2 bulbs to synchronize 2 problems the dining room is on a two way switch so if I switch living room off on the app dining room goes off as well and visa versa any thoughts please
Hi Anthony,
I am not sure, whether I got it right:
1. In your living room you have 3 bulbs and 1 is not recognized. In this case it would make sense to try to add the light via serial number (it’s on the bulb unfortunately). If the 1 bulb was added, but shows it’s not reachable, it might be too far off from other lights or the bridge or your z-wave channels interfere with your WiFi channels. Try to move the bridge closer or add another light in between. Or change the z-wave channels in the Philips App.
2. Assuming you are using the Philips app, you should create 2 independent rooms (no matter whether you dining room is part of your living room). As one bulb can only be mapped into one room in the app, you should be able to control the rooms independently. If you would like to group 2 rooms into a larger room, you can do so later in Siri/HomeKit, Alexa and Google Home.
I hope this helps!
Cheers,
Kay
I have been working with Iris by Lowes as my smart home controller since January. Originally, the Sylvania Osram product line had “Works with Iris” status. However, several months back, the basic $15 A19 LED bulb was no longer supported by Iris. This left a void in future lighting possibilities. I had purchased a Philips Hue Bridge (2nd Gen) because it conformed to the security standards of Blue Iris, the PC application that I use to enhance control of my 7 ‘Iris by Lowes’ Indoor/Outdoor Cams for voice control using Alexa Echo Dots. Having the Philips Bridge already, the logical solution to the future lighting dilemma was to introduce Philips Hue bulbs. Recently, Iris by Lowes has given Philips Hue “Works with Iris” status. This allowed me to integrate the previously separate Philips Hue and Iris by Lowes systems into one system. I was pleased to discover that the Iris Contact Sensors and the Iris Motion Sensors not only work with Philips Hue, but also the (limited IFTTT standards) Iris “Rules” and “Scenes” were also compatible. And the use of my 3 Alexa Echo Dots has also been successfully integrated. The biggest problem I have however, is the limited distances that the Philips Hue Bridge can handle. Philips Hue conforms to the ZigBee Light Link (ZLL) standard which can only handle distances of about 7 meters or 21-22 feet. Iris by Lowes conforms to the ZigBee Home Automation (HA) standard which is good for 10 meters or about 33 feet. While my Wi-Fi router and the Iris Hub are more or less centered in my home setup, the Philips Hue Bridge, plugged into the same router, is in a corner of the Philips Hue bulbs setup. There are numerous ‘Iris by Lowes’ compliant devices in both the house and in two outbuildings that range from 35 feet to 70 feet from the indoors Iris Hub. While this setup does stretch the distance standard at bit, it is more or less stable because of both ZigBee and Z-Wave compatible devices repeat the two protocols. Unfortunately, the Philips bulbs can only be used within the house and even that is unstable, due to the ZLL distance limitation. Although the individual Philips bulbs are suppose to “hop” the protocol to other bulbs, there is non-stop, constantly changing combination of “not reachable” instability. To add insult to injury, the latency that was only 8-10 seconds for each “not reachable” status with only 6 bulbs is now often over a minute with only 10 bulbs. I must say that I am very much UNIMPRESSED with the capabilities of the Philips Hue system.
Hi Scott!
First of all: a warm welcome to smartenlight! You posted the very first comment on this young website! =)
And what a high quality comment, thank you so much for taking the time to share your experience!
I started with Philips Hue around 4 years ago and also had initially problems with unreachable lights. Since lights in between (ZigBee mesh network) could not solve all of the unreachable light problems, I had to make sure that the Philips Bridge is as high up and central as possible.
Even when my setup grew to 2 bridges (one connected to the router, the other to a repeater) I still sometimes observed the “unreachable” light phenomenon.
Somewhere I found the hint to change the ZigBee channel, I use channel 25 now, to minimize the interference between ZigBee and WIFI network. Since then it seems to run quite stable. Thanks for the input regarding ZLL and HA standard, I was not aware of different ZigBee implementations which lead to different ranges.
Some of my Hues are outdoors, two E27 (in outdoor housings) and even the light strip plus some extensions (under a outdoor table, shielded from rain). Up to now – for around 2 years – I had no problems, but you are absolutely right, Philips would never support that and I am doing this on my own risk.
With the Sylvania/Osram Lightify bridge I had bad luck from the beginning. I was not able to update its firmware. Osram must have fixed these early glitches meanwhile. I have set up a smaller Lightify configuration at a friends place 2 weeks ago and it behaved well. I am running my 2 Lightify gardenspots plus extensions on a Philips Hue bridge and it works nicely, though I miss them in my HomeKit setup. Resetting the gardenspots is a nightmare: 5 x 5 seconds connect/disconnect from power-supply.
I ended up with dimmers and motion sensors from Philips Hue and was quite happy when they released HomeKit compatibility for them through a software update a month ago.
So far I am happy with my setup. Since I am interested in (comparing) voice control support of Siri, Alexa and Google Assistant, I was always looking for a lighting system which supports all three. This could be also achieved with HomeBridge and HomeAssistant open source solutions, but I have not mentioned this here, to keep things simple on this website, but maybe will do in the future, lets see …
Thanks again for sharing your setup and experience in the very first comment on this website. This kind of knowledge exchange is exactly what I was hoping for, when building this website.
You made my day!
Thank you!
Kay
p.s. I am looking into improving the comment section a bit so you can get notifications, when someone responds to a post or your comment. Coming soon!