

Please note, we have upgraded our Nanoleaf Aurora setup and updated this post here: Nanoleaf Aurora How To: Setup and Configuration to the Muks!
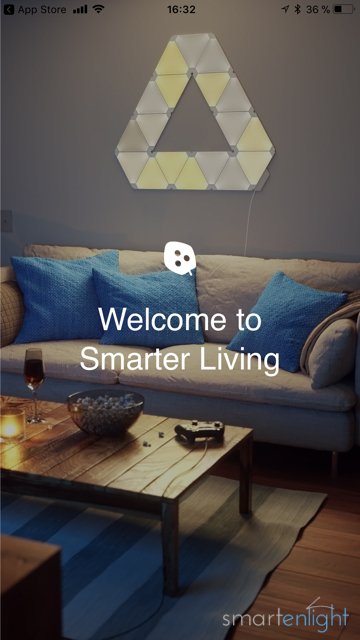
Nanoleaf Aurora provides a personal smart lighting experience which is indeed unlike anything I have seen before. It is a smart lighting device, consisting of triangular LED panels which you can plug together in any artful shape the triangles allow. You attach the panels to your wall, power them up and paint your wall with colorful animations. So yes, we can call it smart lighting, living paint and smart art in one product.
And with the Rhythm module, the Aurora visualizes the music you are playing. Here is a post dedicated to the Aurora Rhythm: Nanoleaf Aurora and Rhythm: See your Music in 14 Trillion Ways!
In this post, we are examining how you can create your individual design and literally picture it on your own wall, for free. Then we will look into how you can mount your design on your wall and the options you have with the Nanoleaf app to fill your Aurora with different animations. In the assistants posts, we will set up Siri, Alexa, and Google Assistant to control our personal smart light art.
Who is Nanoleaf?
Nanoleaf was founded 2012 by Gimmy Chu (CEO), Tom Rodinger (CTO) and Christian Yan (COO). With offices in Shenzhen, Hong Kong and Toronto, Nanoleaf manufactures smart lighting based upon their patented technology for sustainable manufacturing and energy efficiency.
If you are interested what Nanoleaf is up to, you can even find their roadmap on their website.
Nanoleaf Product Range
Nanoleaf One was the companies first product released on Kickstarter 2013. The dimmable Nanoleaf Bloom followed in 2014 and their bestselling product Nanoleaf Gem was released in 2015. Nanoleaf Ivy released end of 2015 supports HomeKit and is listed as the world’s most energy efficient bulb. In November 2016 Nanoleaf released the Aurora as first color changing product with Siri, Google Home, and Alexa support.
Find Your Design
Before we ordered our Aurora – almost a year ago – there were some creative hurdles to overcome. The Aurora inviting empty wall was there, but how many panels do we need, which shape are we going to build, how will it look on our wall? Since we knew we had to attach the Aurora with adhesive tape to the wall, we wanted to do it right, from the very beginning. I will spare you our lengthy (but fun) process which led to our Hexagon shape because with today’s Nanoleaf app, it is much easier: Yes, we can use Augmented Reality.
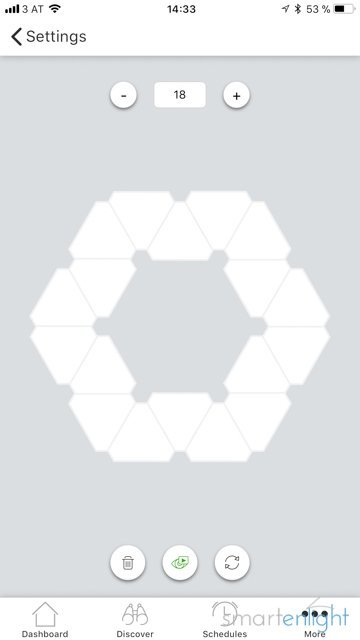
Before buying, download the free Nanoleaf Smarter Series app. You can skip the setup process and head over to the “…” More tab. Under “Aurora Layout Assistant” you will find a panel, where you can play around and construct your own design. If you need more tiles you just add them at the top of the screen. Once you have something which fits your taste and your budget, you can click the little eye in the center of the bottom screen.
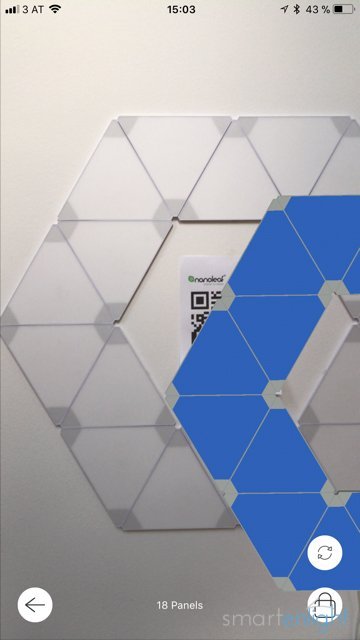
A dialog guides you to download a QR code which you can directly send from your smartphone to your printer. You stick the printed page on the wall where you would like to mount your Aurora and point your smartphone at it and your design appears on your wall. You can now rotate and position your design more precisely where it should be on the wall, the initial size of the tiles is quite accurate. You can walk around, take screenshots and once you are happy, you know exactly what to order and how it will look like.
Note, that Nanoleaf has meanwhile developed a screw mount kit which includes screws, anchors, and flex linkers as well as a flex linkers only kit. You can use them to build your shapes around corners and mount them with screws rather than with the adhesive tape.
First Contact
A couple of days later, when you receive your Aurora, you will find that there is surprisingly little documentation coming with it, except for some nice words. This is because all the information you need is online. I just checked out their updated “Getting Started” page and have to admit a lot has changed over the last year. They have developed brand new tutorials covering all different aspects of mounting and dismounting (spoiler: dental floss helps) your Aurora including their new mounting kits.
It is recommended that you check the panels and pair your Aurora before mounting it. Lay your tiles on a flat surface, plug into the power and then connect the controller to the panels. If you have not downloaded the Nanoleaf Smarter Series app yet, it is a good time to do so. Aurora takes up to 2 minutes to boot and indicates being ready by loading the Northern Lights scene. Don’t let Aurora’s initial brightness confuse you (100 Lumen per panel!), you will be able to configure this and much much more with the app.
Nanoleaf’s app has received a complete redesign a couple of months back. Start with adding a new Aurora device and follow the instructions. Don’t play too long with the many features in the app, we will examine them later.
Mounting Your Aurora
Take a picture of the back of the controller. It contains the serial number and the connection codes for the assistants, which we will need later on. So we better have this info handy, before glueing the controller to the wall.
The one tutorial which helped me most is missing now on Nanoleaf’s page. Understanding the general process of how to put the tiles together, which is straightforward and easy, I was still super nervous. What if I make a mistake and peel off the paint from our wall when having to remorsefully remount it? Though the adhesive stripes are supposed to come off without paint, I did not really want to try it.
So I searched the Nanoleaf Page for some inspiration and found a clip of their marketing guy standing there with a Ukulele. Two minutes later I learned it was his bosses Ukulele and he was using it instead of a level because he could not find one.
No, seriously?
I grabbed my level and the first part of my tiles (I split up the hexagon into 4 parts for easier mounting) and minutes later it was good.
Exploring the App
Assuming you have gone through the app built-in tutorials, we will focus here only on an overview of the many features you can find in the app.

The initial screen is your Aurora dashboard, which on the top provides you an overview of the status of your Aurora, on/off, brightness and which scene is loaded. Below you can find the three scene tabs:
- Colors, for your “painted” or “dynamic” scenes
- Rhythm, for your Aurora Rhythm scenes and
- Groups, which reflect your HomeKit scenes (check out our Siri & Nanoleaf Aurora post for that)
Swiping any scene to the left allows you to edit, share or delete it.
Painted Scenes
Painted scenes are static. You see the shape of your Aurora, and you can select or create a palette of colors and paint every panel to your liking. Since the dynamic scenes are much more impressive, we use a painted scene only as nightlight.
Dynamic Scenes
Dynamic scenes are animated based on: the selected palette, 6 different algorithms and a couple of parameters. Sounds complex, but it isn’t (you should have seen the previous version of the app).
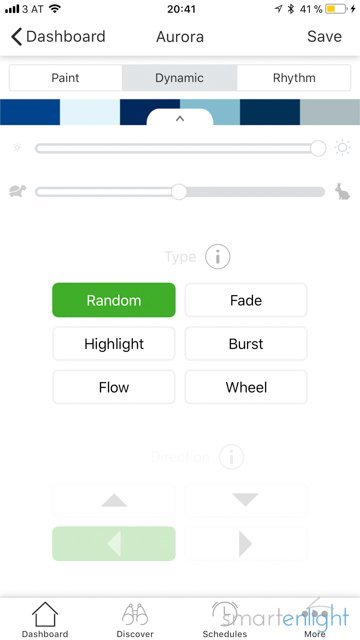
Apart of brightness and speed, which you can always set, the availability of other parameters depend on the type of animation:
- Random: Colors your panels randomly with the palette colors. You can specify the color transition: Block (colors pause briefly) or Curvy (colors transition smoothly) squiggle.
- Flow: Each color of the palette flows into the direction you choose. You can additionally choose the color transition and whether the animation should run once or loop continuously.
- Wheel: Displays a moving gradient created from the palette colors. You can choose the color transition and how many of your palette colors are displayed at once.
- Highlight: Works like random but highlights the colors left in your color palette.
- Fade: Cycles through your palette colors. You can then chose color transition and whether the animation should play once or loop through.
- Burst: Displays palette colors bursting from the center of the Aurora. Color transitions and repetitions can be additionally configured.

Since your preferred animation types will very much depend on the shape of your Aurora and your very personal mood and taste, it is a good idea to spend some time playing around with the different settings.
Our preferred scenes for different times of the day (remember the “Natural Smart Lighting” post), are mainly based around the “Random” type with different speed and brightness settings.
Social Light
I almost forgot one additional feature of the app: you can share your favorite scenes and download the presets from Nanoleaf and the Nanoleaf community (tribe =). You can find our SmartEnlight scenes under the “Discover” Tab, where you can preview all scenes on your Aurora before downloading them to your dashboard. Hope to see your favorite scenes soon there as well!
Smart Assistants
Having our Aurora configured so far, we can finally speech-enable her with
- Siri and Nanoleaf Aurora: Setup and Voice Commands
- Alexa and Nanoleaf Aurora: Setup and Voice Commands
- Google Home and Nanoleaf Aurora: Setup and Voice Commands
For a comparison of all assistants with Nanoleaf Aurora, see: Assistant Showdown with Nanoleaf Aurora: Who will win, Siri, Alexa or Google?
If you are interested in smart ideas for your smart lighting, check out:
- Natural Light with Smart Lighting
- The Many Ways of Controlling Smart Lighting
- Presence controlled Smart Lighting
- Sleeping Better with Smart Lighting
If you have any questions or would like to share your experience with your Aurora, please leave your comment below.
